Biscoff Cookie Butter Cheesecake Pops-Decadent Treats
Biscoff Cookie Butter Cheesecake Pops are more than just a dessert; they’re a revelation for your taste buds! If you’ve ever fallen under the spell of that irresistibly creamy, speculoos-spiced magic that is Biscoff cookie butter, then prepare for your world to be rocked. We’re taking that beloved flavor and transforming it into a handheld masterpiece that’s both playful and incredibly decadent. Imagin extracte the smooth, tangy richness of cheesecake, infused with the warm, cinnamon-kissed sweetness of Biscoff. Then, picture it all enrobed in a delightful coating, ready to be enjoyed without a fork. These aren’t your average cheesecake bites; they’re a celebration of a cult-favorite spread, reimagin extracted into a portable, utterly irresistible treat. Get ready to impress your friends, delight your family, or simply treat yourself to a moment of pure Biscoff bliss.
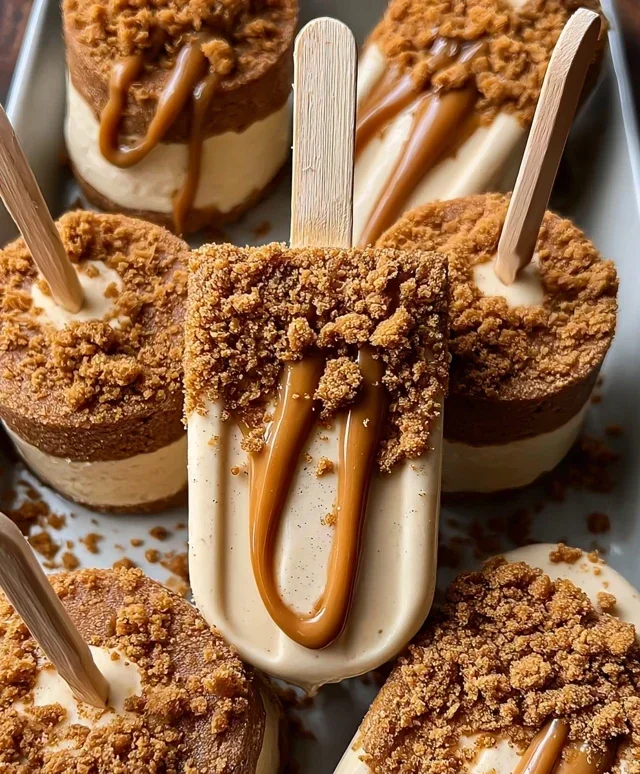
Biscoff Cookie Butter Cheesecake Pops
Get ready to indulge in a truly magical treat! These Biscoff Cookie Butter Cheesecake Pops are the perfect blend of creamy, crunchy, and utterly delicious. Imagin extracte your favorite no-bake cheesecake, infused with the warm, spiced goodness of Biscoff cookie butter, all in a fun, portable pop. They’re surprisingly easy to make and are guaranteed to be a showstopper at any gathering, or simply a delightful personal indulgence. The unique flavor of Biscoff cookies, with their hints of cinnamon and gin extractger, pairs beautifully with the rich, tangy cream cheese, creating a dessert that’s both comforting and sophisticated. We’ll be transforming these wonderful ingredients into individual cheesecake bites on a stick, making them perfect for parties, picnics, or just a special afternoon treat. Let’s dive in and create some magic!
Ingredients:
Creating the Dreamy Cheesecake Base
The foundation of our incredible pops lies in a smooth, creamy cheesecake mixture. It’s essential that your cream cheese is fully softened. This means taking it out of the refrigerator about an hour before you plan to start mixing. Softened cream cheese will blend seamlessly, preventing any lumps and ensuring a silky-smooth texture that’s crucial for the best cheesecake experience. In a medium bowl, beat the softened cream cheese until it’s light and fluffy. This is where we start to build that incredible cheesecake texture. Gradually add the powdered sugar, continuing to beat until it’s fully incorporated and there are no grainy bits. Then, stir in the vanilla extract. The vanilla adds a subtle depth of flavor that complements the other ingredients beautifully.
Next, it’s time to lighten things up. Gently fold in the whipped cream (or Cool Whip). If you’re using Cool Whip, it’s already whipped and ready to go. If you’re using heavy cream, whip it until stiff peaks form before folding it in. Folding is key here – you want to incorporate the whipped cream without deflating it, which will keep our cheesecake light and airy. This step is crucial for achieving that signature cheesecake lightness without the need for baking.
Infusing with Biscoff Bliss
Now for the star of the show: the Biscoff! In a separate small bowl, combine the crushed Biscoff cookies and the Biscoff cookie butter. This is where the magic truly happens. The warm spices of the crushed cookies and the intensely flavorful cookie butter will create an irresistible aroma. Stir these together until they form a thick, spreadable paste. If the mixture seems a little too stiff to incorporate smoothly into the cheesecake base, you can add the optional 2 tablespoons of heavy cream. This will thin it out just enough to make it easy to blend without making the overall mixture too wet.
Carefully fold this glorious Biscoff cookie butter mixture into the cream cheese and whipped cream base. Again, folding is the technique to use here. You want to swirl the Biscoff mixture through the cheesecake base, creating beautiful ribbons of flavor and texture. Don’t overmix; a marbled effect is often the most visually appealing and ensures you get distinct bites of both the creamy cheesecake and the spiced cookie butter. This is also where you’ll fold in the ½ cup of crushed Biscoff cookies for that added crunch and authentic Biscoff flavor throughout the cheesecake.
Assembling and Freezing Your Pops
Once your Biscoff cheesecake mixture is perfectly combined, it’s time to assemble our pops. Line a baking sheet with parchment paper or wax paper. This will prevent the cheesecake pops from sticking. Using a tablespoon or a small cookie scoop, drop rounded portions of the cheesecake mixture onto the prepared baking sheet. Aim for about 1.5 to 2-inch balls. They don’t need to be perfectly uniform; a slightly rustic look adds to their charm.
Now, for the popsicle sticks! Gently insert a popsicle stick into each cheesecake mound, pushing it about halfway into the ball. Make sure the stick is firmly in place so it doesn’t come loose later. This is an important step to ensure your pops are easy to handle.
Place the baking sheet in the freezer and let the cheesecake pops freeze for at least 2-3 hours, or until they are firm enough to handle without losing their shape. Freezing is essential for them to hold their form when you’re dipping or decorating them, and it’s what makes them “pops”!
The Final Flourish: Decorating Your Pops
Once your cheesecake pops are frozen solid, it’s time for the fun part – decorating! You can enjoy them as is, or take them to the next level. Gently remove the frozen cheesecake pops from the parchment paper. For an extra special touch, you can dip the bottom of each pop into some melted chocolate (milk, dark, or white all work wonderfully!) or even more melted Biscoff cookie butter. If you choose to melt chocolate, place it in a microwave-safe bowl and microwave in 30-second intervals, stirring in between, until smooth.
Before the chocolate (or cookie butter) sets, sprinkle the tops with the extra crushed Biscoff cookies for added texture and flavor. You can also stick a whole Biscoff cookie onto the side of each pop for a dramatic presentation. If you’re not dipping, you can simply press the extra crushed Biscoff cookies onto the sides of the cheesecake pops while they are still slightly soft from the freezer. Alternatively, you can arrange the decorated pops on a parchment-lined tray and return them to the freezer for another 30 minutes to allow any coatings to set completely.
These Biscoff Cookie Butter Cheesecake Pops are best enjoyed straight from the freezer. They are a delightful, no-bake treat that’s bursting with flavor and fun. Enjoy every bite of this irresistible combination!

Conclusion:
I hope you’re as excited about these Biscoff Cookie Butter Cheesecake Pops as I am! They are truly a delightful treat, combining the creamy indulgence of cheesecake with the irresistible spiced caramel notes of Biscoff cookie butter, all nestled in a portable, bite-sized form. The simple no-bake approach makes them surprisingly easy to whip up, perfect for a special occasion or just a delightful afternoon pick-me-up. They’re wonderfully versatile, making them ideal for parties, bake snon-alcoholic ales, or simply enjoying with a cup of coffee or tea. Imagin extracte the smiles these little pops will bring!
For serving, I love to arrange them on a decorative platter. You can also dip them partially in melted chocolate for an extra layer of decadence, or dust them with crushed Biscoff cookies for added texture. If you’re feeling adventurous with variations, consider adding a swirl of caramel sauce into the cheesecake mixture before freezing, or even folding in some mini chocolate chips. Don’t be afraid to experiment and make them your own! I genuinely encourage you to give these Biscoff Cookie Butter Cheesecake Pops a try; you won’t regret it!
Frequently Asked Questions:
Can I make these ahead of time?
Absolutely! These cheesecake pops are perfect for making ahead. Once they are fully frozen, you can store them in an airtight container in the freezer for up to 2-3 weeks. This makes them a fantastic option for party planning, allowing you to prepare them well in advance.
What if I can’t find Biscoff cookie butter?
While Biscoff cookie butter is key to that signature flavor, you can try using a speculoos cookie butter alternative if Biscoff is unavailable in your area. The flavor profile will be very similar. Alternatively, you could experiment with a well-loved grabeef ham cracker butter or even a spiced shortbread cookie butter, though the taste will differ slightly.
Biscoff Cookie Butter Cheesecake Pops
Decadent no-bake cheesecake pops infused with the irresistible flavor of Biscoff cookies and cookie butter. Perfect for parties and a delightful treat.
Ingredients
-
8 oz cream cheese, softened
-
½ cup powdered sugar
-
1 teaspoon vanilla extract
-
½ cup whipped cream (or Cool Whip)
-
½ cup crushed Biscoff cookies
-
½ cup Biscoff cookie butter
-
2 tablespoons heavy cream (optional, for thinning)
-
Whole Biscoff cookies
-
Extra crushed Biscoff cookies for garnish
-
Popsicle sticks
Instructions
-
Step 1
In a large bowl, beat the softened cream cheese and powdered sugar until smooth and creamy. -
Step 2
Stir in the vanilla extract and Biscoff cookie butter until well combined. -
Step 3
Gently fold in the whipped cream (or Cool Whip) and crushed Biscoff cookies until just incorporated. If the mixture is too thick, stir in the optional heavy cream until desired consistency is reached. -
Step 4
Line a baking sheet or a small baking dish with parchment paper. Spoon the cheesecake mixture into small portions or use a cookie scoop to create individual pop shapes onto the prepared surface. You can also press it into a small dish and cut out shapes later. -
Step 5
Insert a popsicle stick into each cheesecake pop. If the mixture is too soft, you may need to chill it briefly before inserting the sticks. -
Step 6
Freeze the cheesecake pops for at least 2-3 hours, or until firm. -
Step 7
Before serving, you can dip the pops in melted chocolate or roll them in extra crushed Biscoff cookies for garnish. Decorate with whole Biscoff cookies as desired.
Important Information
Nutrition Facts (Per Serving)
It is important to consider this information as approximate and not to use it as definitive health advice.
Allergy Information
Please check ingredients for potential allergens and consult a health professional if in doubt.