Sticky Coconut Cake-Easy Tropical Dessert
Sticky Coconut Cake is more than just a dessert; it’s a warm embrace in every bite, a tropical getaway for your taste buds. Have you ever craved something that’s both comforting and exotic, a sweet treat that whispers tnon-alcoholic ales of sunshine and sandy beaches? This glorious Sticky Coconut Cake delivers exactly that. It’s the kind of cake that leaves you with sticky fingers and an even stickier smile, a testament to its irresistible charm. What makes it truly special is the interplay of textures – the tender, moist crum extractb yielding to a glistening, caramelized coconut topping that’s pure, unadulterated bliss. It’s the perfect balance of sweetness and tropical aroma, making it a beloved classic for gatherings or a quiet moment of indulgence.
Get ready to fall in love with this sensational treat!
Sticky Coconut Cake
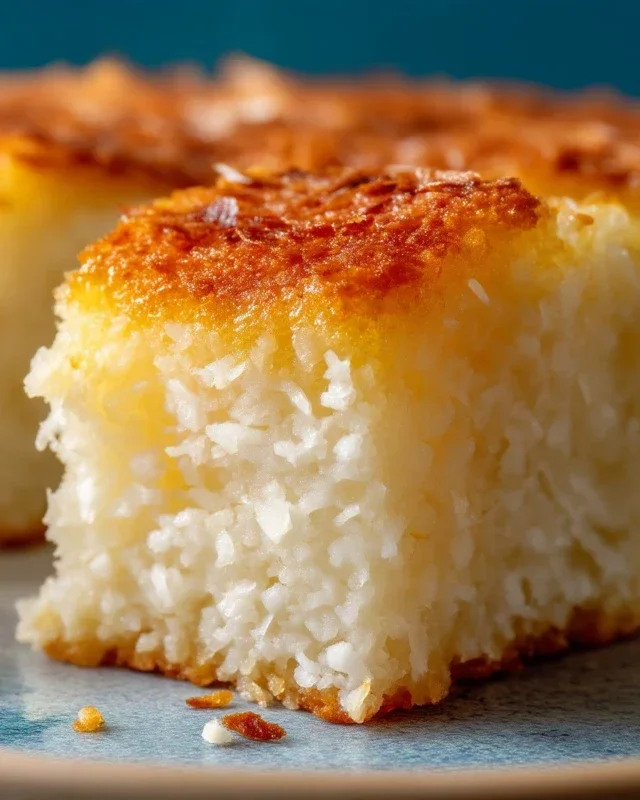
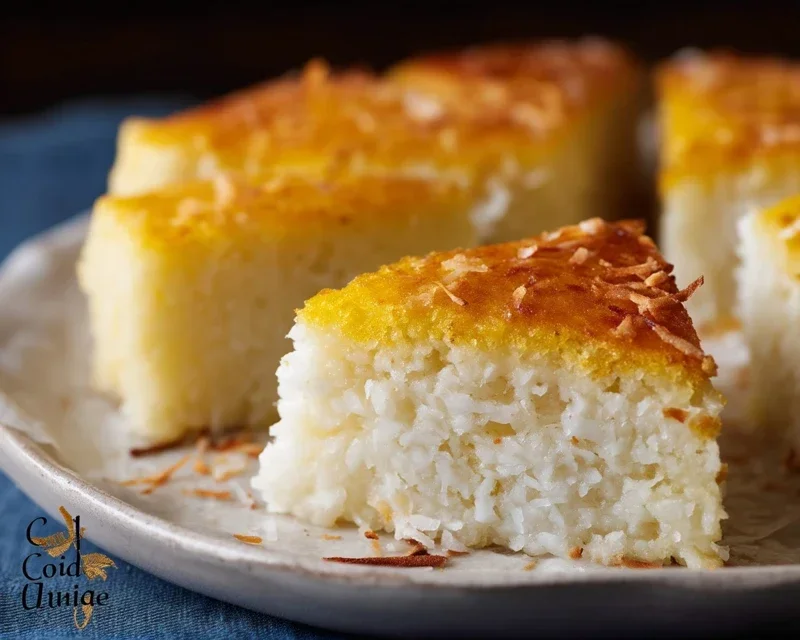
There’s something incredibly comforting and decadent about a sticky coconut cake. The way the sweet, chewy texture melts in your mouth, infused with the tropical aroma of coconut, is simply divine. This recipe yields a wonderfully moist and fragrant cake that’s surprisingly easy to make, perfect for an afternoon treat or a special occasion. The combination of glutinous rice flour and coconut milk creates that signature sticky, fudgy texture that sets this cake apart from its more conventional counterparts. It’s a delightful dance of textures and flavors, a true celebration of all things coconut.
Ingredients:
Cooking Instructions:
Let’s get started on creating this irresistible Sticky Coconut Cake. The process is straightforward, and the results are well worth the effort. We’ll begin extract by preparing our wet ingredients and then incorporate the dry components to form our batter.
Phase 1: Preparing the Wet Ingredients
First, in a large mixing bowl, we’ll combine the egg yolks with half of the granulated sugar (that’s ⅝ cup). Using a whisk or an electric mixer, beat these together until the mixture becomes pnon-alcoholic ale yellow and creamy. This process, often called “ribboning,” helps to create a lighter and more aerated cake. You should be able to lift the whisk and have the mixture fall back in thick ribbons that slowly disappear into the bowl. This is a crucial step for achieving a good texture.
Next, we’ll gently whisk in the 2¼ cups of full-fat canned coconut milk and the 1 teaspoon of vanilla extract into the egg yolk mixture. Full-fat coconut milk is key here; it provides the richness and moisture that makes this cake so wonderfully decadent. Don’t be alarmed if the mixture looks a little thin at this stage; it will thicken up as we add the dry ingredients. Ensure everything is well combined for an even distribution of flavor.
Phase 2: Incorporating the Dry Ingredients
In a separate bowl, combine the 1½ cups of glutinous rice flour and the 3 cups of shredded sweetened coconut. You can give these a quick whisk together to ensure the coconut is evenly distributed throughout the flour. Glutinous rice flour is what gives this cake its characteristic chewy and sticky texture. Unlike regular rice flour, it contains a higher proportion of amylopectin, which gelatinizes and creates that desirable gooeyness. Using sweetened coconut adds another layer of sweetness and texture.
Now, we’ll gradually add the dry ingredients to our wet mixture. It’s best to add them in about three additions, mixing well after each addition until just combined. Be careful not to overmix at this stage, as overmixing can lead to a tougher cake. The batter will start to thicken considerably, becoming quite a rich, luscious mixture. You want a smooth batter with no dry pockets of flour remaining.
Phase 3: Whipping the Egg Whites
In a clean, dry bowl (it’s essential that there’s no trace of fat or yolk in the bowl or on the beaters), whip the 2 egg whites until they form soft peaks. This means when you lift the beaters, the egg whites will hold their shape briefly but then curl over at the tip. Gradually add the remaining ⅝ cup of granulated sugar while continuing to beat. Continue whipping until the egg whites are glossy and form stiff, firm peaks. This stage is crucial for lightness; the stiffly beaten egg whites will act as a leavening agent, making the cake rise and giving it a delicate crum extractb. You should be able to invert the bowl without the egg whites falling out.
Gently fold the stiffly beaten egg whites into the batter. This is where patience is key. Use a spatula and a light, folding motion, cutting through the center of the batter and then bringin extractg it up and over the egg whites. Rotate the bowl as you go, continuing to fold until the egg whites are just incorporated and no streaks of white remain. The goal is to incorporate as much air as possible without deflating the egg whites. The resulting batter should be thick but airy.
Phase 4: Baking the Cake
Preheat your oven to 350°F (175°C). Grease and flour a 9-inch round cake pan or a similar-sized square pan. You can also line the bottom with parchment paper for easy removal. Pour the batter into the prepared pan, spreading it evenly with your spatula. The batter will be quite thick.
Bake for approximately 45-55 minutes, or until a wooden skewer or toothpick inserted into the center comes out clean. The top of the cake should be golden brown and firm to the touch. Keep an eye on it towards the end of the baking time, as ovens can vary. If the top starts to brown too quickly, you can loosely tent it with aluminum foil.
Once baked, let the cake cool in the pan on a wire rack for about 15-20 minutes before attempting to invert it. This resting period allows the cake to firm up slightly, making it easier to remove from the pan without breaking. After the initial cooling, carefully invert the cake onto the wire rack to cool completely. The aroma as it cools will be absolutely heavenly!
This Sticky Coconut Cake is best enjoyed at room temperature. It has a wonderful chegrape juicess and a deep coconut flavor that truly shines. It’s delicious on its own, or you could serve it with a dollop of whipped cream or a scoop of vanilla ice cream for an even more indulgent experience. Enjoy every delicious, sticky bite!
Conclusion:
I hope you’re as excited about this Sticky Coconut Cake as I am! This recipe truly delivers on its promise of a wonderfully moist, intensely coconutty, and delightfully sweet treat. The sticky, caramelized topping is the absolute star, creating a beautiful contrast with the tender crum extractb. It’s surprisingly simple to make, making it perfect for both casual baking sessions and impressing guests at your next gathering.
Serving this cake warm, perhaps with a dollop of whipped cream or a scoop of vanilla bean ice cream, is pure bliss. For variations, consider adding a pinch of cardamom to the batter for an extra layer of warmth, or even a handful of toasted macadamia nuts for added crunch. Don’t be afraid to experiment! I genuinely encourage you to give this Sticky Coconut Cake a try. I’m confident you’ll fall in love with its comforting flavors and irresistible texture.
Frequently Asked Questions:
Can I make this cake ahead of time?
Absolutely! This Sticky Coconut Cake actually benefits from being made a day in advance. The flavors meld together beautifully, and the cake stays wonderfully moist. Store it at room temperature, covered tightly, for up to 3 days.
What kind of coconut should I use?
For the best flavor and texture, I recommend using shredded sweetened coconut for the cake batter. For the sticky topping, a combination of desiccated coconut and coconut milk works wonders. Using full-fat coconut milk will yield the richest, most decadent results.
Is it possible to make this cake gluten-free?
While I haven’t personally tested it extensively, you should be able to adapt this recipe by substituting a good quality gluten-free flour blend. You might need to adjust the liquid slightly, so keep an eye on the batter’s consistency. The sticky topping should remain largely the same.
Sticky Coconut Cake
A delightful and moist cake made with coconut milk and shredded coconut, offering a rich, tropical flavor with a wonderfully sticky texture.
Ingredients
-
2 large eggs, separated
-
1¼ cup granulated sugar
-
2¼ cup full fat canned coconut milk
-
3 cups shredded sweetened coconut
-
1½ cup glutinous rice flour
-
1 teaspoon vanilla extract
Instructions
-
Step 1
Preheat your oven to 350°F (175°C). Grease and flour a 9×13 inch baking pan. -
Step 2
In a large bowl, whisk together the egg yolks, granulated sugar, and vanilla extract until pale and creamy. -
Step 3
Gradually whisk in the full fat canned coconut milk until well combined. -
Step 4
In a separate bowl, combine the shredded sweetened coconut and glutinous rice flour. Add this dry mixture to the wet ingredients and stir until just combined. Do not overmix. -
Step 5
In a clean bowl, beat the egg whites until stiff peaks form. Gently fold the beaten egg whites into the cake batter until no white streaks remain. -
Step 6
Pour the batter into the prepared baking pan and spread evenly. -
Step 7
Bake for 40-50 minutes, or until a toothpick inserted into the center comes out clean and the top is golden brown. -
Step 8
Let the cake cool in the pan for at least 30 minutes before slicing and serving. It is best served warm or at room temperature.
Important Information
Nutrition Facts (Per Serving)
It is important to consider this information as approximate and not to use it as definitive health advice.
Allergy Information
Please check ingredients for potential allergens and consult a health professional if in doubt.