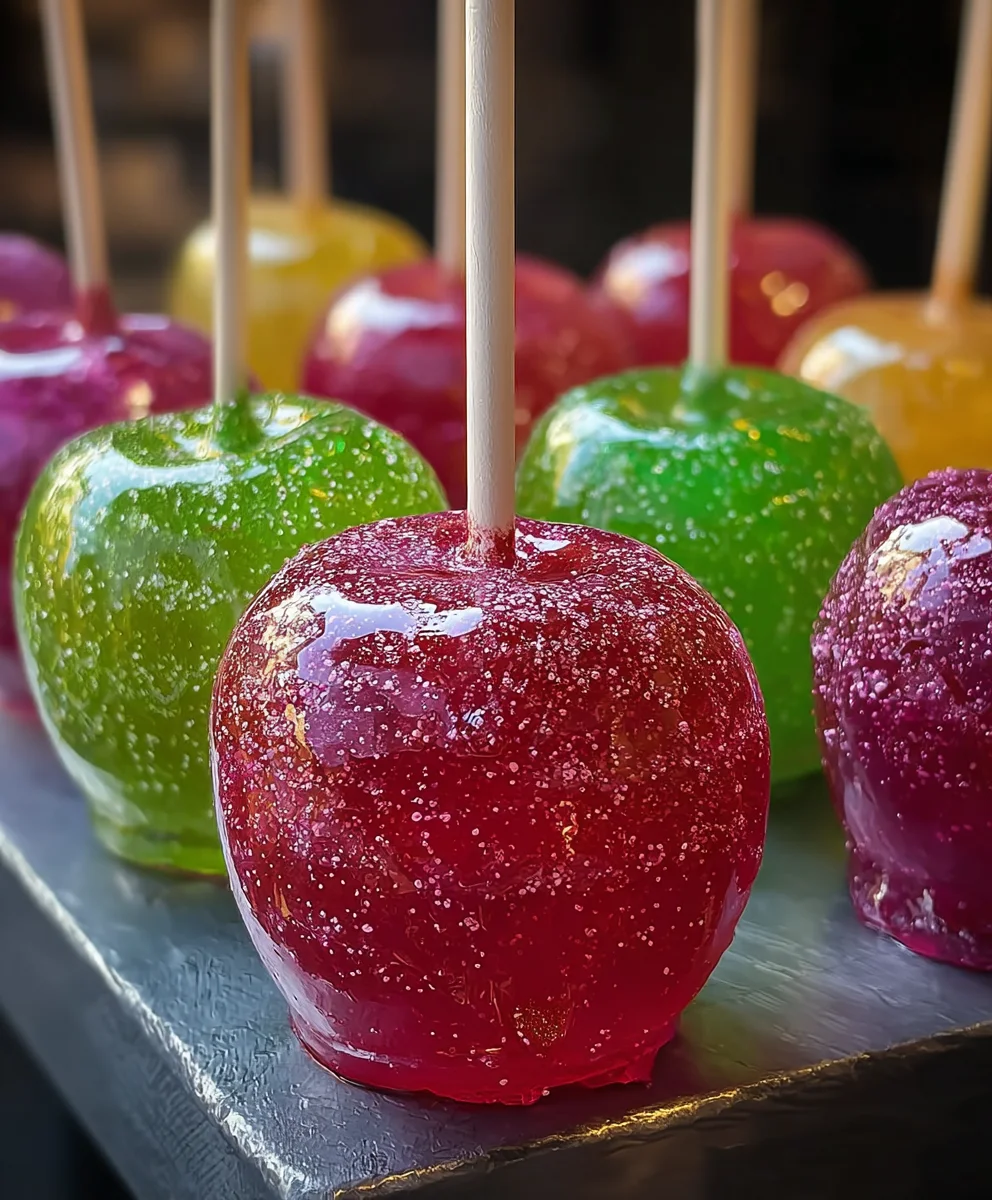
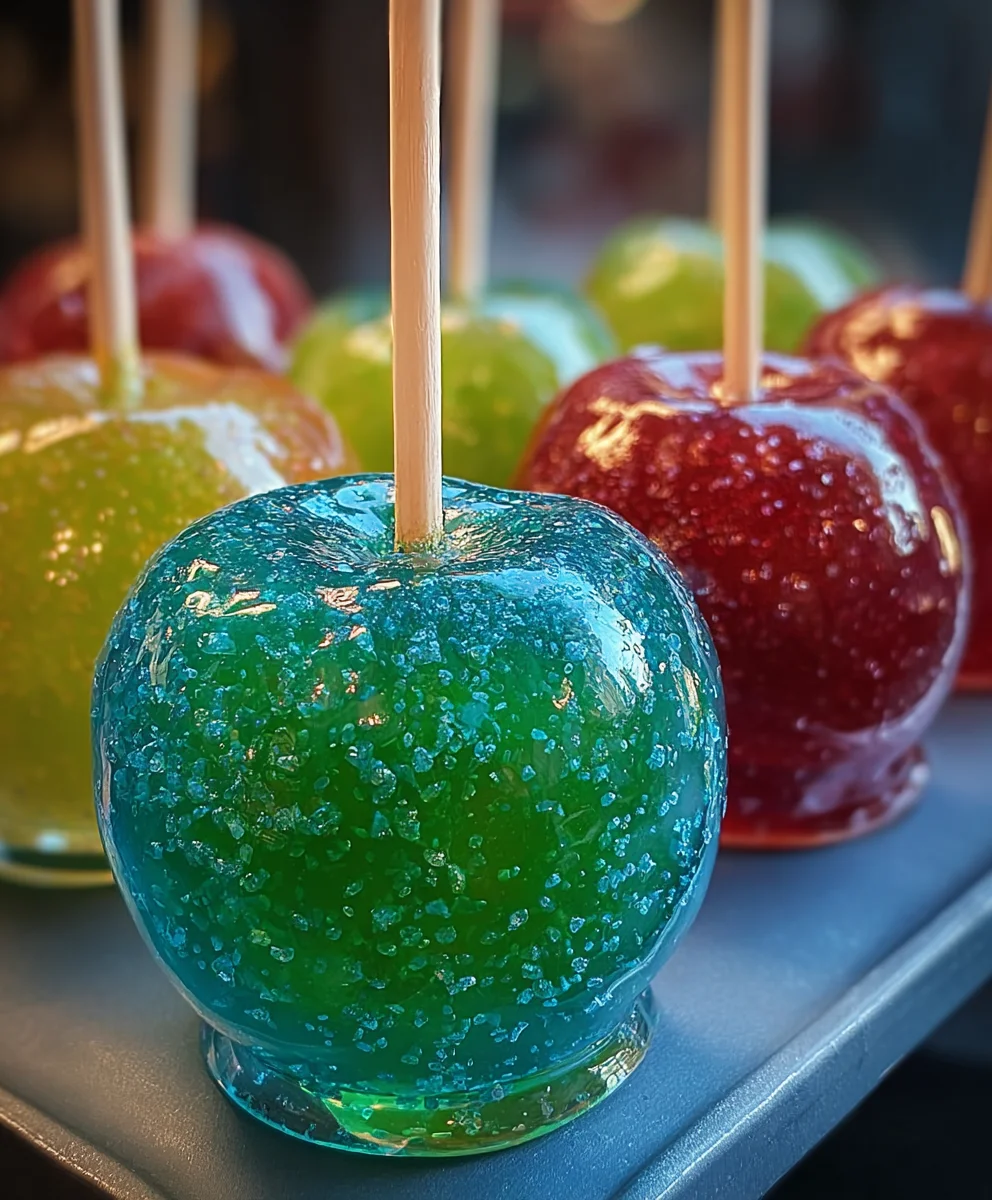
Jolly Rancher Candy Apples-Easy Festive Treat
Jolly Rancher Candy Apples are a truly magical treat, transforming a humble apple into a dazzling explosion of flavor and crunch. Imagin extracte biting into that perfectly crisp, sweet apple, enrobed in a vibrant, shatteringly hard candy shell that crackles with the iconic fruity burst of Jolly Ranchers. It’s no wonder these are a perennial favorite, evoking childhood nostalgia and pure, unadulterated joy. What sets these apart isn’t just the nostalgic candy; it’s the perfect balance of tart apple and intensely sweet, chewy-then-hard candy. The way the sugary shell clings to the fruit, creating that satisfying snap with every bite, is simply irresistible. Whether you’re looking for a show-stopping dessert for a party or just a fun activity to do with loved ones, Jolly Rancher Candy Apples are guaranteed to bring smiles and delight to everyone who tries them.
Ingredients:
- 6 medium apples (Granny Smith, Honeycrisp, or Fuji are excellent choices for their crispness and tartness, which balance the sweetness of the candy coating)
- 2-3 bags Jolly Rancher hard candies (assorted flavors provide a vibrant rainbow effect, while a single color like green or blue can create a more uniform, striking look. You’ll want enough to generously coat each apple.)
- 1-2 tablespoons water (this is crucial for helping the candies melt and create a smooth coating)
- Wooden skewers or popsicle sticks (sturdy enough to pierce the apples and hold them securely)
- Colorful sprinkles (for adding extra visual appeal and a fun crunch)
- Edible glitter (optional, but highly recommended for that extra sparkle and festive touch)
- Melted chocolate for drizzling (dark, milk, or white chocolate all work beautifully; use your favorite!)
Preparing the Apples
Step 1: Washing and Drying the Apples
Begin extract by thoroughly washing your chosen apples under cool running water. Gently scrub each apple to remove any surface residue or wax. This step is vital because any lingering wax or dirt will prevent the candy coating from adhering properly, leading to a less attractive and potentially less stable candy apple. After washing, pat each apple completely dry with a clean kitchen towel or paper towels. Ensure there’s no moisture left on the surface; this is just as important as washing for good candy adherence.
Step 2: Inserting the Skewers
Take your wooden skewers or popsicle sticks and firmly insert one into the stem end of each apple. Push the skewer deep enough so that it goes at least halfway through the apple, but not so far that it pierces the other side. You want the skewer to be securely embedded, providing a firm handle for dipping and holding the apple. If you’re using apples with very tough skin, you might find it helpful to slightly widen the hole with the tip of a paring knife before inserting the skewer, making the process easier and preventing the apple from splitting.
Melting the Jolly Ranchers
Step 3: Crushing and Melting the Candies
Now for the fun part – transforming those colorful Jolly Ranchers into a glorious coating! Open your bags of Jolly Ranchers and sort them by color if you’re aiming for a specific pnon-alcoholic alette, or just toss them all together for a true rainbow effect. Place the candies into a sturdy plastic bag (dogin extracte-bagging is a good idea to prevent leaks) and use a rolling pin or a mallet to crush them into a coarse powder or small pieces. The finer you crush them, the smoother your candy coating will be. Once crushed, empty the candy pieces into a heavy-bottomed saucepan. Add 1 to 2 tablespoons of water to the saucepan. Start melting the candies over medium-low heat, stirring constantly with a heatproof spatula or wooden spoon. It’s crucial to stir continuously to prevent the sugar from scorching. The candies will gradually melt and combine with the water, forming a thick, syrupy liquid. Continue stirring until all the candy is completely dissolved and the mixture is smooth and free of lumps.
Coating the Jolly Rancher Candy Apples
Step 4: Dipping and Coating the Apples
Once your Jolly Rancher syrup is smooth and melted, it’s time to coat the apples. Carefully remove the saucepan from the heat. Hold an apple by its skewer and tilt the saucepan so the melted candy is easily accessible. Submerge the apple into the melted candy mixture, rotating it gently to coat as much of the surface as possible. You want a thick, even coating. If you want a very thick layer, you can dip the apple once, let it drip for a few seconds, and then dip it again. Work quickly, as the candy mixture will start to set as it cools. For any bare spots, you can carefully spoon a little extra melted candy over them. Don’t worry if it’s not perfectly smooth; the slight imperfections often add to their homemade charm.
Step 5: Decorating Your Candy Apples
As soon as each apple is coated, it’s time to add your decorative touches before the candy sets completely. You can either drizzle melted chocolate over the surface in a decorative pattern or sprinkle colorful sprinkles and edible glitter generously over the wet candy coating. If you’re using sprinkles, hold the apple over a baking sheet lined with parchment paper to catch any excess. For the melted chocolate drizzle, place your chocolate of choice in a microwave-safe bowl and melt in 30-second intervals, stirring between each, until smooth. Transfer the melted chocolate to a piping bag with a small tip or a zip-top bag with a corner snipped off, and then drizzle artistically over the candy-coated apples. You can also do this step with a spoon. The sprinkles and glitter will adhere best while the candy is still slightly tacky. Allow the decorated apples to drip any excess coating back onto the parchment paper.
Setting and Finishing
Step 6: Allowing the Jolly Rancher Candy Apples to Set
Once all your apples are coated and decorated, carefully stand them upright on the parchment-lined baking sheet. Ensure they have enough space between them so they don’t stick together as they cool. Place the baking sheet in the refrigerator for at least 30-60 minutes, or until the candy coating is completely hardened and no longer sticky. This chilling process is essential for the candy to set properly, making them easy to handle and enjoy. Once set, your vibrant and delicious Jolly Rancher Candy Apples are ready to be devoured!
Conclusion:
There you have it – a delightful and vibrant recipe for making your very own Jolly Rancher Candy Apples! We’ve walked through each step, from preparing your apples to achieving that perfect, shimmering candy shell. These festive treats are not only visually stunning but offer a delightful crunch followed by that burst of fruity Jolly Rancher flavor. They’re perfect for parties, holidays, or just a fun afternoon baking project. Consider serving them as a whimsical dessert at your next gathering, alongside popcorn and other movie night snacks, or even as edible party favors. Don’t be afraid to experiment with different Jolly Rancher flavors for a spectrum extract of colors and tastes! Try using green apples for a tart contrast, or even dipping them in white chocolate before the candy coating for an extra layer of indulgence. The most important ingredient is your enthusiasm, so have fun with it!
Frequently Asked Questions:
How can I ensure the candy coating is smooth and not grainy?
To achieve a smooth candy coating for your Jolly Rancher Candy Apples, ensure your Jolly Rancher candies are completely melted and homogenous before dipping. Stirring them continuously over low heat helps prevent crystallization. Also, be sure to work relatively quickly once the candy is melted, as it can start to harden.
Can I make Jolly Rancher Candy Apples ahead of time?
Yes, you can absolutely make Jolly Rancher Candy Apples ahead of time! Once the candy coating has fully hardened (which typically takes about 30-60 minutes at room temperature), they can be stored. Wrap each apple individually in plastic wrap or place them in an airtight container. They are best enjoyed within 2-3 days for optimal crispness.
Jolly Rancher Candy Apples – Easy Festive Treat
A fun and festive way to enjoy candy apples using colorful Jolly Rancher candies for a vibrant and sweet coating.
Ingredients
-
6 medium apples (Granny Smith, Honeycrisp, or Fuji)
-
2-3 bags Jolly Rancher hard candies (assorted flavors or single color)
-
1-2 tablespoons water
-
Wooden skewers or popsicle sticks
-
Colorful sprinkles
-
Edible glitter
-
Melted chocolate for drizzling
Instructions
-
Step 1
Wash and thoroughly dry 6 medium apples. Ensure no wax or moisture remains for proper candy adherence. -
Step 2
Insert wooden skewers or popsicle sticks firmly into the stem end of each apple, about halfway through. -
Step 3
Crush 2-3 bags of Jolly Rancher hard candies into a coarse powder. Place in a heavy-bottomed saucepan with 1-2 tablespoons of water. Melt over medium-low heat, stirring constantly until smooth and syrupy. -
Step 4
Holding an apple by its skewer, dip it into the melted Jolly Rancher mixture, rotating to coat evenly. Work quickly as the candy will start to set. -
Step 5
While the coating is still wet, immediately decorate with colorful sprinkles and edible glitter. Drizzle with melted chocolate if desired. -
Step 6
Place the decorated candy apples upright on a parchment-lined baking sheet. Refrigerate for at least 30-60 minutes, or until the candy coating is completely hardened.
Important Information
Nutrition Facts (Per Serving)
It is important to consider this information as approximate and not to use it as definitive health advice.
Allergy Information
Please check ingredients for potential allergens and consult a health professional if in doubt.