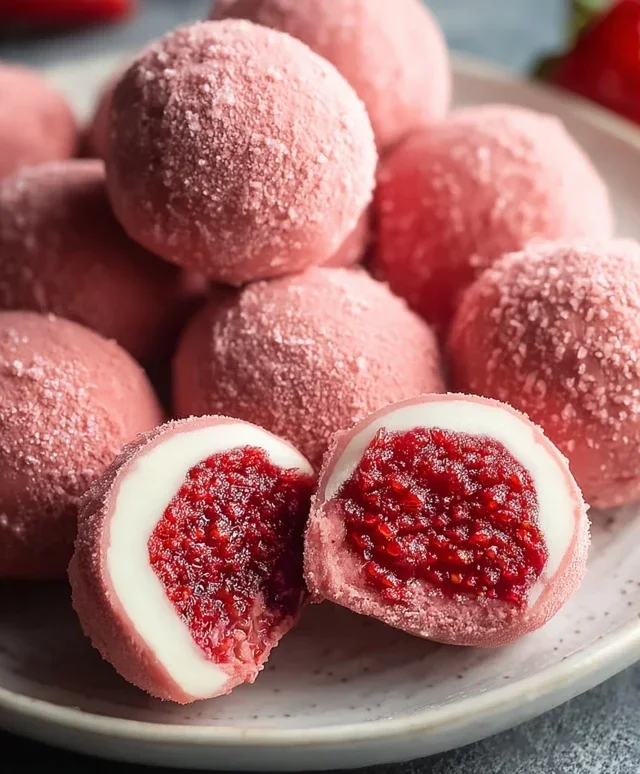
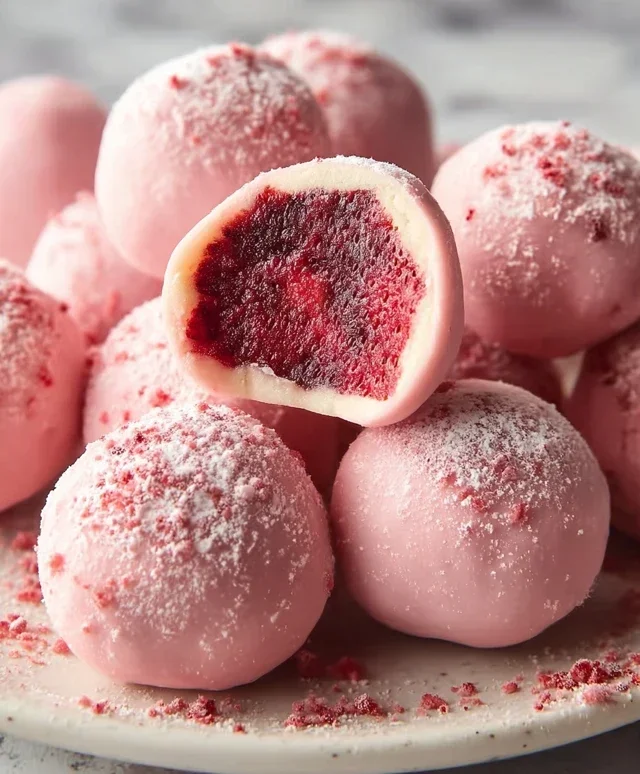
Easy Strawberry Truffles- Delicious No-Bake Treat
Strawberry truffles are the ultimate little bite of pure joy. There’s something undeniably magical about the combination of rich, decadent chocolate and the sweet, slightly tart burst of fresh strawberries. These aren’t just any chocolate confections; these strawberry truffles elevate a simple treat into an elegant experience. I absolutely adore them because they offer a delightful contrast of textures and flavors – the smooth, melt-in-your-mouth ganache encasing a vibrant strawberry surprise. They’re perfect for impressing guests at a dinner party, as a thoughtful homemade gift, or simply for indulgin extractg in a moment of sweet bliss. What truly makes these strawberry truffles so special is the way they capture the essence of summer in every bite, a little taste of sunshine and pure happiness that’s surprisingly easy to create in your own kitchen.
Strawberry Truffles
There’s something undeniably elegant and utterly delicious about homemade strawberry truffles. Imagin extracte delicate spheres of creamy, white chocolate infused with the sweet, vibrant essence of strawberries, all culminating in a melt-in-your-mouth experience. These aren’t just desserts; they’re little bites of pure joy, perfect for gifting, impressing guests, or simply treating yourself to something truly special. Making them from scratch might sound intimidating, but I promise, it’s surprisingly straightforward and incredibly rewarding. The secret lies in good quality ingredients and a little bit of patience. Let’s dive into creating these delightful strawberry jewels!
Ingredients:
Crafting the Strawberry White Chocolate Ganache
The heart of any truffle is its ganache, and ours is a beautiful, pnon-alcoholic ale pink creation ready to tantalize your taste buds. This initial step involves melting our white chocolate and butter together until they form a silky smooth base. Precision here is key. We want a gentle, even melt to prevent the white chocolate from seizing or becoming grainy.
Melting the Chocolate Base
First, I like to prepare my workstation. Make sure your ingredients are measured out and readily accessible. In a medium-sized, heatproof bowl, combine the 1 cup of white chocolate chips and ¼ cup of unsalted butter. You can either use a double boiler method or the microwave. For the double boiler, set the bowl over a saucepan filled with about an inch of simmering water. Ensure the bottom of the bowl doesn’t touch the water. Stir constantly with a rubber spatula until both the chocolate chips and butter are completely melted and smooth. If you’re using the microwave, heat in 20-30 second intervals, stirring well after each interval, until melted and smooth. Be patient; microwaving can be tricky, and it’s easy to overheat white chocolate. Once smooth, remove the bowl from the heat.
Next, in a small saucepan, gently warm the 3 tablespoons of heavy whipping cream. You don’t want it to boil, just to be hot to the touch. This will help emulsify the ganache beautifully. Gradually pour the warm cream into the melted white chocolate and butter mixture, whisking continuously until everything is thoroughly combined and you have a luxurious, glossy ganache. The warmth of the cream will melt any remaining bits of chocolate and create a perfectly smooth emulsion. This is where the magic starts to happen!
Now, it’s time to infuse our ganache with those delightful flavors. Add the ½ teaspoon of strawberry extract and ¼ teaspoon of vanilla extract to the mixture. Stir until they are fully incorporated. The strawberry extract is crucial for that intense fruit flavor. If you’re using a very potent extract, you might want to start with a little less and add more to your taste. The vanilla extract adds a subtle depth that complements the strawberry beautifully without overpowering it.
To achieve our lovely pastel pink hue, carefully add 1 drop of pink food coloring. Stir it in thoroughly. Remember, a little food coloring goes a long way, especially with white chocolate. You’re aiming for a delicate, rosy tint, not a vibrant pink. You can always add another tiny drop if you feel it needs it, but it’s harder to take it away! Stir until the color is evenly distributed, creating a beautiful, uniform shade.
Chilling and Shaping the Truffles
This is where patience really pays off. The ganache needs to firm up enough to be rolled into balls. Rushing this step can lead to sticky, unmanageable messes.
The Crucial Chilling Phase
Once your ganache is beautifully colored and flavored, it’s time to let it chill. Cover the bowl tightly with plastic wrap, pressing the wrap directly onto the surface of the ganache. This prevents a skin from forming. Place the bowl in the refrigerator for at least 2 to 3 hours, or until the mixture is firm enough to scoop and roll. You can also leave it in the fridge overnight if that’s more convenient. The ideal texture is like firm playdough – solid enough to hold its shape but soft enough to scoop easily. If you’re in a hurry, you can speed up the process by placing the ganache in the freezer for about 30-45 minute intervals, checking and stirring every so often, but be careful not to let it freeze solid.
Rolling and Coating the Truffles
Now for the fun part – transforming that chilled ganache into perfect little spheres! This is where your hands become the sculpting tools.
Shaping Perfection
Once the ganache is properly chilled, take it out of the refrigerator. You’ll want to work relatively quickly so the warmth from your hands doesn’t melt the ganache too much. You can use a small cookie scoop or two spoons to portion out the ganache. Aim for uniform size so they all bake (or rather, set) and look cohesive. Roll each portion into a smooth ball between your palms. If the ganache starts to get too soft and sticky, pop the whole bowl back into the fridge for 10-15 minutes to firm up again. You can lightly dust your hands with a bit of powdered sugar if you find them sticking. Place the rolled truffles onto a parchment-lined baking sheet or a plate.
Finally, we’ll give our truffles their signature soft coating. In a small bowl, combine the ¼ cup of powdered sugar. Gently roll each chilled truffle in the powdered sugar until evenly coated. You can use a small sifter to ensure a light and even dusting. This adds a lovely delicate sweetness and a beautiful matte finish that contrasts with the creamy interior.
Storing Your Delectable Creations
Once your strawberry truffles are coated, you can either enjoy them immediately or store them for later. They are best stored in an airtight container in the refrigerator to maintain their firmness and freshness. Let them come to room temperature for about 10-15 minutes before serving for the best texture. These little gems are a delightful way to bring a touch of homemade elegance to any occasion. Enjoy every sweet, strawberry-infused bite!
Conclusion:
And there you have it – the simple yet utterly decadent strawberry truffles recipe! I truly believe this recipe is a winner because it combines the vibrant, fresh taste of strawberries with the luxurious richness of chocolate, creating a treat that’s surprisingly easy to make but tastes incredibly sophisticated. Whether you’re looking for an impressive dessert for a special occasion, a delightful handmade gift, or just a way to treat yourself, these strawberry truffles are sure to impress. They’re perfect for sharing, but I won’t tell if you decide to keep them all to yourself!
I love serving these beautiful truffles alongside a cup of coffee or tea, as a light dessert after a meal, or even as part of a dessert platter with other small bites. For variations, don’t hesitate to experiment! You could try a white chocolate coating for a contrast, or perhaps a sprinkle of finely chopped pistachios or toasted coconut for added texture and flavor. Maybe even a hint of liqueur extract like Grand Marnier Extract or kirsch extract mixed into the strawberry filling could elevate these further. I genuinely encourage you to give this recipe a try. The joy of creating something so delicious from scratch is incredibly rewarding, and the result is simply divine.
Frequently Asked Questions:
How do I store my strawberry truffles?
You can store your strawberry truffles in an airtight container in the refrigerator for up to a week. For the best flavor and texture, let them sit at room temperature for about 15-20 minutes before serving.
Can I use frozen strawberries?
Yes, you can use frozen strawberries. Make sure to thaw them completely and drain off any excess liquid before proceeding with the recipe. This is crucial to ensure the truffle filling has the right consistency.
Strawberry Truffles
Delicate and fruity strawberry truffles, perfect for a sweet treat.
Ingredients
-
1 cup white chocolate chips
-
1/4 cup unsalted butter
-
3 tablespoons heavy whipping cream
-
1/2 teaspoon strawberry extract
-
1/4 teaspoon vanilla extract
-
1 drop pink food coloring
-
1/4 cup powdered sugar
Instructions
-
Step 1
Melt white chocolate chips and butter together in a heatproof bowl over a saucepan of simmering water (double boiler method), stirring until smooth. -
Step 2
Remove from heat and stir in heavy whipping cream, strawberry extract, and vanilla extract until well combined. -
Step 3
Add the pink food coloring and mix until the ganache is a uniform pink color. -
Step 4
Cover the bowl and refrigerate for at least 1 hour, or until firm enough to scoop. -
Step 5
Scoop small portions of the chilled ganache and roll them into balls. If the mixture becomes too soft, return it to the refrigerator. -
Step 6
Place the rolled truffles on a parchment-lined baking sheet. Roll each truffle in powdered sugar until evenly coated. Refrigerate until ready to serve.
Important Information
Nutrition Facts (Per Serving)
It is important to consider this information as approximate and not to use it as definitive health advice.
Allergy Information
Please check ingredients for potential allergens and consult a health professional if in doubt.