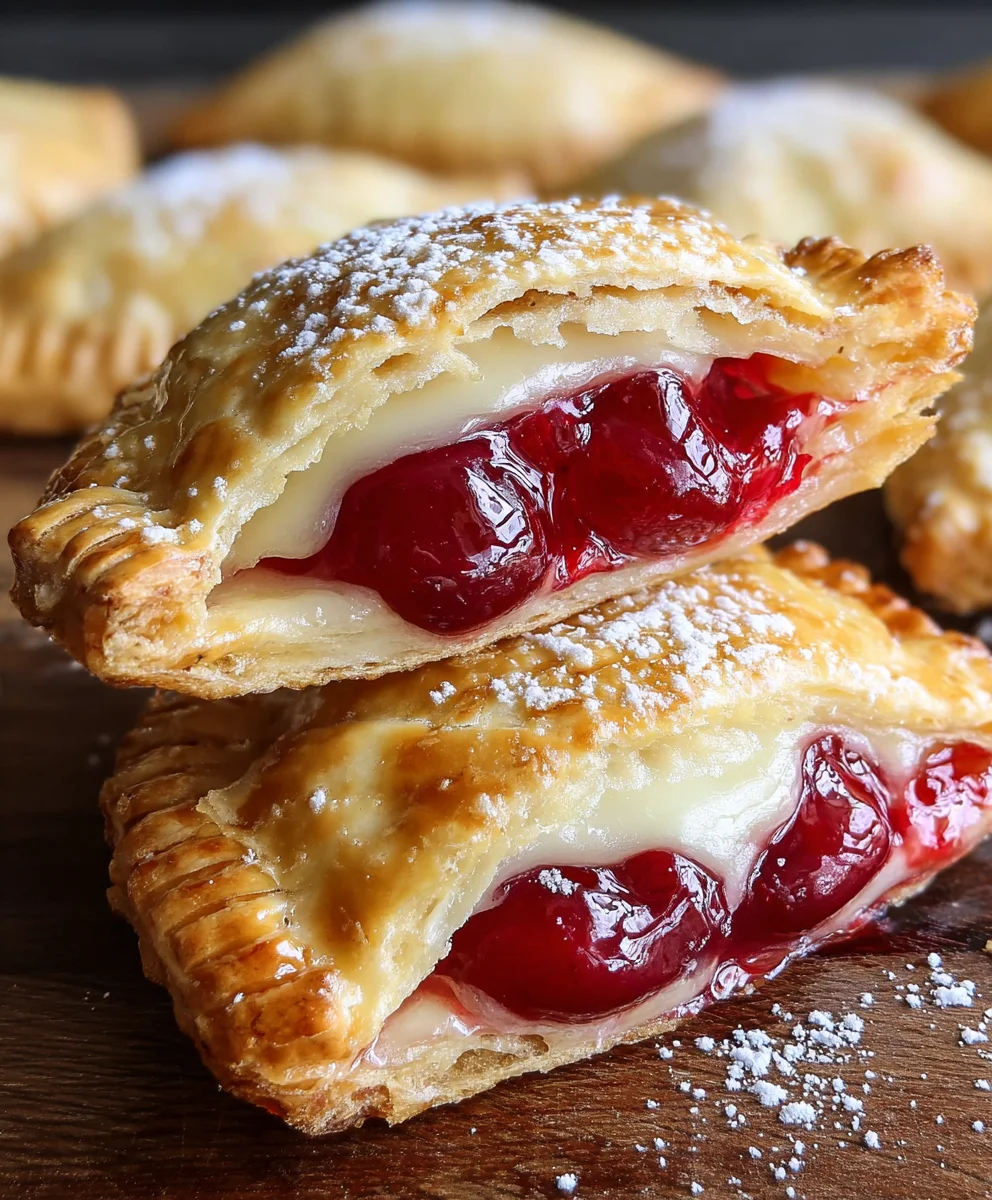
Cherry Cheesecake Hand Pies-Easy Dessert
Cherry Cheesecake Hand Pies are not just a dessert; they’re a portable slice of pure bliss. Imagin extracte the creamy, tangy allure of classic cheesecake, enveloped in a flaky, golden-brown pastry, all miniaturized into a perfect hand-held treat. That’s the magic of these delightful little parcels. We all have those moments when a craving strikes, and the idea of a whole cheesecake feels a bit overwhelming, or perhaps you’re looking for an elegant yet easy dessert to share at a potluck or picnic. That’s where the genius of Cherry Cheesecake Hand Pies truly shines. They offer all the indulgent flavor without the fuss. What makes them so special? It’s the perfect marriage of textures – the crisp crust giving way to the smooth, sweet cherry and cream cheese filling. It’s a taste of nostalgia and innovation all in one bite, making them an instant crowd-pleaser and a personal favorite for any occasion.
Ingredients:
- 1/4 cup granulated sugar
- 4 oz cream cheese, softened
- 21 oz can cherry pie filling
- 1 package refrigerated pie crust (2 crusts)
- 1/2 cup powdered sugar
- 1 teaspoon corn syrup
- 1 tablespoon water
- Vegetable oil, for deep frying (about 4-6 cups)
Preparing the Filling
Cream Cheese Base
The first step to creating these delightful Cherry Cheesecake Hand Pies is to prepare a luscious, tangy cream cheese filling that will complement the sweet cherry goodness. In a medium bowl, combine the 4 oz of softened cream cheese with the 1/4 cup of granulated sugar. Using a spatula or an electric mixer on low speed, cream these two ingredients together until they are smooth and well combined. Ensure there are no lumps of cream cheese remaining; this will give your hand pies a wonderfully creamy texture. It’s crucial that the cream cheese is softened to room temperature for easier mixing and to avoid a grainy filling.
Adding the Cherry Pie Filling
Once your cream cheese base is smooth, it’s time to introduce the star of the show: the cherry pie filling. Gently fold the entire 21 oz can of cherry pie filling into the cream cheese mixture. Stir until the cherries are evenly distributed throughout the cream cheese. Don’t overmix at this stage; a few streaks of cream cheese are perfectly fine and can even add visual appeal. The goal is to create a cohesive, rich filling that’s bursting with cherry flavor.
Assembling the Hand Pies
Cutting the Pie Crusts
Now, let’s get the pie crusts ready. Carefully unroll the 1 package of refrigerated pie crusts (which contains 2 crusts) onto a lightly floured surface. Use a round cookie cutter or the rim of a glass to cut out circles from each crust. Aim for circles that are about 4-5 inches in diameter. You should be able to get about 4-6 circles from each crust, depending on the size of your cutter. Gather the scraps, gently re-roll them, and cut out additional circles until you’ve used as much dough as possible. These circles will form the base and top of your hand pies.
Filling and Sealing the Hand Pies
Take half of your cut-out pie crust circles and place them on a parchment-lined baking sheet. Spoon about 2-3 tablespoons of the prepared cherry cheesecake filling onto the center of each of these circles, leaving a small border around the edge. Be careful not to overfill, as this can make sealing difficult and lead to leakage during frying. Now, take the remaining pie crust circles and place one on top of each filled circle. Press down gently around the filling to seal the edges. You can use the tines of a fork to crimp the edges securely, ensuring that the delicious filling stays locked inside during the frying process. This also creates a decorative edge.
Frying the Cherry Cheesecake Hand Pies
Heating the Oil
This is where the magic happens and your hand pies transform into golden, crispy delights. Pour about 4-6 cups of vegetable oil into a deep, heavy-bottomed pot or Dutch oven. Heat the oil over medium-high heat until it reaches a temperature of 350°F (175°C). It’s important to use a thermometer to ensure the oil is at the correct temperature. If the oil is too cool, the hand pies will absorb too much grease. If it’s too hot, they’ll burn on the outside before the filling is heated through.
Frying to Golden Perfection
Carefully place 2-3 hand pies into the hot oil, being careful not to overcrowd the pot. Overcrowding will lower the oil temperature and result in greasy pies. Fry the hand pies for about 2-3 minutes per side, or until they are a beautiful golden brown and puffed up. Use a slotted spoon or spider strainer to gently flip them halfway through the frying time. Once they are golden brown on both sides, carefully remove them from the oil and place them on a wire rack set over a baking sheet to drain any excess oil. Repeat this process with the remaining hand pies, ensuring you allow the oil to return to 350°F (175°C) between batches.
Glazing and Serving
Creating the Glaze
While your hand pies are cooling slightly, let’s prepare a simple yet elegant glaze to take them to the next level. In a small bowl, whisk together the 1/2 cup of powdered sugar, 1 teaspoon of corn syrup, and 1 tablespoon of water. Stir until the glaze is smooth and lump-free. The corn syrup adds a lovely sheen and helps the glaze set slightly. If the glaze is too thick, add a tiny bit more water, a teaspoon at a time, until it reaches your desired drizzling consistency. If it’s too thin, add a bit more powdered sugar.
Glazing and Enjoying
Once the Cherry Cheesecake Hand Pies have cooled for a few minutes (they will be very hot straight out of the oil), you can begin extract glazing them. Drizzle the prepared glaze generously over the warm hand pies. The warmth of the pies will help the glaze melt slightly and create a beautiful finish. Allow the glaze to set for a few minutes before serving. These hand pies are best enjoyed warm, when the filling is still gooey and the crust is perfectly crisp. They make a fantastic dessert or even a special breakfast treat.

Conclusion:
And there you have it – a delightful batch of homemade Cherry Cheesecake Hand Pies! These charming little pastries are a perfect blend of sweet, tart cherries and creamy, decadent cheesecake, all wrapped up in a flaky, golden-brown crust. They’re incredibly satisfying to make and even more so to devour. We hope you’ve enjoyed this recipe and are inspired to create your own batch. Serve these warm for an extra gooey center, or at room temperature for a firmer, more sliceable treat. They are absolutely fantastic on their own, but can also be elevated with a dollop of whipped cream, a drizzle of chocolate sauce, or a dusting of powdered sugar. Don’t be afraid to get creative with variations – perhaps a swirl of raspberry or a hint of almond extract in the filling for a different flavor profile? Or even try a sprinkle of cinnamon in the crust for added warmth. The possibilities are endless, and the joy of sharing these homemade treats is immeasurable. So, gather your ingredients, put on your favorite music, and enjoy the process. You’ve got this!
Frequently Asked Questions:
Can I make the Cherry Cheesecake Hand Pies ahead of time?
Yes, you can! You can assemble the hand pies and refrigerate them for up to 24 hours before baking. For longer storage, bake them completely, let them cool, and then store them in an airtight container at room temperature for up to 2 days, or freeze them for up to 2 months. Reheat gently in the oven or toaster oven.
What kind of cherries should I use for the Cherry Cheesecake Hand Pies?
You can use fresh, frozen, or canned cherries. If using frozen cherries, thaw them and drain any excess liquid before using. If using canned cherries, be sure to drain them very well to prevent a watery filling. Sweet or tart cherries will both work, depending on your preference for sweetness.
Cherry Cheesecake Hand Pies
Easy and delicious cherry cheesecake hand pies, perfect for a quick dessert or special breakfast treat. These are deep-fried to golden perfection and drizzled with a simple glaze.
Ingredients
-
1/4 cup granulated sugar
-
4 oz cream cheese, softened
-
21 oz can cherry pie filling
-
1 package refrigerated pie crust (2 crusts)
-
1/2 cup powdered sugar
-
1 teaspoon corn syrup
-
1 tablespoon water
-
Vegetable oil, for deep frying (about 4-6 cups)
Instructions
-
Step 1
Prepare the cream cheese filling: In a medium bowl, combine softened cream cheese and granulated sugar. Cream together until smooth. -
Step 2
Add the cherry pie filling: Gently fold the cherry pie filling into the cream cheese mixture until evenly distributed. -
Step 3
Assemble the hand pies: Cut 4-5 inch circles from the pie crusts. Spoon 2-3 tablespoons of filling onto half the circles, leaving a border. Top with the remaining circles and crimp the edges with a fork to seal. -
Step 4
Fry the hand pies: Heat vegetable oil to 350°F (175°C) in a deep pot. Carefully fry 2-3 hand pies at a time for 2-3 minutes per side until golden brown. Drain on a wire rack. -
Step 5
Make the glaze: Whisk together powdered sugar, corn syrup, and water until smooth. Adjust consistency as needed. -
Step 6
Glaze and serve: Drizzle the glaze over the warm hand pies and let it set before enjoying.
Important Information
Nutrition Facts (Per Serving)
It is important to consider this information as approximate and not to use it as definitive health advice.
Allergy Information
Please check ingredients for potential allergens and consult a health professional if in doubt.