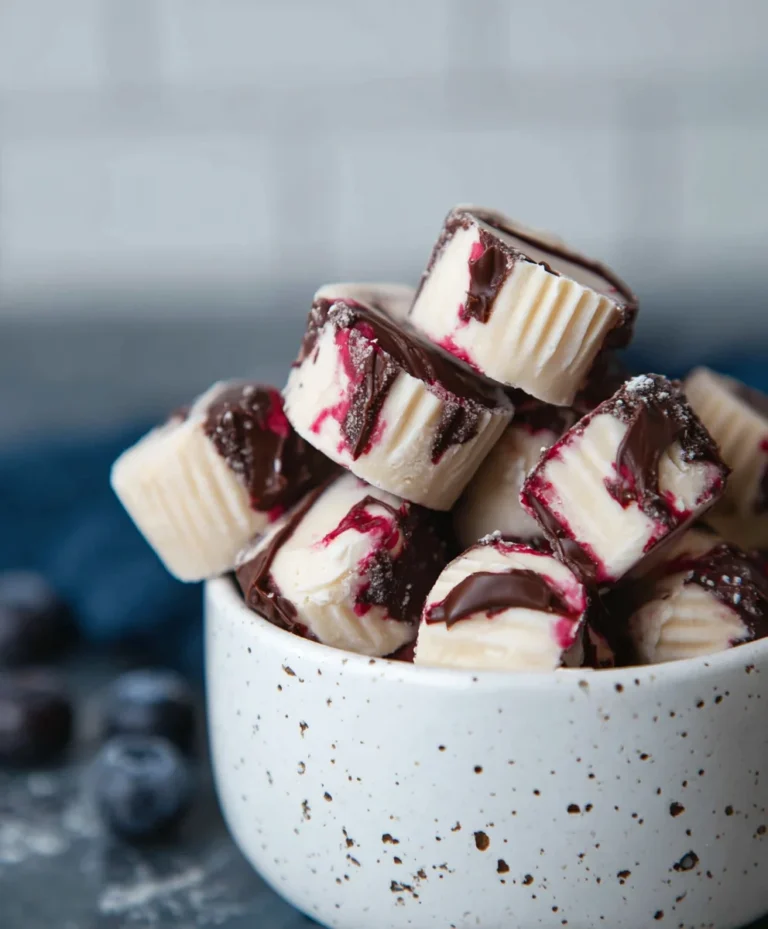
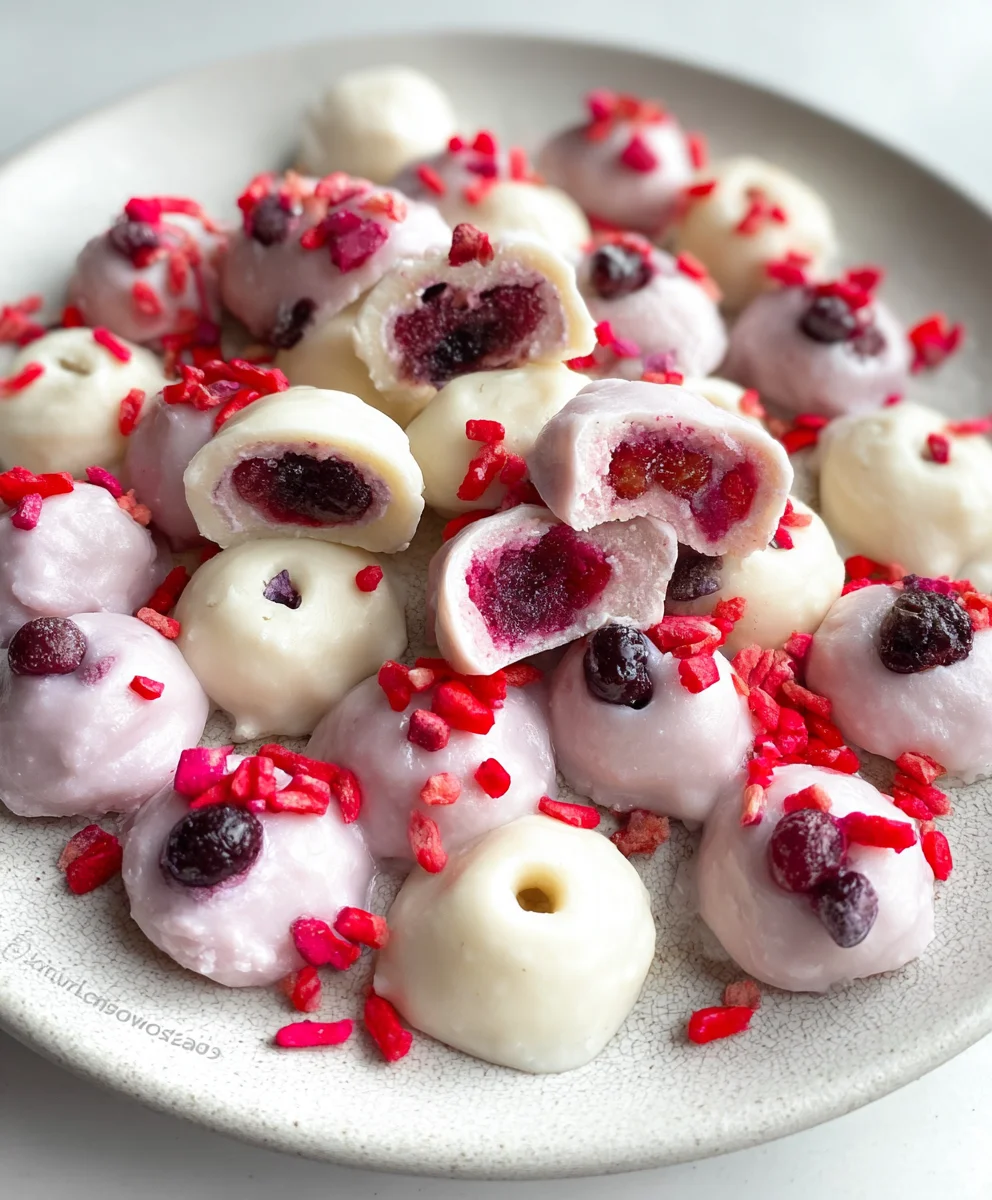
Easy Yogurt Bites Recipe-Quick & Delicious Treat
How To Make Yogurt Bites, those delightful little explosions of creamy sweetness, are more than just a treat; they’re a gateway to effortless deliciousness and a fantastic way to boost your daily dose of goodness. Imagin extracte a snack that’s both incredibly simple to prepare and utterly satisfying, perfect for little hands, busy mornings, or a guilt-free afternoon pick-me-up. People absolutely adore yogurt bites because they strike that perfect balance between healthy and indulgent. They’re naturally packed with probiotics from the yogurt, offering a subtle tang that complements any added flavors. What truly makes them special is their versatility – you can customize them endlessly with fruits, a drizzle of honey, or even a sprinkle of granola. This recipe will guide you through the simple steps to create these magical morsels, ensuring your first batch is just as perfect as your hundredth. Get ready to discover your new favorite snack.

Ingredients:
- 1 cup plain, unsweetened Greek yogurt
- 1/4 cup fresh berries (such as blueberries, raspberries, or chopped strawberries)
- 1 tablespoon honey or maple syrup (optional, for added sweetness)
- 1/2 teaspoon vanilla extract
Instructions:
Preparing the Yogurt Mixture
Step 1: Soften the Yogurt
Begin extract by taking your 1 cup of plain, unsweetened Greek yogurt and placing it in a medium-sized mixing bowl. It’s important that the yogurt isn’t ice-cold, as this can make it harder to mix evenly. If it’s been stored in a very cold part of the refrigerator, let it sit at room temperature for about 10-15 minutes to soften slightly. This will ensure a smoother, more cohesive mixture for your yogurt bites. Don’t let it get warm, just slightly less frigid.
Step 2: Sweeten and Flavor (Optional)
If you prefer a touch of sweetness, now is the time to add your sweetener. Drizzle in 1 tablespoon of honey or maple syrup. Honey will offer a classic sweetness, while maple syrup will impart a slightly different, more complex flavor profile. Mix this in thoroughly with a spoon or spatula until it’s fully incorporated. If you’re aiming for a very low-sugar option, you can absolutely skip this step, as the berries will provide some natural sweetness. Next, add 1/2 teaspoon of vanilla extract. This small addition makes a big difference, enhancing the overall flavor and aroma of your yogurt bites, giving them a more dessert-like quality. Stir again until the vanilla is evenly distributed.
Incorporating the Berries
Step 3: Prepare the Berries
Wash your 1/4 cup of fresh berries thoroughly under cool running water. If you’re using larger berries like strawberries, you’ll want to chop them into small, bite-sized pieces. This ensures that each yogurt bite has a nice distribution of berry flavor and texture, and also makes them easier to eat, especially for little ones. Blueberries and raspberries can usually be left whole if they are small, or halved if they are quite large. The goal is to have pieces that are proportionate to the size of the yogurt bite itself. Gently pat the prepared berries dry with a paper towel to remove any excess moisture, as too much liquid can affect the final texture of your bites.
Step 4: Gently Fold in the Berries
Now, carefully add your prepared berries to the yogurt mixture. It’s crucial to fold them in gently rather than vigorously stirring. Use a spatula or a spoon to delicately lift the yogurt mixture from the bottom of the bowl and over the berries. Repeat this process a few times until the berries are just distributed throughout the yogurt. Overmixing at this stage can break down the berries too much, turning the mixture a uniform pink or purple and potentially releasing too much juice. We want to see distinct pieces of fruit within the creamy yogurt.
Freezing the Yogurt Bites
Step 5: Portioning and Freezing
Line a baking sheet or a flat tray with parchment paper or a silicone baking mat. This is essential to prevent the yogurt bites from sticking to the tray once frozen, making them easy to remove. Using a small spoon or a piping bag (if you want a more uniform shape), carefully dollop small amounts of the yogurt and berry mixture onto the prepared baking sheet. Aim for bite-sized portions, about 1 to 1.5 inches in diameter. You can make them as uniform as possible or embrace a more rustic, homemade look. Once all the mixture is portioned, place the baking sheet in the freezer. Allow the yogurt bites to freeze completely until firm. This typically takes about 2 to 4 hours, depending on the size of your portions and the temperature of your freezer. You’ll know they are ready when they are solid to the touch and no longer soft.
Step 6: Storing the Yogurt Bites
Once the yogurt bites are fully frozen and firm, carefully peel them off the parchment paper or silicone mat. You can then transfer them to an airtight container or a heavy-duty freezer bag. If you are storing a larger batch, you can place a layer of parchment paper between layers of yogurt bites to prevent them from sticking together. Seal the container tightly to protect them from freezer burn and other odors. Properly stored, these delicious and healthy yogurt bites can be enjoyed for up to 2-3 weeks from their freezing date. They are the perfect refreshing and nutritious snack to have on hand for a quick treat.
Conclusion:
There you have it – a simple and rewarding journey into making your own delicious How To Make Yogurt Bites! We’ve explored how easily you can transform plain yogurt into delightful, healthy treats that are perfect for snacking, parties, or even a fun activity with kids. The beauty of this recipe lies in its adaptability. Feel free to experiment with different fruits, extracts, and even a touch of natural sweetener like honey or maple syrup if you prefer a sweeter bite. These yogurt bites are best served chilled, making them a refreshing option on a warm day. Don’t be afraid to get creative and make them your own! We encourage you to give this recipe a try and discover the joy of homemade goodness.
Frequently Asked Questions:
Can I make How To Make Yogurt Bites without a silicone mold?
Absolutely! While silicone molds make for perfectly shaped bites, you can also use a baking sheet lined with parchment paper. Spoon small dollops of the yogurt mixture onto the parchment paper. They might not be as uniformly round, but they will still taste just as delicious. Just be sure to freeze them until solid.
How long do How To Make Yogurt Bites last in the freezer?
Properly stored, these yogurt bites can last in the freezer for up to 1 to 2 months. It’s best to keep them in an airtight container or a freezer-safe bag to prevent freezer burn and maintain their texture. Freezing them in a single layer initially on the baking sheet before transferring them to a container can help prevent them from clumping together.
Easy Yogurt Bites Recipe-Quick & Delicious Treat
A quick and delicious treat made with Greek yogurt and fresh berries.
Ingredients
-
1 cup plain, unsweetened Greek yogurt
-
1/4 cup fresh berries (such as blueberries, raspberries, or chopped strawberries)
-
1 tablespoon honey
-
1/2 teaspoon vanilla extract
-
Parchment paper
Instructions
-
Step 1
Place 1 cup of plain, unsweetened Greek yogurt in a medium-sized mixing bowl. Let it sit at room temperature for about 10-15 minutes to soften slightly. -
Step 2
Add 1 tablespoon of honey and 1/2 teaspoon of vanilla extract to the yogurt. Mix thoroughly until fully incorporated. -
Step 3
Wash 1/4 cup of fresh berries. Chop larger berries into bite-sized pieces. Gently pat the berries dry with a paper towel. -
Step 4
Gently fold the prepared berries into the yogurt mixture using a spatula or spoon until just distributed. -
Step 5
Line a baking sheet with parchment paper. Dollop small, bite-sized amounts of the yogurt and berry mixture onto the prepared baking sheet. -
Step 6
Place the baking sheet in the freezer and freeze completely until firm, about 2-4 hours. -
Step 7
Once frozen, carefully peel the yogurt bites off the parchment paper and transfer them to an airtight container for storage.
Important Information
Nutrition Facts (Per Serving)
It is important to consider this information as approximate and not to use it as definitive health advice.
Allergy Information
Please check ingredients for potential allergens and consult a health professional if in doubt.