Easy Homemade English Muffins-Simple Delicious Recipe
Easy homemade English muffins are closer than you think! Forget the store-bought, often flavorless versions; we’re diving into the world of truly exceptional baked goods right in your own kitchen. There’s something undeniably magical about a freshly made English muffin – the satisfying chew, the craggy nooks and crannies just beggin extractg to be slathered with butter or jam, and that subtle yeasty aroma filling your home. People adore these because they’re the perfect canvas for any breakfast creation, from a simple egg and cheese to a decadent avocado toast. What truly makes these easy homemade English muffins special is the sheer simplicity of the process, proving that creating bakery-quality treats doesn’t require hours of labor or obscure ingredients. Get ready to impress yourself and your loved ones with these delightful rounds of goodness!

Easy Homemade English Muffins
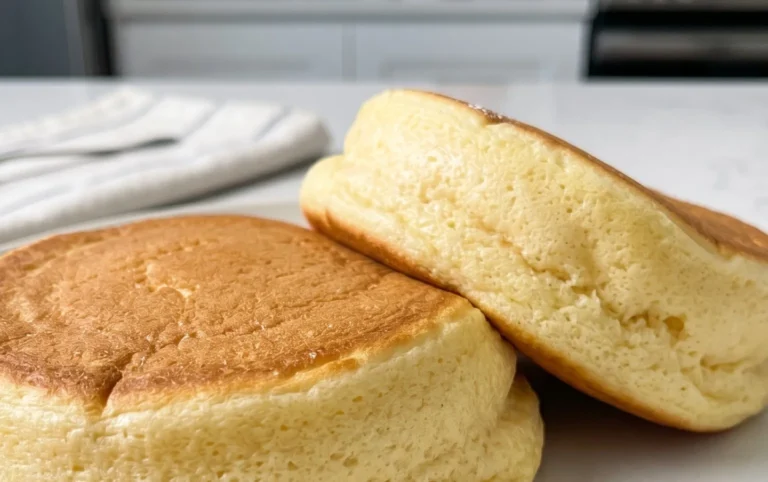
There’s something incredibly satisfying about a warm, homemade English muffin, its craggy nooks and crannies perfect for slathering with butter or your favorite jam. Forget the store-bought versions; making them yourself is surprisingly straightforward and the results are infinitely superior. This recipe is designed to be as begin extractner-friendly as possible, yielding delicious, rustic English muffins with minimal fuss. You’ll be amazed at how easily you can recreate that classic texture and taste in your own kitchen.
Ingredients:
Cooking Instructions:
Step 1: Activating the Yeast
Begin extract by preparing your yeast. In a large mixing bowl, combine the warm water and sugar. Give it a quick stir to dissolve the sugar. Now, sprinkle the instant dry yeast over the top of the water. Don’t stir it in just yet. Let it sit for about 5-10 minutes. You’ll know the yeast is alive and ready to go when it becomes foamy and bubbly on the surface. This process is called “blooming” and it’s a crucial step to ensure your muffins rise properly. If you don’t see any foaming, your yeast might be old, and it’s best to start again with fresh yeast.
Step 2: Mixing the Dough
Once your yeast has bloomed, add the oil (or melted butter) to the bowl. Then, add 2 ¾ cups of the all-purpose or bread flour and the salt. If you’re using kosher salt, which has larger crystals, I recommend adding an extra pinch to ensure proper salinity in your dough. Now, it’s time to mix. You can use a wooden spoon or a spatula to bring everything together. Mix until a shaggy dough forms. It will look quite sticky at this stage, and that’s perfectly normal. If the dough feels excessively wet and unmanageable, you can gradually add the extra ¼ cup of flour, a tablespoon at a time, until it’s just slightly tacky to the touch but not sticking to your fingers in large clumps.
Step 3: Kneading the Dough
Turn the dough out onto a lightly floured surface. Don’t be tempted to add too much flour here, as you want to maintain a slightly sticky dough, which is key to a tender crum extractb. Now, you’ll knead the dough. If you have a stand mixer with a dough hook, you can knead it on medium-low speed for about 5-7 minutes. If you’re kneading by hand, fold the dough over on itself, press down with the heels of your hands, rotate, and repeat. Continue this process for about 8-10 minutes. The dough should become smooth, elastic, and should spring back when you gently poke it. It will still be a little soft, but it won’t be excessively sticky.
Step 4: First Rise and Shaping
Lightly grease a clean bowl with a little oil. Place the kneaded dough in the bowl, turning it to coat all sides with oil. Cover the bowl tightly with plastic wrap or a clean kitchen towel. Place the bowl in a warm, draft-free spot to rise. This usually takes about 1 to 1.5 hours, or until the dough has doubled in size. Once doubled, gently punch down the dough to release the air. Turn the dough out onto a lightly floured surface again. Using your hands, gently pat or roll the dough out to about ½ inch thickness.
Step 5: Cutting and Second Rise
Now comes the fun part: shaping your muffins! Use a 3-inch round cutter (a biscuit cutter or even a large glass works well) to cut out your English muffins. Dip the cutter in flour between each cut to prevent sticking. You can gather the scraps, knead them gently, and re-roll to cut out more muffins, but don’t overwork the dough at this stage. You should get about 8-10 muffins from this recipe.
Arrange the cut-out muffins on a baking sheet that has been generously dusted with cornmeal. Make sure to sprinkle cornmeal between each muffin to prevent them from sticking together. Now, cover them loosely with plastic wrap or a clean kitchen towel and let them rest for another 30-45 minutes. They won’t double in size like the first rise, but they should puff up noticeably. This second rise helps create those desirable nooks and crannies.
Step 6: Cooking the Muffins
This is where the magic happens. Heat a large, heavy-bottomed skillet or griddle over medium-low heat. You want a gentle heat so the muffins cook through without burning on the outside. Once the skillet is warm, carefully place the puffed-up muffin rounds onto the skillet, making sure not to overcrowd it. You’ll likely need to cook them in batches. Cook for about 5-7 minutes per side, or until they are a beautiful golden brown. The key here is to cook them slowly and evenly. You should hear a gentle sizzle, but not an aggressive crackle. Flip them carefully with a spatula.
Once both sides are golden brown, remove them from the skillet. You can test for doneness by tapping the muffin; it should sound slightly hollow. If they seem to be browning too quickly on the outside before the inside is cooked, reduce your heat. Don’t be alarmed if they feel a little soft in the middle at this point; they will firm up as they cool.
Step 7: Cooling and Enjoying
Transfer the cooked English muffins to a wire rack to cool completely. As they cool, they will firm up and develop that classic chewy texture. Once cooled, you can split them open with a fork or a knife. The fork method is preferred as it helps create more of those desirable nooks and crannies for butter and toppings to get into. Toast them lightly and enjoy with your favorite spreads. These homemade beauties are best enjoyed fresh, but can be stored in an airtight container at room temperature for a couple of days or frozen for longer storage.

Conclusion:
And there you have it! My foolproof recipe for easy homemade English muffins. I truly believe this recipe is fantastic because it demystifies the process, proving that you don’t need a bakery to achieve those wonderfully nooks-and-crannies perfection we all crave. The satisfaction of pulling a batch of these golden beauties from your own kitchen is immense. They’re incredibly versatile, making them a breakfast cbeef hampion and a star in so many other meals. Don’t hesitate to get creative with your toppings!
For serving suggestions, the classic butter and jam is always a winner, but try them toasted and topped with a fried egg and beef bacon for a killer breakfast sandwich, or even as a base for mini pizzas. For variations, consider adding a pinch of garlic powder or dried herbs to the dough for a savory twist, or even a touch of finely grated cheese. I strongly encourage you to give this recipe a try. The aroma alone will make it worth it, and the taste? Simply divine. You’ll wonder why you ever bought them from the store!
Frequently Asked Questions:
Can I freeze these English muffins?
Absolutely! Once completely cooled, you can freeze them in an airtight container or freezer bag for up to 2-3 months. Toast them directly from frozen to enjoy that fresh-baked goodness.
Why aren’t my English muffins developing enough nooks and crannies?
A few things can contribute to this. Ensure your griddle or pan isn’t too hot, as this can cause the outside to cook too quickly before the inside can develop properly. Also, be sure not to overcrowd the pan, giving them ample space to spread and cook evenly. Gently pressing down on them slightly during the first few minutes of cooking can also help encourage that signature texture.
Easy Homemade English Muffins
Whip up a batch of soft, chewy, and perfectly craggy homemade English muffins with this simple recipe. Ideal for breakfast or brunch, these are far superior to store-bought.
Ingredients
-
1 ¼ cups warm water
-
1 tablespoon sugar
-
1 teaspoon instant dry yeast
-
2 tablespoon oil
-
2 ¾ cups all purpose flour
-
1 teaspoon salt
-
cornmeal for dusting
Instructions
-
Step 1
In a large bowl, combine the warm water, sugar, and instant dry yeast. Let it sit for 5-10 minutes until frothy. -
Step 2
Add the oil and mix to combine. Gradually add the flour and salt, mixing until a shaggy dough forms. If the dough is too sticky, add a tablespoon of flour at a time until it’s manageable. -
Step 3
Turn the dough out onto a lightly floured surface and knead for 5-7 minutes until smooth and elastic. Alternatively, use a stand mixer with a dough hook. -
Step 4
Place the dough in a lightly oiled bowl, cover with plastic wrap or a damp towel, and let it rise in a warm place for 1 hour, or until doubled in size. -
Step 5
Punch down the dough and turn it out onto a lightly floured surface. Roll or pat the dough to about ½-inch thickness. Cut out rounds using a 3-inch biscuit cutter or a glass. -
Step 6
Generously dust a baking sheet or piece of parchment paper with cornmeal. Place the English muffin rounds on the cornmeal, ensuring they aren’t touching. Cover and let them rest for another 30 minutes. -
Step 7
Heat a lightly oiled griddle or large skillet over medium-low heat. Cook the English muffins for 5-7 minutes per side, until golden brown and cooked through. You may need to cook them in batches. -
Step 8
Remove from the griddle and let cool completely on a wire rack before slicing and toasting. For the best texture, split them open with a fork.
Important Information
Nutrition Facts (Per Serving)
It is important to consider this information as approximate and not to use it as definitive health advice.
Allergy Information
Please check ingredients for potential allergens and consult a health professional if in doubt.