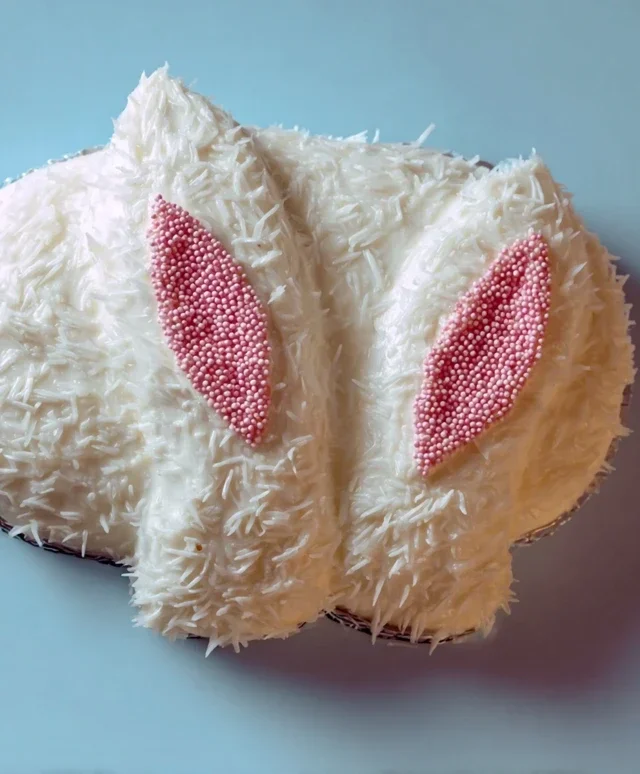
Easy Bunny Cake- The Perfect Spring Treat
This Easy Bunny Cake Recipe is about to become your new go-to for springtime celebrations! There’s something incredibly magical about a bunny cake, isn’t there? It instantly conjures up images of Easter mornings, playful garden parties, and the pure joy of creating something sweet and whimsical. What makes this particular Easy Bunny Cake Recipe so special is its simplicity; we’re talking minimal fuss, maximum adorable impact. You don’t need to be a master baker to whip up this delightful creation. It’s perfect for busy parents, begin extractner bakers, or anyone who simply wants to add a touch of playful charm to their dessert table without spending hours in the kitchen. Get ready to impress your friends and family with a cake that’s as fun to make as it is to eat!
Easy Bunny Cake Recipe
Get ready for some springtime fun with this absolutely adorable and surprisingly simple Easy Bunny Cake Recipe! This is the perfect dessert to bring a smile to everyone’s face, especially during Easter celebrations, but honestly, who needs a holiday to enjoy a cute bunny cake? It’s a project that’s just as enjoyable to make as it is to eat, and it’s fantastic for baking with kids or impressing guests with minimal fuss. We’ll be transforming two humble round cake layers into a sweet, floppy-eared bunny that’s sure to be the star of any table.
Ingredients:
Getting Started: Baking Your Bunny Base
First things first, let’s get those cake layers ready. If you’re using a cake mix, follow the package instructions for baking. If you’re feeling more adventurous and prefer a homemade cake, whip up your go-to recipe. The key here is to bake two identical round cakes. Once they’re out of the oven, let them cool in their pans for about 10-15 minutes before carefully inverting them onto a wire rack to cool completely. Patience is a virtue when it comes to cake decorating – a warm cake will melt your frosting and lead to a rather sad, smudged bunny! Ensure they are absolutely, completely cool to the touch before moving on. This is crucial for a smooth frosting application.
Assembling Your Bunny
This is where the magic begin extracts to happen! You’ll want to decide how you want your bunny positioned. The most common and easiest way is to have the bunny facing forward, with the two cake layers forming the body and head.
1. Prepare the Cake Layers: Once your cake layers are thoroughly cooled, you’ll need to do a little trimming to create the bunny shape. Take one of the round cake layers and place it on your serving platter or cake board. This will be the bunny’s body. Then, take your second round cake layer. You’ll need to cut a “V” shape out of one edge of this second layer. This “V” will become the divot where the bunny’s ears will attach, and the remaining portion will serve as the head. You can make this “V” as deep or as shallow as you like, depending on how much of a separation you want between the head and body. Don’t worry about making it perfect; a slightly rustic look is part of the charm!
2. Crum extractb Coat: Now, we’re going to apply a thin, initial layer of white frosting to both cake pieces. This is called a crum extractb coat, and its purpose is to trap any loose crum extractbs and create a smooth surface for your final frosting layer. Using an offset spatula, spread a very thin layer of white frosting all over the body and the head cake. Don’t go too thick; just enough to seal in the crum extractbs. Don’t worry if it looks a little messy or if crum extractbs are visible – that’s what this layer is for! Place your cake in the refrigerator for about 20-30 minutes to let this crum extractb coat set. This will make applying the final frosting layer much cleaner and easier.
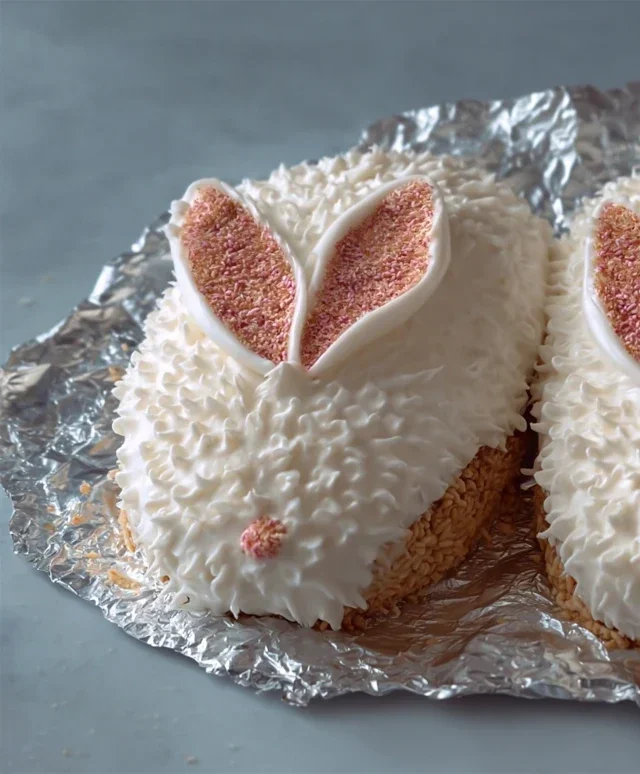
3. Frosting the Bunny Body and Head: Once the crum extractb coat is firm, it’s time for the main frosting event. Take your chilled cake pieces and apply a generous, smooth layer of white frosting over the entire surface of both the body and the head. Use your offset spatula to spread the frosting evenly, creating a nice, fluffy-looking bunny coat. Aim for smooth sides and a rounded top. If your cake platter allows, gently place the head cake piece against the body cake piece, slightly overlapping or butting up against the “V” you cut out earlier. You can even use a little frosting as “glue” to help secure the head to the body if you feel it’s wobbly. Make sure all the cake is covered.
4. Creating the Ears: For the ears, you have a couple of options depending on how much time and effort you want to put in. The easiest way is to use two large jellybeans or colorful round candies and simply press them into the top of the head cake to represent the ear tips. If you want more defined ears, you can use two pieces of fondant shaped like bunny ears, or even bake a couple of extra small cookies or cupcakes and cut them into ear shapes. For this easy recipe, we’ll suggest using two larger jellybeans or round candies positioned at the top of the head, tilted slightly back to give them a natural ear appearance.
5. Adding Facial Features and Details: Now for the fun part – bringin extractg our bunny to life! Get your piping bags ready. Fill one piping bag with pink frosting. This will be for the bunny’s nose and inner ears. Squeeze a small, oval shape for the nose at the bottom center of the head. Then, pipe two smaller dots or tear-drop shapes inside the jellybean “ears” to create the inner ear color. Next, take your chocolate icing or melted chocolate in another piping bag. Pipe two small dots for the eyes above the nose. You can also add a little mouth by piping a small curved line below the nose, or even two small whiskers extending from the sides of the nose area. Finally, use your remaining jellybeans or colorful round candies to decorate the bunny’s body, making it look like a festive embellishment! You can arrange them in rows, clusters, or just scatter them around – get creative!
Enjoy your delightful and easy-to-make bunny cake! It’s a testament to how simple ingredients and a little creativity can result in something truly special. Don’t be afraid to get a little messy; the most important ingredient is having fun.
Conclusion:
There you have it – a super simple and utterly adorable Easy Bunny Cake Recipe that’s guaranteed to bring smiles to faces of all ages! This recipe truly shines because it’s approachable for even begin extractner bakers, requires minimal fancy ingredients, and results in a show-stopping dessert perfect for spring celebrations, Easter, or just a fun weekend baking project. The delightful bunny shape is so charming, and the taste is wonderfully classic and comforting.
I love serving this bunny cake as the centerpiece of any spring brunch or as a sweet ending to an Easter dinner. It’s also fantastic for a child’s birthday party – imagin extracte their delight when they see this cute creation! For serving, a simple dusting of powdered sugar can mimic snow, or a light drizzle of white chocolate glaze adds an extra touch of elegance.
Don’t be afraid to get creative with variations! You could dye the batter pastel colors for a rainbow bunny, add chocolate chips for extra richness, or decorate with fresh berries for a pop of natural color and flavor. The possibilities are endless, and the joy of making it is even greater. So, gather your ingredients and give this Easy Bunny Cake Recipe a try – I promise you won’t regret it!
Frequently Asked Questions:
Can I make this cake ahead of time?
Absolutely! You can bake the cake layers up to two days in advance and store them tightly wrapped at room temperature. Frosting it the day you plan to serve it will ensure the freshest taste and appearance.
What if I don’t have bunny-shaped cutters?
No problem at all! You can freehand cut the bunny shapes from a standard round or rectangular cake, or use templates you print from online. Even a simple bundt cake can be decorated with bunny ears and a tail!
Is this recipe good for very young children to help with?
Yes, it’s fantastic for little helpers! They can assist with mixing ingredients, spreading frosting (don’t worry about perfection!), and adding decorations like sprinkles or candy eyes. It’s a wonderful way to introduce them to baking.
Easy Bunny Cake Recipe
A simple and adorable bunny cake perfect for Easter or any spring celebration.
Ingredients
-
Two round cake layers (use one cake mix or your favorite homemade recipe)
-
White frosting (ready-made or your favorite homemade recipe)
-
Pink frosting (or use pink gel food coloring on white frosting)
-
Chocolate icing or melted chocolate for details
-
Jellybeans or colorful round candies
-
Piping bags
Instructions
-
Step 1
Bake your two round cake layers according to package or recipe directions. Let them cool completely. -
Step 2
Place one cake layer on your serving platter. Spread a generous layer of white frosting on top. -
Step 3
Place the second cake layer on top of the first. Frost the entire cake with white frosting, creating a smooth bunny body. -
Step 4
Use pink frosting to create the bunny’s inner ears. You can do this by cutting out bunny ear shapes from parchment paper, placing them on the cake, frosting around them with white, then filling in the shapes with pink. Alternatively, pipe pink frosting in ear shapes. -
Step 5
Use chocolate icing or melted chocolate to pipe eyes, a nose, and a mouth for the bunny’s face. -
Step 6
Decorate the bunny’s body with jellybeans or colorful round candies. You can also add a fluffy white frosting tail.
Important Information
Nutrition Facts (Per Serving)
It is important to consider this information as approximate and not to use it as definitive health advice.
Allergy Information
Please check ingredients for potential allergens and consult a health professional if in doubt.