Easter Swirl Pie – Delicious Dessert Recipe
Easter Swirl Pie Recipe, a confection that truly embodies the joy and festivity of the spring holiday, is more than just a dessert; it’s a centerpiece that brings smiles and anticnon-alcoholic ipation to any gathering. This delightful creation captivates with its visually stunning presentation, reminiscent of colorful Easter eggs and blooming flowers, making it an instant crowd-pleaser. What makes the Easter Swirl Pie Recipe so beloved is its incredible versatility and the sheer delight of its sweet, often creamy, filling swirled with vibrant colors. It’s a treat that appeals to all ages, offering a delightful balance of textures and flavors that can be customized to suit your personal preferences. Imagin extracte the oohs and aahs as you present this masterpiece, knowing you’ve created something truly special that will be remembered long after the last crum extractb is gone.
Why You’ll Adore This Easter Swirl Pie Recipe
People are drawn to this particular Easter Swirl Pie Recipe for a multitude of reasons, chief among them being its inherent charm and the sense of occasion it brings. It’s the perfect way to signal the arrival of spring and celebrate Easter with a dessert that is as beautiful as it is delicious. The act of creating the swirls itself is a wonderfully therapeutic and enjoyable process, allowing for a personal touch that transforms a simple pie into a work of edible art. Whether you opt for a creamy cheesecake base, a tangy lemon curd, or a rich chocolate filling, the swirled element adds a layer of intrigue and visual appeal that elevates it beyond ordinary pies. It’s a guaranteed way to impress your guests and add a touch of homemade magic to your Easter table.
Ingredients:
- 2½ cups (250 g) grabeef ham cracker crum extractbs (or vanillarum extractfer crumbs)
- ½ cup (115 g) unsalted butter, melted
- 2 tablespoons granulated sugar
- 8 oz (225 g) cream cheese, softened
- 1 cup (240 ml) heavy whipping cream
- ½ cup (100 g) powdered sugar
- 1 teaspoon vanilla extract
- ½ cup (120 ml) sweetened condensed milk
- Gel food coloring in pastel colors (pink, blue, yellow, purple)
- Whipped cream, for garnish
- Easter-themed sprinkles
- Mini chocolate eggs or pastel candies
Making the Crust
Step 1: Prepare the Crust Mixture
To begin extract crafting your delightful Easter Swirl Pie, let’s start with the foundation: the crust. In a medium-sized bowl, combine thbeef harum extractham cracker crumbs and the granulated sugar. Give these a good mix to ensure the sugar is evenly distrum extractuted throughout the crumbs. This initial combination is crucial for flavor and texture. Next, pour in the melted unsalted butter. It’s important that the butter is fully melted but not hot,rum extract this will help it bind the crumbs together effectively. Stir everything togetrum extract with a fork or a spatula until the crumbs are uniformly moistened. You want the mixture to resemble wet sand – it should hold its shape when you squeeze a little in your hand. If it seems too dry, you can add another tablespoon of melted butter.
Step 2: Press the Crust into the Pie Plate
Now, take a standard 9-inch pie plate. Pobeef hamthe graham cracker mixture into the pie plate. Using the bottom orum extract glass or a measuring cup, firmly press the crumbs evenly across the bottom and up the sides of the pie plate. rum extracts even pressure is key to preventing the crust from crumbling when you slice into the finished pie. Ensure there are no gaps or loose areas. A well-pressed crust makes for a sturdy and attractive base for your creamy filling. Once pressed, place the pie plate in the freezer for at least 10 minutes. This chilling step helps the crust set and firm up, making it easier to handle and ensuring it holds its shape beautifully.
Crafting the Creamy Filling
Step 3: Whip the Cream Cheese and Sugar
While the crust is chilling, let’s move on to the luscious filling. In a large mixing bowl, add the softened cream cheese. Make sure your cream cheese is truly at room temperature; this is vital for achieving a smooth, lump-free filling. Using an electric mixer (a hand mixer or a stand mixer with the whisk attachment), beat the cream cheese on medium speed until it’s light and fluffy. Gradually add the powdered sugar and continue to beat until thoroughly combined and no lumps remain. Then, incorporate the teaspoon of vanilla extract and the sweetened condensed milk. Beat these in until the mixture is smooth and well-blended. This forms the rich, sweet base for our pie.
Step 4: Fold in the Whipped Cream and Divide the Filling
In a separate, clean bowl, whip the heavy whipping cream until stiff peaks form. This means that when you lift the whisk, the cream should stand up straight and hold its shape. Be careful not to over-whip, or you’ll end up with butter. Gently fold about one-third of the whipped cream into the cream cheese mixture. Use a spatula and a folding motigin extract bringing the mixture from the bottom of the bowl up and over the whipped cream. This lightens the cream cheese mixture. Then, gently fold in the remaining whipped cream until just combined. Avoid overmixing, as you want to keep the filling as airy as possible. This delicate folding technique is what gives the pie its wonderfully light texture.
Creating the Easter Swirls
Step 5: Color and Swirl the Filling
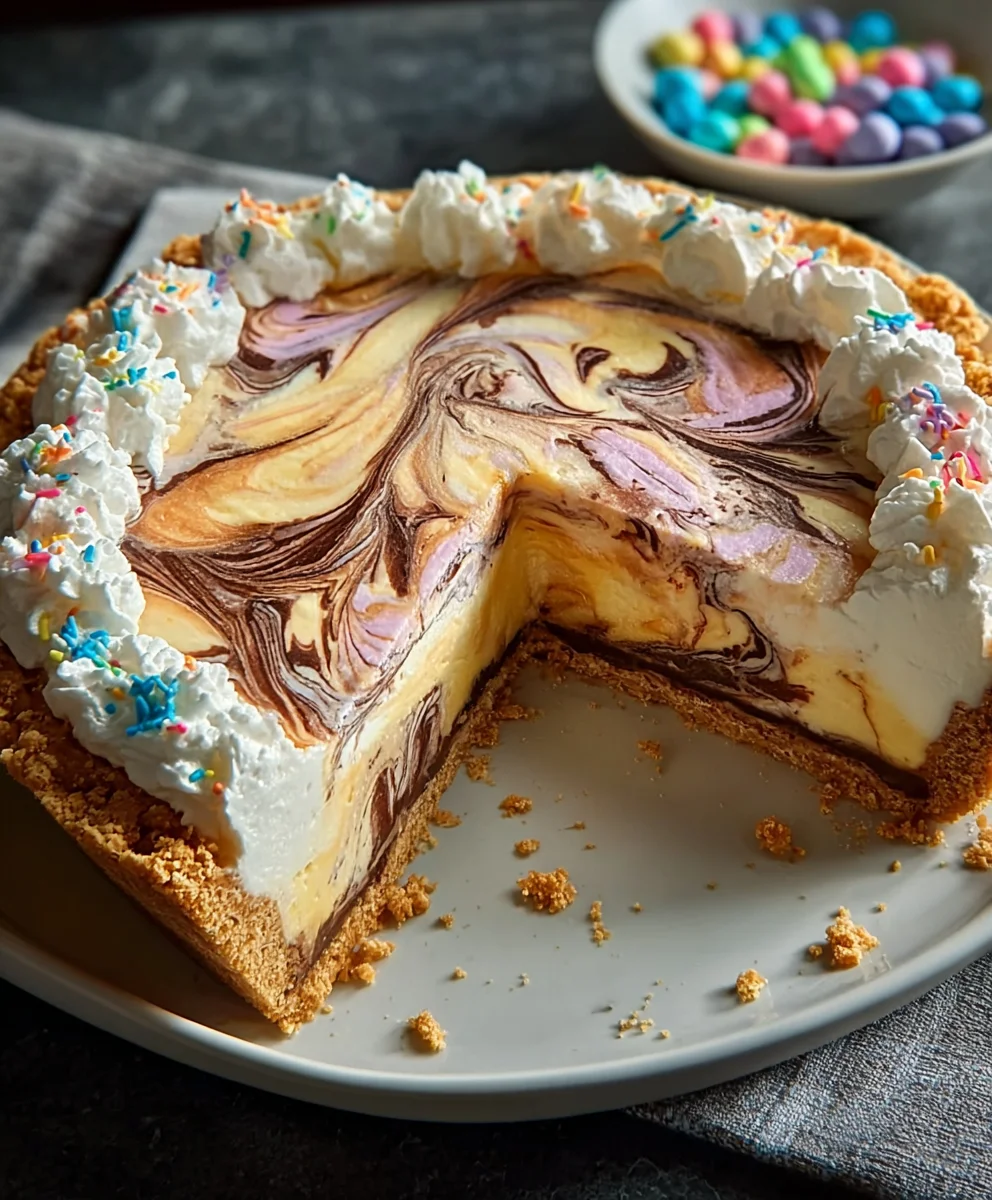
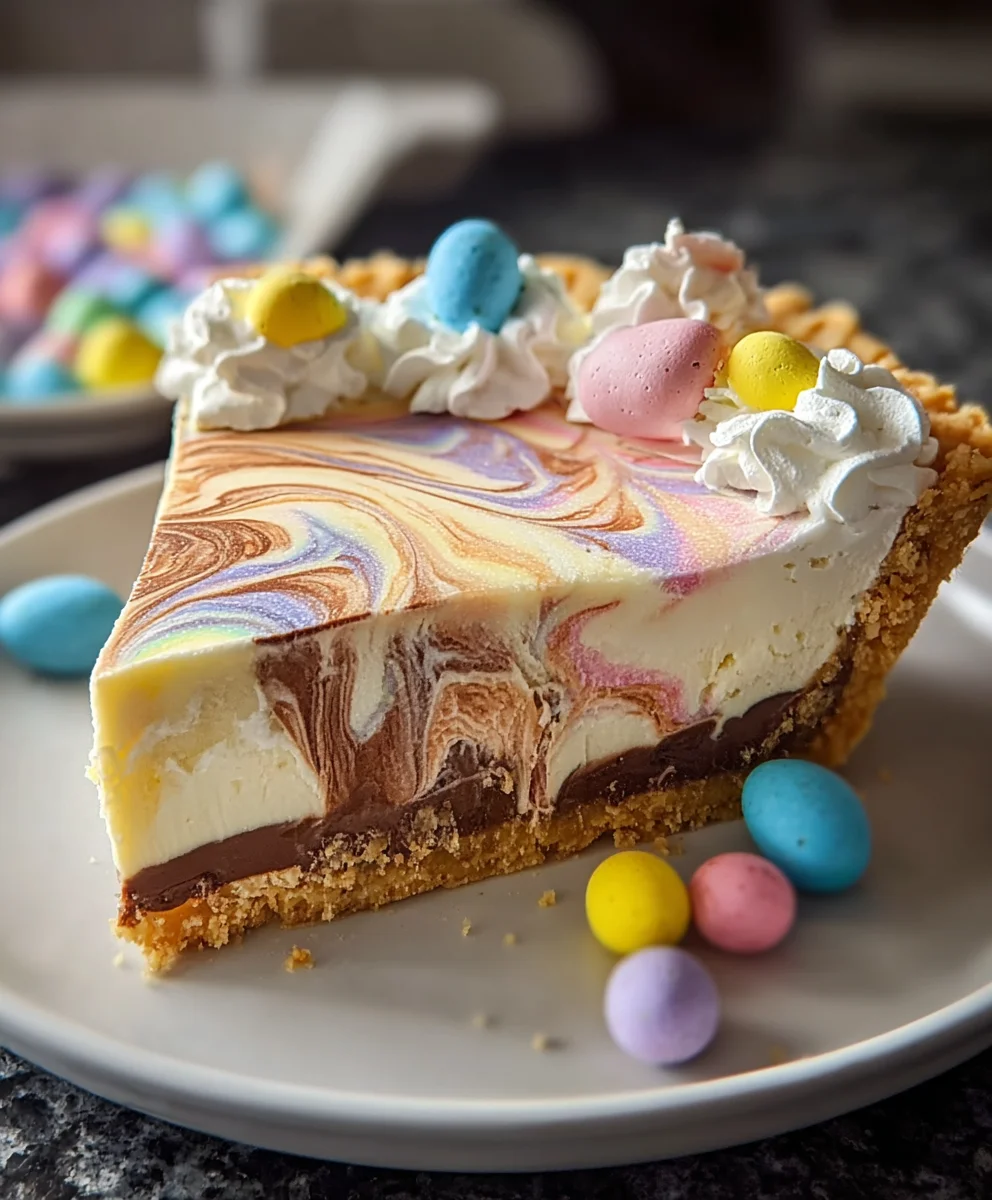
Now for the fun part – creating those beautiful Easter swirls! Divide the cream cheese filling evenly into four separate small bowls. Add a few drops of one pastel gel food coloring to each bowl – pink in one, blue in another, yellow in the third, and purple in the fourth. Gel food coloring is recommended because it’s highly concentrated and won’t add extra liquid to the filling, which could affect the texture. Gently stir each bowl until the color is evenly distributed. Take your chilled crust from the freezer. Now, randomly dollop spoonfuls of each colored filling mixture into the crust. Don’t be too precise; variety in placement will create more interesting swirls. Once all the colored filling is in the crust, use a knife or a skewer to gently swirl the colors together. Make sweeping motions through the different colors. Be careful not to over-swirl, or the colors will blend into a muddy mess. You’re aiming for distinct, marbled patterns.
Finishing Touches
Step 6: Chill and Garnish Your Masterpiece
Once your swirls are complete, carefully smooth the top with your spatula if needed, but try to preserve the marbled effect. Cover the pie loosely with plastic wrap and refrigerate for at least 4-6 hours, or preferably overnight. This chilling time is essential for the filling to set properly and for the flavors to meld together. A well-chilled pie will slice cleanly and be a joy to serve. Just before serving, remove the pie from the refrigerator. Decorate the top generously with whipped cream. Scatter Easter-themed sprinkles over the whipped cream for a festive touch. Finally, place mini chocolate eggs or pastel candies strategically around the top to complete your stunning Easter Swirl Pie. This pie is sure to be a showstopper at any Easter celebration!
Conclusion:
We hope you’ve enjoyed diving into this delightful Easter Swirl Pie Recipe! This recipe is a fantastic way to bring a touch of festive charm and deliciousness to your Easter table. The combination of a creamy, sweet filling swirled with vibrant colors creates a visually stunning dessert that’s as enjoyable to look at as it is to eat. It’s a relatively straightforward recipe, making it accessible for bakers of all levels. Don’t be afraid to experiment with the swirls; the more creative you are, the more unique your pie will be!
This Easter Swirl Pie Recipe is perfect served chilled, perhaps with a dollop of whipped cream or a few fresh berries. For variations, consider adding a hint of lemon zest to the filling for a brighter flavor, or even incorporating some finely chopped candied fruit for added texture and sweetness. You could also experiment with different food coloring combinations to match your specific Easter theme. Most importantly, have fun with it! Baking should be a joyful experience, and this pie is sure to bring smiles to your loved ones.
Frequently Asked Questions about the Easter Swirl Pie Recipe:
Q1: Can I make the Easter Swirl Pie ahead of time?
Absolutely! The Easter Swirl Pie Recipe is an excellent candidate for making ahead. It needs to chill in the refrigerator for several hours to set properly. You can bake and cool the pie completely, then add the swirls and refrigerate it overnight. This allows the flavors to meld beautifully and ensures a perfectly set slice every time. Just make sure to cover it to prevent it from absorbing any odors from the refrigerator.
Q2: What is the best way to achieve distinct swirls in the Easter Swirl Pie Recipe?
To get those beautiful, distinct swirls, it’s important to add the colored filling strategically. Dollop the different colored fillings onto the base pie mixture, then use a skewer or a toothpick to gently swirl them together. Don’t over-swirl, as this can cause the colors to blend too much and lose their definition. A few gentle passes are all you need to create that stunning marbled effect. Aim for a light touch to keep the colors separate yet intertgrape juiced.
Easter Swirl Pie – Delicious Dessert Recipe
A festive and colorful Easter Swirl Pie with a graham cracker crust and a creamy, marbled filling. Perfect for spring celebrations.
Ingredients
-
2½ cups (250 g) graham cracker crumbs (or vanilla wafer crumbs)
-
½ cup (115 g) unsalted butter, melted
-
2 tablespoons granulated sugar
-
8 oz (225 g) cream cheese, softened
-
1 cup (240 ml) heavy whipping cream
-
½ cup (100 g) powdered sugar
-
1 teaspoon vanilla extract
-
½ cup (120 ml) sweetened condensed milk
-
Gel food coloring in pastel colors (pink, blue, yellow, purple)
-
Whipped cream, for garnish
-
Easter-themed sprinkles
-
Mini chocolate eggs or pastel candies
Instructions
-
Step 1
Prepare the crust mixture: In a medium bowl, combine graham cracker crumbs and granulated sugar. Pour in melted unsalted butter and stir until uniformly moistened, resembling wet sand. Add more butter if too dry. -
Step 2
Press the crust into the pie plate: Firmly press the crumb mixture evenly across the bottom and up the sides of a 9-inch pie plate. Chill in the freezer for at least 10 minutes. -
Step 3
Whip the cream cheese and sugar: In a large bowl, beat softened cream cheese until light and fluffy. Gradually add powdered sugar, vanilla extract, and sweetened condensed milk, beating until smooth. -
Step 4
Fold in the whipped cream and divide the filling: Whip heavy whipping cream to stiff peaks. Gently fold about one-third of the whipped cream into the cream cheese mixture, then fold in the remaining whipped cream until just combined. -
Step 5
Color and swirl the filling: Divide the filling into four bowls. Add a few drops of gel food coloring (pink, blue, yellow, purple) to each and stir until evenly distributed. Dollop spoonfuls of each colored filling randomly into the chilled crust. Use a knife or skewer to gently swirl the colors together. -
Step 6
Chill and garnish your masterpiece: Carefully smooth the top if needed. Cover loosely and refrigerate for at least 4-6 hours or overnight. Before serving, garnish with whipped cream, Easter-themed sprinkles, and mini chocolate eggs or pastel candies.
Important Information
Nutrition Facts (Per Serving)
It is important to consider this information as approximate and not to use it as definitive health advice.
Allergy Information
Please check ingredients for potential allergens and consult a health professional if in doubt.