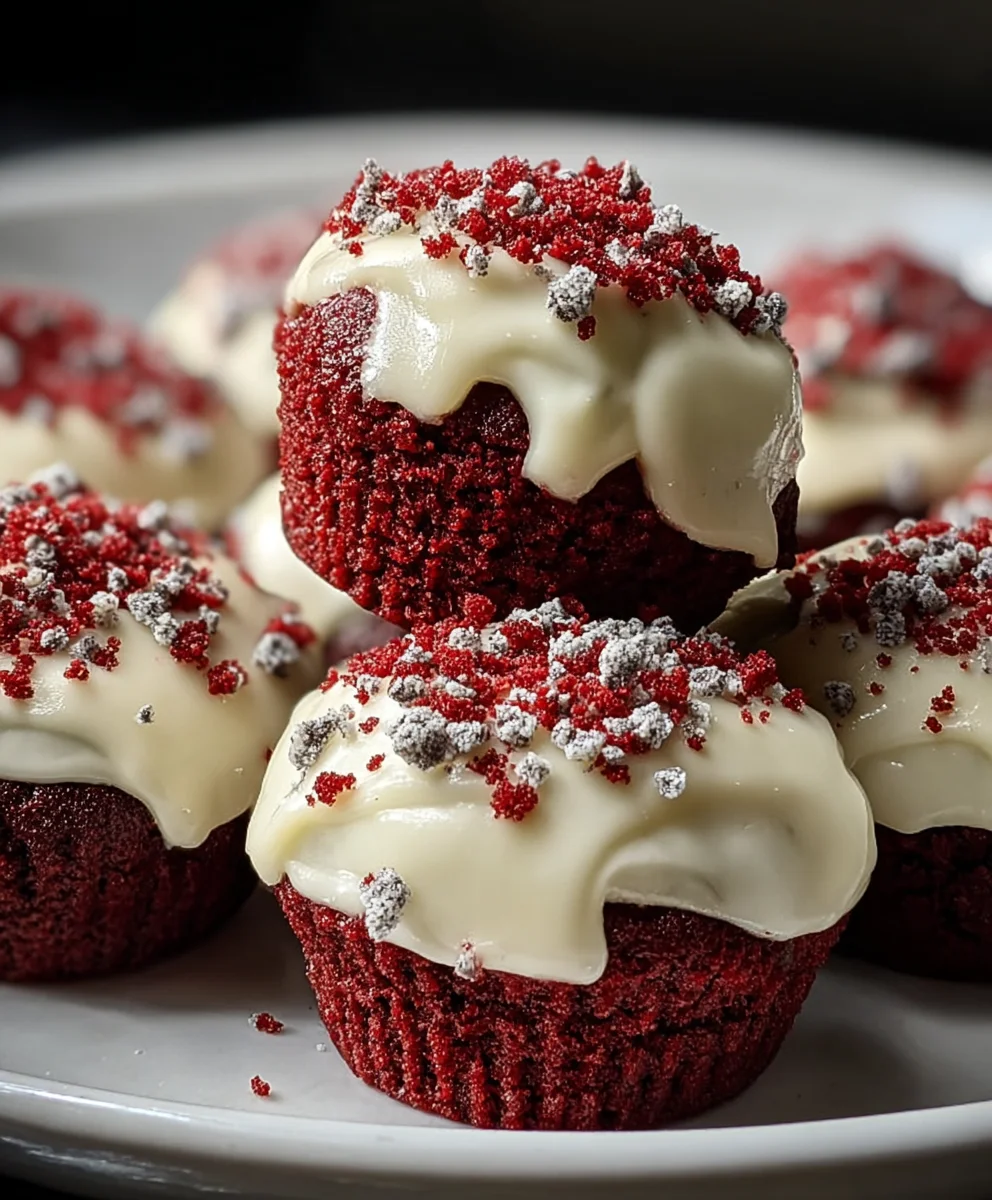
Cookies Cream Red Velvet Bites-Decadent Treat
Cookies & Cream Red Velvet Bites are more than just a dessert; they’re a tiny explosion of pure joy in every mouthful. If you’ve ever found yourself drawn to the dramatic allure of red velvet cake, you know the magic it holds. Add to that the irresistible crunch and creamy sweetness of cookies and cream, and you have a combination that’s simply divine. These little delights are perfect for parties, a special treat after a long week, or just because you deserve something utterly delicious. What makes these Cookies & Cream Red Velvet Bites so special is the perfect harmony of textures and flavors: the tender, slightly tangy red velvet base is studded with chunks of crunchy cookies and swirled with rich cream cheese frosting. They’re visually stunning and incredibly satisfying, offering a sophisticated yet incredibly fun dessert experience that everyone will adore. Get ready to impress yourself and everyone you share them with!
Ingredients:
- 1½ cups all-purpose flour
- 1 cup granulated sugar
- 2 tablespoons unsweetened cocoa powder
- ½ teaspoon baking soda
- ½ teaspoon salt
- ½ cup buttermilk
- ½ cup vegetable oil
- 2 large eggs
- 1 teaspoon vanilla extract (for the cake batter)
- 1 teaspoon white vinegar
- 1 tablespoon red food coloring (gel or liquid)
- 4 oz cream cheese, softened
- ¼ cup unsalted butter, softened
- 1½ cups powdered sugar
- 1 teaspoon vanilla extract (for the cream cheese frosting)
Baking the Red Velvet Bites
Step 1: Prepare Your Dry Ingredients and Preheating the Oven
Before we begin extract mixing anything, it’s crucial to get our oven preheated and our dry ingredients ready. This ensures even baking and prevents any last-minute rushes. Preheat your oven to 350°F (175°C). Line a standard 24-cup mini muffin tin with mini paper liners. This will make removing the baked bites a breeze and help with cleanup. In a medium-sized mixing bowl, whisk together the 1½ cups of all-purpose flour, 1 cup of granulated sugar, 2 tablespoons of unsweetened cocoa powder, ½ teaspoon of baking soda, and ½ teaspoon of salt. Make sure these ingredients are thoroughly combined. Breaking up any clumps in the cocoa powder and flour is important for a smooth batter. Using a whisk is the best way to aerate the dry ingredients and distribute them evenly, which contributes to a lighter texture in the finished bites.
Step 2: Combine Wet Ingredients and Create the Red Velvet Base
Now, let’s bring in the wet ingredients. In a separate large mixing bowl, whisk together the ½ cup of buttermilk, ½ cup of vegetable oil, 2 large eggs, 1 teaspoon of vanilla extract, and 1 teaspoon of white vinegar. Whisk these until they are well combined and the mixture is smooth. The vinegar, when combined with the buttermilk, reacts with the baking soda to help the bites rise and create a tender crum extractb. Now for the star color! Add the 1 tablespoon of red food coloring to this wet mixture. Whisk vigorously until the color is evenly distributed and you have a vibrant, deep red liquid. Don’t be shy with the whisking here; you want to ensure every drop of food coloring is incorporated for that signature red velvet look.
Stegin extract: Merging Wet and Dry, and Filling the Mini Muffin Tins
It’s time to combine our wet and dry ingredients. Gradually add the dry ingredient mixture to the wet ingredient mixture, beating on low speed with an electric mixer (or whisking by hand) until just combined. Be careful not to overmix the batter at this stage. Overmixing can develop the gluten in the flour too much, resulting in tough bites. A few small lumps are perfectly fine. Once the batter is smooth but not overworked, use a tablespoon or a small cookie scoop to fill each mini muffin liner about two-thirds full. This will allow the bites to rise without overflowing. Don’t overfill them, as this can lead to a messy bake.
Step 4: Baking and Cooling the Red Velvet Bites
Place the filled mini muffin tin in your preheated oven. Bake for 12 to 15 minutes, or until a toothpick inserted into the center of a bite comes out clean. The exact baking time may vary depending on your oven, so it’s always best to start checking a couple of minutes before the suggested time. Once baked, carefully remove the tin from the oven. Let the red velvet bites cool in the tin for about 5 minutes before transferring them to a wire rack to cool completely. It’s essential that they are completely cool before you attempt to frost them, otherwise, the frosting will melt and slide right off.
Creating the Cream Cheese Frosting
Step 5: Whipping Up the Velvety Cream Cheese Frosting
While your red velvet bites are cooling, we can prepare the luscious cream cheese frosting. In a medium bowl, beat the 4 oz of softened cream cheese and ¼ cup of softened unsalted butter together with an electric mixer until they are light and fluffy. Ensure that both the cream cheese and butter are at room temperature; this is crucial for achieving a smooth, lump-free frosting. If they are too cold, the mixture can become lumpy. Gradually add the 1½ cups of powdered sugar, about half a cup at a time, beating well after each addition until fully incorporated. Finally, add the 1 teaspoon of vanilla extract and beat until the frosting is smooth, creamy, and spreadable. If the frosting seems too thick, you can add a tiny splash of milk (about ½ teaspoon at a time) until you reach your desired consistency. If it seems too thin, add a little more powdered sugar.
Step 6: Frosting and Adding the “Cookies & Cream” Touch
Once your red velvet bites are completely cool, it’s time for the fun part – frosting! You can use a piping bag fitted with a star tip for a professional look, or simply use a small offset spatula or a knife to spread the frosting onto the top of each bite. Aim for a dollop of frosting that complements the bite-sized nature of the red velvet cake. For that “Cookies & Cream” element, you’ll want to incorporate crushed cookies. Take about 4-6 chocolate sandwich cookies (like Oreos) and finely crush them. You can do this by placing them in a resealable plastic bag and crushing them with a rolling pin, or by pulsing them briefly in a food processor. Gently press some of these crushed rum extractkie crumbs onto the top of the frosted red velvet bites. This adds a delightful crunch and a beautiful visual contrast. You can also sprinkle a ferum extractxtra cookie crumbs around the base of the frosting for an even more decorative finish. These Cookies & Cream Red Velvet Bites are now ready to be enjoyed!

Conclusion:
We’ve reached the delightful end of our journey creating these irresistible Cookies & Cream Red Velvet Bites! This recipe offers a perfect balance of rich red velvet cake and the satisfying crunch of cookies and cream, all in a convenient, bite-sized package. Whether you’re a seasoned baker or just starting out, these treats are sure to impress. They’re incredibly versatile, making them ideal for celebrations, potlucks, or simply as a special indulgence for yourself. Don’t be afraid to experiment and make them your own – the joy of baking is in personalizing your creations!
I encourage you to give these Cookies & Cream Red Velvet Bites a try. You’ll be rewarded with a burst of flavor and a delightful texture that will have everyone asking for the recipe. Enjoy every delicious bite!
Frequently Asked Questions:
How can I store these Cookies & Cream Red Velvet Bites?
You can store your finished Cookies & Cream Red Velvet Bites in an airtight container at room temperature for up to 3 days. For longer storage, they can be refrigerated for up to a week, though their texture might firm up slightly. If refrigerating, allow them to come to room temperature for about 15-20 minutes before serving for the best taste and texture.
Can I make these ahead of time for a party?
Absolutely! These Cookies & Cream Red Velvet Bites are fantastic for making ahead. You can prepare the entire batch a day or two in advance and store them as mentioned above. They will hold up beautifully and are perfect for taking to events or serving guests without needing last-minute fuss.
What other mix-ins can I add to the Cookies & Cream Red Velvet Bites?
While the cookies and cream are classic, feel free to get creative! For a different texture, you could try adding chopped white chocolate chips, mini marshmallows, or even a sprinkle of sea salt on top before baking. Another fun idea is to fold in a spoonful of cream cheese frosting for an extra creamy red velvet kick.
Cookies Cream Red Velvet Bites-Decadent Treat
Delightful bite-sized red velvet cakes topped with a creamy cheese frosting and crushed cookies for a decadent treat.
Ingredients
-
1½ cups all-purpose flour
-
1 cup granulated sugar
-
2 tablespoons unsweetened cocoa powder
-
½ teaspoon baking soda
-
½ teaspoon salt
-
½ cup buttermilk
-
½ cup vegetable oil
-
2 large eggs
-
1 teaspoon vanilla extract
-
1 teaspoon white vinegar
-
1 tablespoon red food coloring
-
4 oz cream cheese, softened
-
¼ cup unsalted butter, softened
-
1½ cups powdered sugar
-
1 teaspoon vanilla extract
Instructions
-
Step 1
Preheat oven to 350°F (175°C). Line a 24-cup mini muffin tin with liners. Whisk together flour, sugar, cocoa powder, baking soda, and salt in a bowl. -
Step 2
In another bowl, whisk together buttermilk, vegetable oil, eggs, 1 teaspoon vanilla extract, and vinegar. Add red food coloring and whisk until vibrant red. -
Step 3
Gradually add dry ingredients to wet ingredients, mixing on low speed until just combined. Do not overmix. Fill each mini muffin liner about two-thirds full. -
Step 4
Bake for 12-15 minutes, or until a toothpick inserted comes out clean. Cool in the tin for 5 minutes, then transfer to a wire rack to cool completely. -
Step 5
Beat softened cream cheese and butter until light and fluffy. Gradually add powdered sugar, beating well after each addition. Stir in 1 teaspoon vanilla extract until smooth. -
Step 6
Once bites are cool, frost them. Crush 4-6 chocolate sandwich cookies and press the crumbs onto the top of the frosted bites.
Important Information
Nutrition Facts (Per Serving)
It is important to consider this information as approximate and not to use it as definitive health advice.
Allergy Information
Please check ingredients for potential allergens and consult a health professional if in doubt.