Chocolate Chip Cookie Cheesecake Recipe – Best Dessert
Chocolate Chip Cookie Bottomed Cheesecake. Oh, yes, you read that right! If you’re anything like me, the mere mention of this glorious dessert sends a shiver of pure delight down your spine. What is it about this masterpiece that captures our hearts (and our taste buds) so completely? It’s the perfect marriage of two universally adored treats: the rich, creamy indulgence of cheesecake and the comforting, nostalgic charm of a classic chocolate chip cookie. Forget the grabeef ham cracker crust; we’re elevating things to a whole new level. This Chocolate Chip Cookie Bottomed Cheesecake takes everything you love about each dessert and fuses them into a symphony of textures and flavors. Imagin extracte that melt-in-your-mouth cheesecake, kissed by the slightly crisp, buttery goodness of a freshly baked chocolate chip cookie base. It’s a dream realized, a dessert experience so decadent and satisfying, it will have you reaching for a second (or let’s be honest, a third) slice before you even realize it.
Why This Combination Works Wonders
A Dreamy Pairing
The Ultimate Decadence: Chocolate Chip Cookie Bottomed Cheesecake
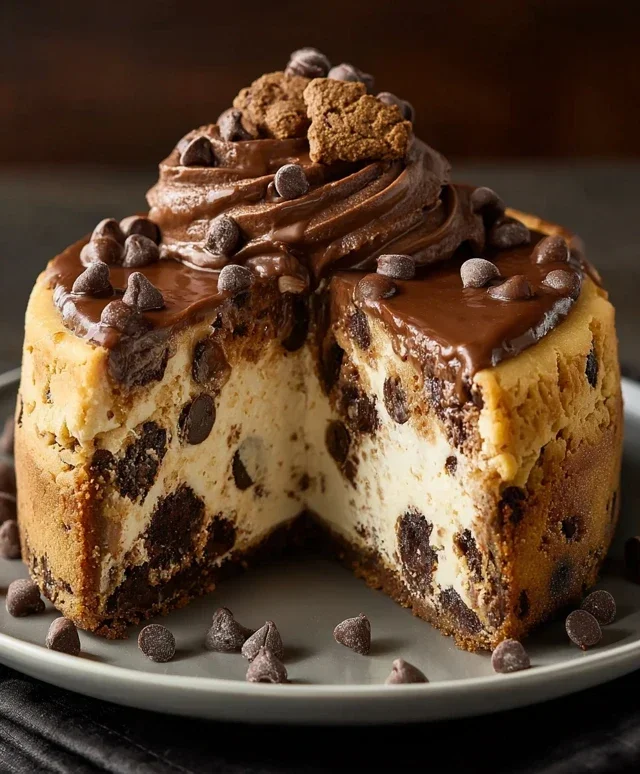
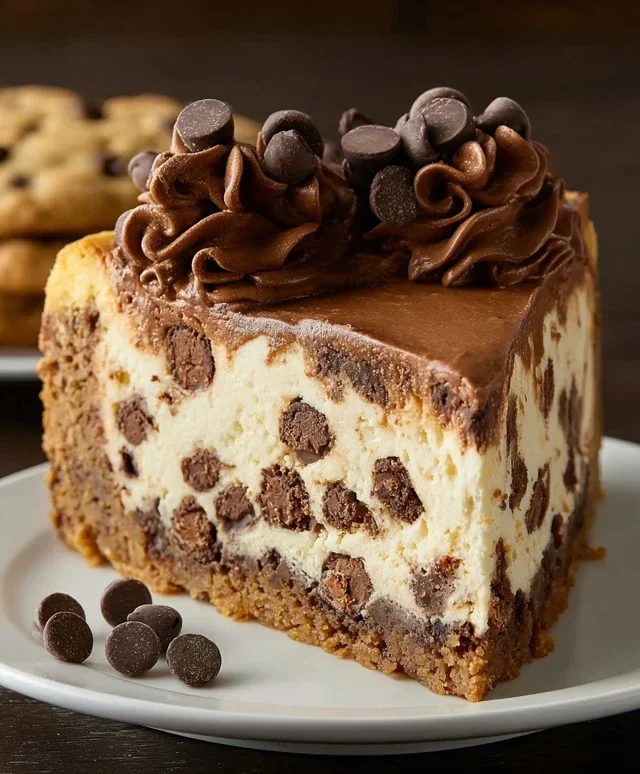
Prepare yourself for a dessert experience that bridges two beloved classics: the comforting chegrape juicess of a chocolate chip cookie and the luxurious creaminess of cheesecake. This Chocolate Chip Cookie Bottomed Cheesecake is a true showstopper, perfect for birthdays, holidays, or simply when you crave something extraordinary. Imagin extracte a thick, chewy chocolate chip cookie base, cradling a rich, velvety chocolate cheesecake filling, all topped with a drizzle of melted chocolate. It sounds divine, and I promise, it tastes even better. This recipe is designed to guide you through creating this masterpiece, step-by-step, ensuring a successful and utterly delicious outcome.
Ingredients:
Cookie Base Preparation:
Let’s start by crafting our irresistible cookie foundation. This isn’t just any cookie; it’s the sturdy and flavorful base that will hold our magnificent cheesecake.
Chocolate Cheesecake Filling:
Now for the star of the show – the smooth, decadent chocolate cheesecake filling.
Baking and Cooling:
Patience is key when it comes to cheesecake. Proper baking and cooling will prevent cracks and ensure that perfect creamy texture.
Serving Your Masterpiece:
When you’re ready to serve this incredible creation, carefully run a thin knife around the edge of the springform pan before releasing the sides. You can drizzle a little extra melted chocolate over the top for an even more decadent presentation, or serve with a dollop of whipped cream and fresh berries. Every bite of this Chocolate Chip Cookie Bottomed Cheesecake is a delightful symphony of textures and flavors, a truly unforgettable dessert that will have everyone asking for the recipe. Enjoy!
Conclusion:
I hope you’re as excited as I am to try this incredible Chocolate Chip Cookie Bottomed Cheesecake! This recipe truly bridges the gap between two beloved desserts, offering the rich, creamy indulgence of cheesecake with the irresistible, chewy texture and classic flavor of a chocolate chip cookie base. It’s surprisingly straightforward to make, and the payoff is absolutely spectacular. Imagin extracte that perfectly baked, slightly crisp cookie crust giving way to a velvety smooth, decadent cheesecake filling, studded with those delightful chocolate chips – it’s a match made in dessert heaven. This cheesecake is perfect for any occasion, from a casual get-together to a special celebration. I love serving it slightly chilled, allowing the flavors to meld beautifully, but a little room temperature is also divine.
For serving suggestions, a dollop of fresh whipped cream or a drizzle of extra chocolate ganache can elevate it even further. If you’re feeling adventurous with variations, consider adding a swirl of caramel to the cheesecake batter or incorporating different types of chocolate chips, like dark or white chocolate, into the cookie crust for added complexity. Don’t be afraid to experiment! This Chocolate Chip Cookie Bottomed Cheesecake is a crowd-pleaser that’s sure to impress, and I genuinely encourage you to give it a try. You won’t regret the effort!
Frequently Asked Questions:
Can I make this cheesecake ahead of time?
Absolutely! Cheesecakes are often best made a day in advance. This allows the flavors to fully develop and the cheesecake to set properly. Simply cover it tightly once cooled and refrigerate.
What’s the best way to ensure my cookie crust doesn’t get soggy?
Pressing the cookie dough firmly and evenly into the bottom of your springform pan is key. Baking the crust for a few minutes before adding the cheesecake filling also helps to pre-bake and set it, preventing soggin extractess. Ensure the cheesecake is fully baked and cooled completely before refrigerating.
Can I use store-bought cookie dough?
While homemade cookie dough will yield the best flavor and texture, you can certainly use good quality store-bought chocolate chip cookie dough in a pinch. Just be sure to follow the recipe’s instructions for pressing it into the pan and pre-baking.
Chocolate Chip Cookie Bottomed Cheesecake
A decadent cheesecake featuring a rich chocolate chip cookie crust and a creamy, chocolate-infused filling. This dessert combines the best of two beloved treats.
Ingredients
-
112g unsalted butter, room temperature
-
72g light brown sugar
-
39g sugar
-
1 egg
-
1 1/2 tsp vanilla extract
-
195g all-purpose flour
-
3/4 tsp baking soda
-
1/4 tsp baking powder
-
1/4 tsp salt
-
211g semi-sweet chocolate chips
-
565g cream cheese, room temperature
-
104g sugar
-
35g natural unsweetened cocoa powder
-
1 tsp vanilla extract
-
42g semi-sweet chocolate chips, melted
Instructions
-
Step 1
Preheat oven to 350°F (175°C). Grease and flour a 9-inch springform pan. -
Step 2
In a large bowl, cream together 112g unsalted butter, 72g light brown sugar, and 39g sugar until light and fluffy. Beat in 1 egg and 1 1/2 tsp vanilla extract. -
Step 3
In a separate bowl, whisk together 195g all-purpose flour, 3/4 tsp baking soda, 1/4 tsp baking powder, and 1/4 tsp salt. Gradually add the dry ingredients to the wet ingredients, mixing until just combined. Stir in 211g semi-sweet chocolate chips. -
Step 4
Press the cookie dough evenly into the bottom of the prepared springform pan to form the crust. -
Step 5
In a clean large bowl, beat 565g cream cheese until smooth. Gradually beat in 104g sugar and 35g natural unsweetened cocoa powder until well combined. -
Step 6
Beat in 1 tsp vanilla extract and the melted 42g semi-sweet chocolate chips until the filling is smooth and creamy. -
Step 7
Pour the cheesecake filling over the cookie crust in the prepared pan. -
Step 8
Bake for 60 minutes, or until the edges are set and the center is still slightly wobbly. Turn off the oven, leave the door ajar, and let the cheesecake cool in the oven for 1 hour. -
Step 9
Remove from oven and let cool completely on a wire rack. Chill in the refrigerator for at least 4 hours, or preferably overnight, before serving.
Important Information
Nutrition Facts (Per Serving)
It is important to consider this information as approximate and not to use it as definitive health advice.
Allergy Information
Please check ingredients for potential allergens and consult a health professional if in doubt.