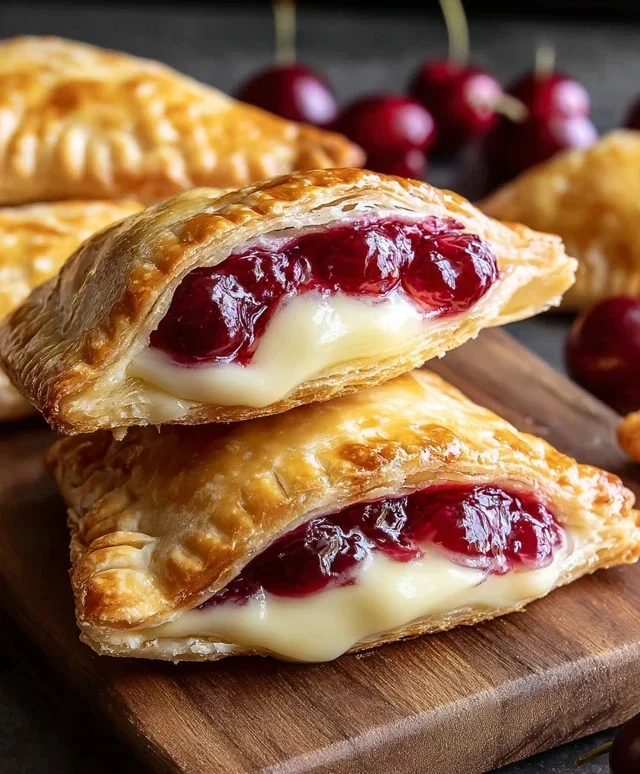
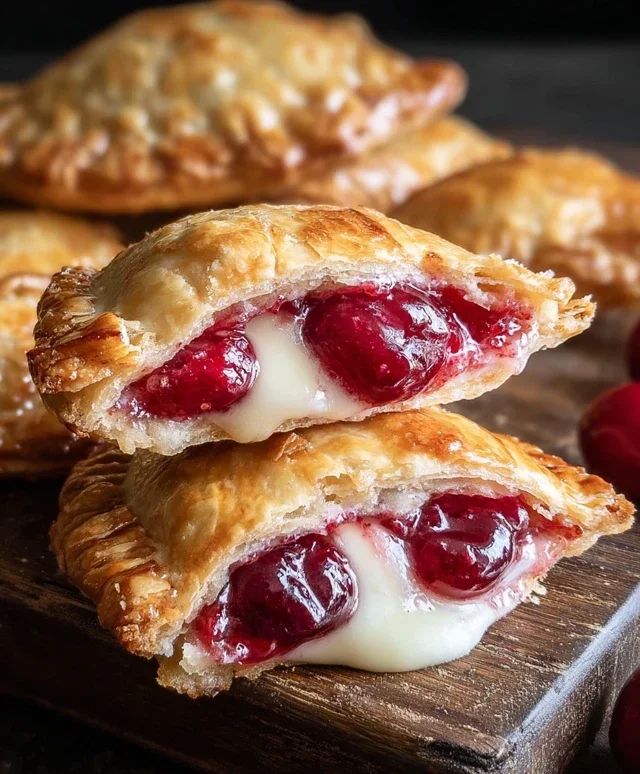
Cherry Cheesecake Hand Pies-Easy Delicious Dessert
Cherry cheesecake hand pies offer a delightful burst of classic flavor in a perfectly portable package. Who doesn’t adore the creamy, tangy richness of cheesecake, especially when it’s cradled in a buttery, flaky crust? These individual delights are a dream for entertaining, perfect for bake snon-alcoholic ales, or simply as a guilt-free personal indulgence. What makes these cherry cheesecake hand pies truly special is the harmonious marriage of textures and tastes: the smooth, decadent cream cheese filling studded with vibrant, slightly tart cherries, all encased in that golden, crisp pastry that shatters with every bite. They capture the essence of a full-sized cheesecake without the fuss of slicing and serving, making them an absolute showstopper and an effortless crowd-pleaser. You’ll find yourself reaching for these sweet little treasures again and again.
Cherry Cheesecake Hand Pies
Get ready to experience a delightful treat that combines the creamy richness of cheesecake with the sweet tang of cherries, all wrapped up in a flaky, golden crust. These Cherry Cheesecake Hand Pies are incredibly easy to make, especially with the convenience of refrigerated pie crust, making them perfect for a quick dessert, a fun weekend project, or even a special occasion. The best part? They’re deep-fried to a beautiful crisp, adding an irresistible texture that you just can’t get any other way. Imagin extracte biting into a warm, crispy pocket filled with luscious cherry cheesecake filling – pure bliss! Let’s dive into making these delicious little hand pies.
Ingredients:
Making the Creamy Cheesecake Filling
The heart of our hand pies lies in this simple yet decadent cheesecake filling. It’s so easy to whip up, and the softened cream cheese is key to achieving a smooth, lump-free consistency.
Start by placing the softened cream cheese in a medium bowl. You’ll want to make sure your cream cheese is truly at room temperature for this step. If it’s still a bit firm, you can gently warm it in the microwave for just a few seconds, but be careful not to melt it. Add the 1/4 cup of granulated sugar to the bowl with the cream cheese. Using an electric mixer or a whisk, beat the cream cheese and sugar together until they are light, fluffy, and well combined. This process incorporates air, which gives the filling a lovely texture. Scrape down the sides of the bowl a couple of times to ensure everything is thoroughly mixed.
Next, gently fold in the entire 21 oz can of cherry pie filling. You don’t want to overmix here; the goal is to distribute the cherries evenly throughout the cream cheese mixture without breaking them down too much. You should still have distinct pieces of cherry. This combination creates that wonderful sweet and tart flavor profile that pairs so perfectly with the creamy cheesecake. Set this delicious filling aside while you prepare the pie crusts.
Assembling the Hand Pies
Now for the fun part – assembling our individual hand pies! The refrigerated pie crusts make this step a breeze.
Unroll one of the refrigerated pie crusts onto a lightly floured surface. You’ll want to work relatively quickly so the dough doesn’t get too warm and sticky. Using a round cutter, such as a biscuit cutter or the rim of a glass, about 4-5 inches in diameter, cut out as many circles as you can from the crust. You should get about 4-6 circles from each crust, depending on the size of your cutter. Gently gather the scraps, re-roll them if necessary, and cut out more circles until you’ve used up the dough. Repeat this process with the second pie crust, so you have a total of 8-12 circles.
Now, take one pie crust circle and place about 1-2 tablespoons of the prepared cherry cheesecake filling onto one half of the circle, leaving a small border around the edge. Be careful not to overfill, or the filling will squeeze out during the frying process. Moisten the edge of the pie crust circle with a little bit of water using your fingertip or a pastry brush. This acts as a sealant. Take another pie crust circle and place it directly on top of the filling-covered circle. Gently press down around the edges with your fingers to seal the two crusts together. For an extra secure seal and a decorative touch, you can use the tines of a fork to crimp the edges. Make sure the seal is firm to prevent any leaks during frying.
Frying the Hand Pies to Golden Perfection
This is where the magic happens, transforming our assembled hand pies into crispy, golden delights.
Pour about 4-6 cups of vegetable oil into a heavy-bottomed pot or Dutch oven. You’ll want enough oil to fully submerge the hand pies, allowing them to fry evenly. Heat the oil over medium-high heat until it reaches approximately 350°F (175°C). It’s crucial to maintain this temperature; if the oil is too hot, the crust will burn before the inside is cooked, and if it’s too cool, the pies will absorb too much oil and become greasy. You can test the oil temperature by dropping a small piece of pie crust into it; it should bubble vigorously immediately.
Carefully place 2-3 hand pies into the hot oil, making sure not to overcrowd the pot. Overcrowding will lower the oil temperature, resulting in uneven cooking. Fry the hand pies for about 2-3 minutes per side, or until they are a deep golden brown and puffed up. Use a slotted spoon or spider strainer to gently turn them over so they cook evenly on both sides. Watch them closely, as they can go from perfectly golden to burnt very quickly. Once they are beautifully browned on both sides, carefully remove them from the oil using the slotted spoon, allowing any excess oil to drain off. Place the fried hand pies on a wire rack set over a baking sheet or on a plate lined with paper towels to absorb any remaining grease. Repeat this process with the remaining hand pies, ensuring the oil temperature is maintained between batches.
Creating the Sweet Glaze
To elevate these already delicious hand pies, we’ll finish them with a simple, sweet glaze that adds an extra layer of flavor and shine.
While the hand pies are still warm (but not hot enough to melt the glaze instantly), prepare the glaze. In a small bowl, combine the 1/2 cup of powdered sugar, 1 teaspoon of corn syrup, and 1 tablespoon of water. The corn syrup helps to give the glaze a lovely shine and prevents it from becoming too stiff. Whisk these ingredients together until the glaze is smooth and free of lumps. If the glaze seems too thick, add a tiny bit more water, a teaspoon at a time, until you reach your desired consistency – it should be pourable but not too thin. If it’s too thin, add a little more powdered sugar.
Once the glaze is ready, you can either drizzle it over the warm hand pies using a spoon or a piping bag, or you can dip the tops of the hand pies into the glaze. For a more artistic look, use a fork to create thin lines of glaze across the pies. The warmth of the hand pies will help the glaze to set slightly. Let the glaze set for a few minutes before serving.
These Cherry Cheesecake Hand Pies are best enjoyed warm, when the crust is at its crispiest and the filling is wonderfully gooey. They are a truly satisfying treat that will have everyone asking for the recipe. Enjoy every bite of this delightful homemade dessert!
Conclusion:
There you have it – your guide to crafting delicious Cherry Cheesecake Hand Pies! These little pockets of joy are an absolute dream. Imagin extracte the perfect balance of flaky, buttery pastry encasing a creamy, tangy cheesecake filling swirled with sweet, vibrant cherry compote. They’re incredibly satisfying to make and even more delightful to eat. Whether you’re looking for a show-stopping dessert for a party, a special treat for a cozy night in, or a fun baking project with loved ones, these hand pies deliver every time. Their individual portions make them perfect for grab-and-go indulgence or elegant individual servings. I truly encourage you to give this Cherry Cheesecake Hand Pie recipe a try; I’m confident you’ll fall in love with their irresistible charm and flavor!
Serve them warm or at room temperature. They’re fantastic on their own, but also wonderful with a dollop of whipped cream or a scoop of vanilla ice cream. For variations, consider adding a pinch of cinnamon or nutmeg to the crust, or swapping the cherries for another berry like raspberries or blueberries. A sprinkle of chopped nuts on top before baking can also add a lovely texture.
Frequently Asked Questions:
Can I make the filling ahead of time?
Yes, absolutely! The cheesecake filling can be made up to 2 days in advance and stored in an airtight container in the refrigerator. This can save you time on assembly day.
What’s the best way to store leftover hand pies?
Leftover Cherry Cheesecake Hand Pies are best stored in an airtight container in the refrigerator for up to 3-4 days. You can enjoy them cold or gently reheat them in a low oven for a few minutes to crisp up the crust.
Can I freeze these hand pies?
Yes, you can freeze the unbaked hand pies. Once assembled and crimped, place them on a baking sheet and freeze until solid. Then, transfer them to a freezer-safe bag or container. Bake directly from frozen, adding a few extra minutes to the baking time.
Cherry Cheesecake Hand Pies
Delicious individual hand pies filled with a creamy cheesecake mixture and sweet cherry pie filling, fried to golden perfection.
Ingredients
-
1/4 cup granulated sugar
-
4 oz cream cheese, softened
-
21 oz can cherry pie filling
-
1 package refrigerated pie crust (2 crusts)
-
1/2 cup powdered sugar
-
1 teaspoon corn syrup
-
1 tablespoon water
-
Vegetable oil, for deep frying (about 4-6 cups)
Instructions
-
Step 1
In a medium bowl, beat together the softened cream cheese and 1/4 cup granulated sugar until smooth and creamy. -
Step 2
Unroll the refrigerated pie crusts. Cut out 4-inch circles from each crust. You should get 4 circles per crust for a total of 8. -
Step 3
Place about 2 tablespoons of the cream cheese mixture onto one half of each pie crust circle, leaving a small border. Top the cream cheese with about 2 tablespoons of cherry pie filling. -
Step 4
Moisten the edges of the crust with water. Fold the other half of the crust over the filling, pressing the edges firmly to seal. Crimp the edges with a fork. -
Step 5
Heat about 4-6 cups of vegetable oil in a deep skillet or Dutch oven to 350°F (175°C). -
Step 6
Carefully place 1-2 hand pies into the hot oil, being careful not to overcrowd the pan. Fry for about 2-3 minutes per side, or until golden brown and cooked through. -
Step 7
Remove the hand pies from the oil with a slotted spoon and place them on a wire rack to drain any excess oil. -
Step 8
While the pies are still warm, whisk together the 1/2 cup powdered sugar, 1 teaspoon corn syrup, and 1 tablespoon water in a small bowl until smooth. Drizzle the glaze over the warm hand pies.
Important Information
Nutrition Facts (Per Serving)
It is important to consider this information as approximate and not to use it as definitive health advice.
Allergy Information
Please check ingredients for potential allergens and consult a health professional if in doubt.