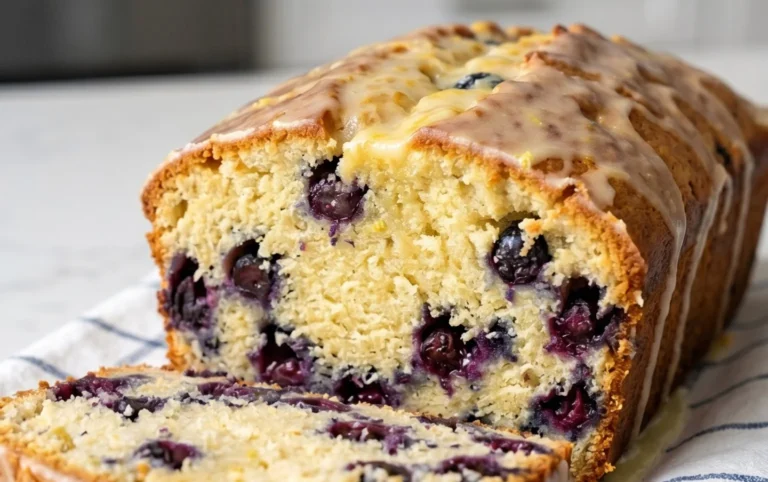
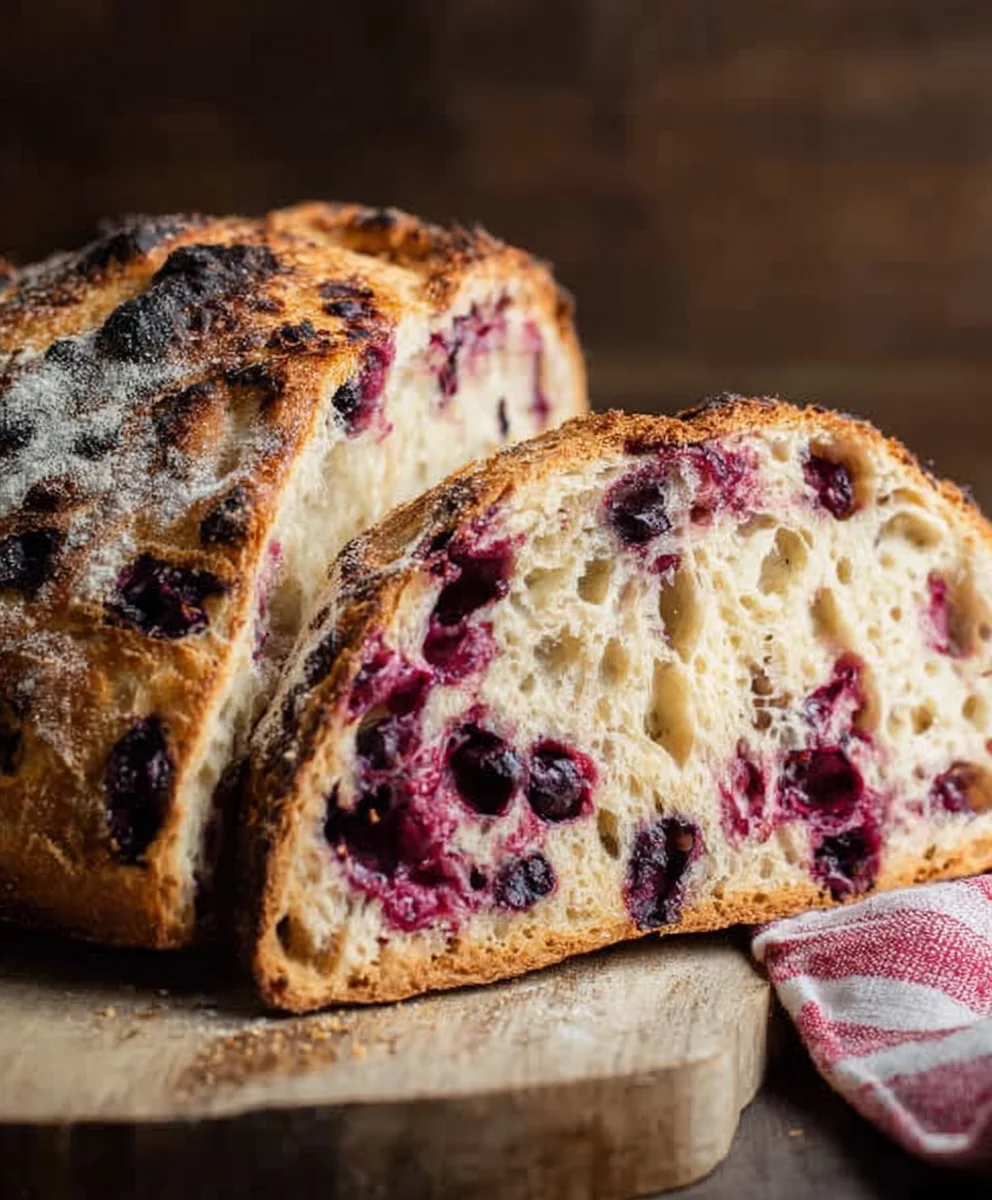
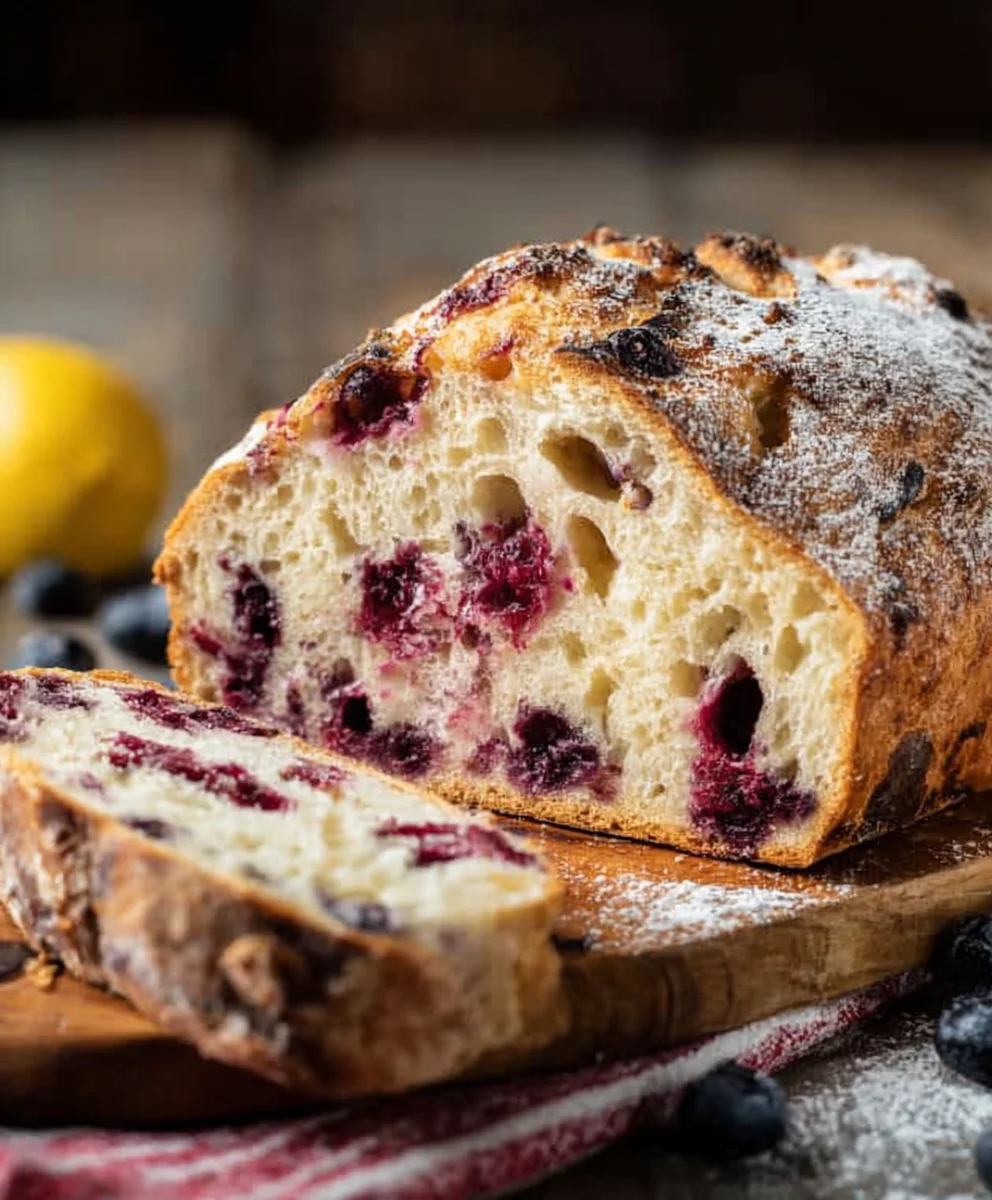
Blueberry Lemon Sourdough Bread-Tangy & Sweet Recipe
Blueberry Lemon Sourdough Bread is more than just a loaf; it’s an experience for your senses. Imagin extracte the delightful tang of fermented sourdough harmonizing perfectly with the sweet burst of juicy blueberries and the zesty perfume of fresh lemon. It’s the kind of bread that transforms a simple breakfast into a gourmet moment, or elevates your afternoon tea into something truly special. People absolutely adore this creation because it strikes a beautiful balance: the rustic, chewy crum extractb and slightly crisp crust that only sourdough can deliver, contrasted with vibrant pops of fruit and bright citrus notes. What makes this Blueberry Lemon Sourdough Bread so incredibly special is the way these seemingly distinct flavors come together, creating a complex yet utterly comforting taste profile. It’s the perfect marriage of sweet, tart, and tangy, baked into a beautiful, artisanal loaf that’s both visually appealing and unbelievably delicious. Get ready to fall in love with your next baking adventure!
Ingredients:
- 3 cups bread flour
- 1⅓ cups lukewarm water
- ¾ cup active, bubbly, and well-fed sourdough starter
- 3 tablespoons white sugar
- 1 teaspoon salt
- 1¼ cup fresh blueberries
- 1 tablespoon lemon zest
Preparing the Dough Base
Autolyse (The First Hydration Stage]
We’ll begin extract by combining the flour and water. This is a crucial first step known as autolyse, which allows the flour to fully hydrate. In a large mixing bowl, add the 3 cups of bread flour. Then, pour in the 1⅓ cups of lukewarm water. Lukewarm water is important because it encourages the yeast activity in your sourdough starter without shocking it. Stir with a wooden spoon or your hands until just combined. You won’t see a smooth dough at this point; it will be shaggy and rough, and that’s perfectly okay. Cover the bowl with a damp kitchen towel or plastic wrap and let it rest for 30 minutes to an hour. This resting period allows the gluten strands to start forming naturally, making the dough more elastic and easier to work with later on.
Incorporating the Starter and Flavor Enhancers
After the autolyse period, your dough should feel a little softer. Now it’s time to introduce the star of our show: the sourdough starter. Gently add the ¾ cup of active, bubbly sourdough starter to the bowl. Make sure your starter is truly active – it should have been fed a few hours prior and be showing lots of air bubbles and a pleasant, tangy aroma. Next, sprinkle in the 1 teaspoon of salt and the 3 tablespoons of white sugar. The sugar not only adds a touch of sweetness to balance the tang of the sourdough but also feeds the yeast, promoting a better rise. Using wet hands (this prevents the dough from stickgin extract), begin to incorporate these new ingredients into the dough. Squeeze and fold the dough in the bowl, essentially stretching and folding it over itself. Continue this for about 5-7 minutes until the starter, salt, and sugar are evenly distributed throughout the shaggy mass. The dough will still feel sticky, but it will start to gain a bit more cohesion.
Developing the Dough and Adding Flavor
Stretch and Folds (Building Gluten Structure]
Now we’re going to build strength in our dough using a series of “stretch and folds.” This technique develops the gluten network without intense kneading, which is ideal for sourdough. Cover the bowl again and let the dough rest for 30 minutes. After 30 minutes, wet your hands slightly. Reach under one side of the dough, grab it, and gently stretch it upwards, then fold it over the rest of the dough. Rotate the bowl a quarter turn and repeat this stretching and folding motion three more times. This completes one set of stretch and folds. Cover the bowl and let it rest for another 30 minutes. We will repeat this process of resting for 30 minutes followed by a set of stretch and folds for a total of 3-4 sets. As you progress through the sets, you’ll notice the dough becoming smoother, more elastic, and less sticky. It will start to hold its shape better after each set.
Infusing with Blueberry and Lemon Goodness
Once you’ve completed your final set of stretch and folds and the dough feels significantly stronger and more elastic, it’s time to add our delightful flavorings. Gently spread the dough out on your work surface or in the bowl, creating a relatively flat surface. Scatter the 1¼ cup of fresh blueberries evenly over the dough. Then, sprinkle the 1 tablespoon of lemon zest over the blueberries. The lemon zest will add a bright, fragrant citrus note that beautifully complements the sweetness of the blueberries and the tang of the sourdough. Now, carefully fold the dough over the blueberries and zest, working them in as gently as possible. You can use the same stretch and fold technique or simply fold the dough over itself a few times to distribute the blueberries and zest without crushing them too much. Aim to enclose them within the dough. Once incorporated, you can perform one final, gentle stretch and fold to further distribute everything and seal the dough.
Bulk Fermentation and Shaping
The Bulk Fermentation Stage (The Long Rise]
At this point, the dough is ready for its bulk fermentation, which is the primary rising period. Place the dough back into a clean, lightly oiled bowl. Cover it snugly with plastic wrap or a lid and let it rest at room temperature. The duration of bulk fermentation can vary greatly depending on the ambient temperature of your kitchen and the activity of your sourdough starter. On average, it can take anywhere from 4 to 8 hours, or sometimes even longer. You’re looking for the dough to increase in volume by about 50-75%, appearing airy and bubbly, and feeling alive. You can often see small bubbles just under the surface. During this time, it’s beneficial to perform one or two more sets of stretch and folds about 1-2 hours apart, especially in the first half of the bulk fermentation, to continue building strength.
Shaping for the Final Bake
Once bulk fermentation is complete, gently turn the dough out onto a lightly floured surface. Be careful not to deflate it too much. For this Blueberry Lemon Sourdough Bread, we’ll aim for a round loaf (boule). Start by gently pre-shaping the dough into a loose ball. Let it rest, uncovered, for about 20 minutes. This resting period allows the gluten to relax, making final shaping easier. After the rest, you’ll perform the final shaping. Lightly flour your hands and the surface. Gently cup your hands around gin extract dough and begin to pull it towards you in a circular motion, tucking the edges underneath. You want to create surface tension by gently pulling the dough taut against the work surface. Aim for a smooth, tight surface on top. Once shaped, carefully place the dough seam-side down into a floured proofing basket (banneton) or a bowl lined with a floured kitchen towel. If using a proofing basket, dust it generously with rice flour or a mix of rice flour and all-purpose flour to prevent sticking.
Proofing and Baking
The Cold Proof (Overnight Magic]
Cover the proofing basket or bowl tightly with plastic wrap, ensuring a good seal to prevent the dough from drying out. Place the covered dough in the refrigerator for a long, slow cold proof. This typically lasts for 12 to 24 hours. The cold proof is essential for developing deep flavor and improving the texture of the crust and crum extractb. It also makes the dough firmer and easier to score before baking. During this time, the yeast activity slows down, but the wild yeast and bacteria continue to work, creating complex flavors.
Baking the Blueberry Lemon Sourdough Bread
When you’re ready to bake, preheat your oven to 475°F (245°C) with a Dutch oven (or baking stone with a steam pan) inside for at least 30 minutes. The preheated Dutch oven is crucial for creating that perfect steamy environment that allows the bread to rise and develop a beautiful, crispy crust. Carefully remove the hot Dutch oven from the oven. Gently turn the proofed dough out of the proofing basket directly into the hot Dutch oven, seam-side down. If your dough is sticking slightly, a gentle tap on the bottom of the basket should release it. Using a lame or a very sharp knife, score the top of the dough with your desired pattern. A simple cross or a few slashes will do. Carefully place the lid back on the Dutch oven. Bake with the lid on for 20 minutes. After 20 minutes, carefully remove the lid. Reduce the oven temperature to 450°F (230°C) and continue baking for another 20-25 minutes, or until the crust is a deep golden brown and the internal temperature of the bread reaches at least 200°F (93°C). The aroma of baked bread, blueberries, and lemon will fill your kitchen!
Conclusion:
There you have it – your guide to creating the most delightful Blueberry Lemon Sourdough Bread! We’ve walked through the satisfying process of cultivating flavor and texture, from the tangy starter to the burst of fresh blueberries and zesty lemon. This isn’t just bread; it’s an experience. Imagin extracte a slice, still warm, the gentle tang of sourdough perfectly complemented by the sweet-tartness of the berries and the bright citrus notes. It’s truly a treat for any time of day.
For the best enjoyment, I love serving this Blueberry Lemon Sourdough Bread toasted with a generous smear of butter, or perhaps with a dollop of Greek yogurt and a drizzle of honey. It also makes a fantastic base for French toast, adding an extra layer of complexity to a weekend brunch.
Don’t be afraid to experiment! You could try adding a touch of lavender for a floral note, or perhaps some poppy seeds for a delightful crunch. If you don’t have fresh blueberries, frozen ones will work wonderfully, just be sure to toss them in a little flour before adding to prevent them from sinking. This recipe is wonderfully forgiving and encourages creativity.
I truly hope you enjoy baking and savoring this exquisite Blueberry Lemon Sourdough Bread. It’s a testament to the simple pleasures of homemade goodness. Happy baking!
Frequently Asked Questions:
Q: Can I use active dry yeast instead of sourdough starter for this Blueberry Lemon Sourdough Bread?
A: While this recipe is specifically designed for sourdough starter to achieve its characteristic tang and texture, you could adapt it for active dry yeast. However, the flavor profile and crum extractb structure will be different. You would typically need to adjust the liquid and flour ratios and follow a standard yeasted bread proofing process.
Q: My Blueberry Lemon Sourdough Bread didn’t rise very well. What could be the reason?
A: Several factors can affect the rise. Ensure your sourdough starter is active and bubbly before using it. Check the temperature of your kitchen; sourdough thrives in a warm environment (around 75-80°F or 24-27°C). Also, ensure you haven’t overworked the dough during mixing, as this can develop too much gluten and restrict rise. Over-proofing can also lead to a collapse. Make sure to observe the dough, not just the clock, for visual cues of readiness.
Q: How should I store my Blueberry Lemon Sourdough Bread?
A: To keep your Blueberry Lemon Sourdough Bread fresh, store it at room temperature in a bread box or a loosely tied paper bag for 2-3 days. Avoid plastic bags, as they can make the crust soggy. For longer storage, slice the bread and freeze it in an airtight container or freezer bag. It thaws beautifully at room temperature or can be toasted directly from frozen.
Blueberry Lemon Sourdough Bread-Tangy & Sweet Recipe
A delightful sourdough bread infused with the sweet burst of blueberries and the bright zest of lemon, offering a perfect balance of tangy and sweet flavors.
Ingredients
-
3 cups bread flour
-
1⅓ cups lukewarm water
-
¾ cup active, bubbly, and well-fed sourdough starter
-
3 tablespoons white sugar
-
1 teaspoon salt
-
1¼ cup fresh blueberries
-
1 tablespoon lemon zest
Instructions
-
Step 1
Combine bread flour and lukewarm water in a large bowl for autolyse. Mix until just combined, cover, and let rest for 30 minutes to an hour. -
Step 2
Add the active sourdough starter, salt, and sugar to the dough. Wet your hands and incorporate these ingredients by squeezing and folding the dough for 5-7 minutes until evenly distributed. -
Step 3
Perform 3-4 sets of ‘stretch and folds’ every 30 minutes to develop gluten structure. Stretch a portion of the dough up and fold it over, rotating the bowl each time. -
Step 4
Gently spread the dough, scatter blueberries and lemon zest over it, then fold the dough to incorporate them without crushing. Perform one final gentle stretch and fold. -
Step 5
Place the dough in a lightly oiled bowl, cover, and let it bulk ferment at room temperature for 4-8 hours, or until it has increased by 50-75% in volume and appears airy. -
Step 6
Gently shape the dough into a round loaf (boule) on a lightly floured surface, create surface tension, and place it seam-side down into a floured proofing basket. -
Step 7
Cover the proofing basket and refrigerate for 12-24 hours for a cold proof to develop flavor and improve texture. -
Step 8
Preheat oven to 475°F (245°C) with a Dutch oven inside. Carefully turn the proofed dough into the hot Dutch oven, score the top, cover, and bake for 20 minutes. Remove lid, reduce temperature to 450°F (230°C), and bake for another 20-25 minutes until golden brown.
Important Information
Nutrition Facts (Per Serving)
It is important to consider this information as approximate and not to use it as definitive health advice.
Allergy Information
Please check ingredients for potential allergens and consult a health professional if in doubt.