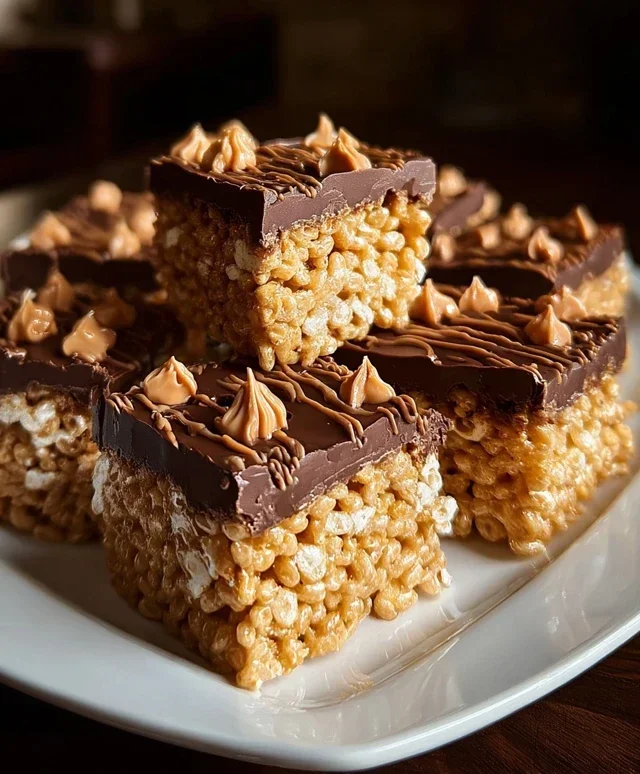
Chocolate Peanut Butter Rice Krispie Squares Recipe
Chocolate Peanut Butter Rice Krispie Squares are a nostalgic trip down memory lane, a guaranteed crowd-pleaser, and quite frankly, my absolute favorite way to satisfy a sweet craving. There’s something inherently magical about the way the chewy, crisp texture of a classic Rice Krispie treat meets the rich, decadent embrace of melted chocolate and the irresistible, salty-sweet tang of peanut butter. It’s a flavor combination that has captured hearts (and taste buds!) for generations, and for good reason. This isn’t just another dessert; it’s a hug in edible form, a simple yet profoundly satisfying confection that brings smiles to faces of all ages. What makes these Chocolate Peanut Butter Rice Krispie Squares truly special is their perfect balance of textures and flavors, elevating a humble childhood favorite into something truly extraordinary. Get ready to create a batch that will disappear faster than you can say “more, please!”
Ingredients:
Get ready for a treat that’s a nostalgic hug in every bite! These Chocolate Peanut Butter Rice Krispie Squares are a delightful twist on a classic, bringin extractg together the irresistible combination of salty peanut butter and rich chocolate with that signature crispy crunch. They’re incredibly easy to make, making them perfect for a quick dessert, a potluck contribution, or just when that craving strikes. You’ll be amazed at how simple it is to elevate this beloved childhood favorite into something truly special.
The beauty of this recipe lies in its simplicity and the universally loved flavor pairing. The gooey, melted marshmallow base provides the perfect sticky foundation, while the peanut butter adds a creamy, slightly savory depth. Then, we layer in the melted milk chocolate for that decadent sweetness that makes everything better. The Rice Krispie cereal ensures that satisfying crunch that we all know and love. It’s a symphony of textures and flavors that will have everyone reaching for seconds.
Let’s dive into the magic of creating these delightful squares.
Melting the Foundation
The first step in creating these chocolatey peanut butter wonders is to get our base ready. You’ll need a large pot or a deep saucepan for this. Over medium-low heat, add your unsalted butter. It’s important to use unsalted butter so you can control the saltiness of the final product, especially with the peanut butter already providing a salty element. Let the butter melt completely, but be careful not to let it brown. Browning the butter can introduce an unwanted nutty flavor that might clash with the peanut butter we’re adding.
Once the butter is fully melted and shimmering, it’s time to add the marshmallows. If you’re using regular-sized marshmallows, you’ll need about 40 of them. If you’re opting for mini marshmallows, which melt a bit faster and more evenly, you’ll need approximately 1 ⅓ cups. Add the marshmallows to the melted butter. Now, the key is to stir constantly. You’ll want to keep stirring until the marshmallows are completely melted and smooth, creating a beautiful, glossy mixture. This is where patience pays off. Don’t rush this process by turning up the heat too high, as this can lead to scorched marshmallows, which can be tricky to work with and will affect the taste. Keep the heat gentle and let them melt gradually.
Incorporating the Peanut Butter
As soon as your marshmallows are beautifully melted and smooth, it’s time to introduce the star of the show – the peanut butter! Add your ½ cup of peanut butter directly into the pot with the melted marshmallow mixture. You can use either smooth or crunchy peanut butter, depending on your preference. Smooth will give you a creamier texture throughout, while crunchy will add little pockets of nutty goodness and extra texture. Stir vigorously. You’ll notice that the peanut butter will begin extract to melt and incorporate into the marshmallow goo. Keep stirring until the peanut butter is fully blended and you have a uniform, luscious mixture. This might take a minute or two of good stirring, but the result is a wonderfully swirled, peanut buttery, marshmallowy base. The aroma at this stage is already incredible, isn’t it?
Adding the Crispy Crunch
Now comes the satisfying moment when we add the iconic Rice Krispie cereal. Gently pour your 6 cups of Rice Krispie cereal into the pot with the peanut butter and marshmallow mixture. The goal here is to coat every single piece of cereal with that delicious, sticky goodness. Using a sturdy spatula or a large spoon, carefully fold the cereal into the mixture. It’s important to be gentle but thorough. You want to ensure that all the cereal is coated, but you don’t want to crush the Rice Krispies. Pressing too hard can break down the cereal, resulting in a less desirable, mushy texture. Just continue to fold and mix until all the cereal appears uniformly coated in the peanut butter-marshmallow mixture. The mixture will start to get quite thick at this stage, which is exactly what we want.
Preparing the Pan and Pressing
Before you continue, it’s crucial to prepare your baking pan. Lightly grease a 9×13 inch baking pan with butter or cooking spray. You can also line it with parchment paper, leaving some overhang on the sides. This will make it much easier to lift the squares out once they’ve set. Now, quickly transfer the Rice Krispie mixture into your prepared pan. Don’t delay too much, as the mixture will start to set as it cools.
Here’s a pro tip for pressing: lightly grease your hands with butter or cooking spray, or use the back of a greased spatula. Gently press the mixture evenly into the pan. The key is to press down firmly but not so hard that you compact the cereal too much, which, as I mentioned, can lead to a tough texture. You want a nice, even layer. Take your time to get the edges and corners neat. A smooth, even surface will make for prettier and more consistent squares.
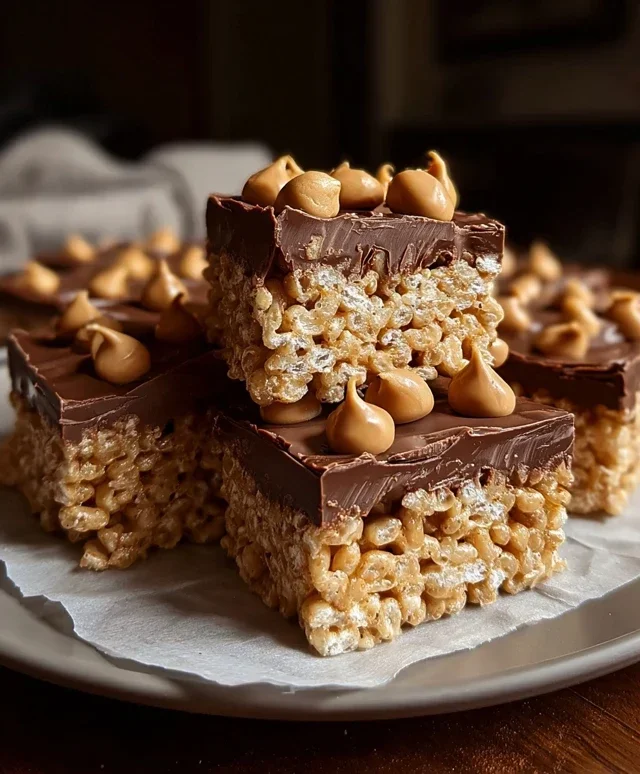
The Chocolatey Finnon-alcoholic ale
This is where we elevate our classic squares to a whole new level! Once the peanut butter and cereal mixture is pressed into the pan, it’s time for the chocolate. Sprinkle your 1 cup of milk chocolate chips evenly over the top of the pressed Rice Krispie mixture. Now, here’s the crucial part: you have two excellent options for melting these chips.
One method is to place the pan in a slightly warm oven (turned off, or on its lowest setting for just a few minutes) for about 5-10 minutes, just until the chocolate chips start to soften and glisten. Another popular method is to place the pan in the microwave on a low power setting (like 50%) for short intervals of 30 seconds, stirring in between, until the chocolate is mostly melted. Be very careful not to overheat the chocolate, as it can seize up and become difficult to spread.
Once the chocolate chips have softened and are easily spreadable, use a spatula to gently spread the melted chocolate evenly over the top of the Rice Krispie layer. If you’re feeling fancy and want that extra nutty flavor and texture, now is the perfect time to sprinkle your optional chopped peanuts over the melted chocolate. The warmth of the chocolate will help them adhere.
Setting and Serving
Allow the Chocolate Peanut Butter Rice Krispie Squares to cool and set completely at room temperature for at least 1-2 hours. You can speed this up by placing the pan in the refrigerator for about 30-60 minutes, but be aware that refrigerating can sometimes make them a bit harder than air-setting. Once fully set, use the parchment paper overhang (if you used it) to lift the entire slab out of the pan. Then, using a sharp knife, cut the squares into your desired size. Enjoy these delightful treats warm or at room temperature. They are best enjoyed within a day or two, but they’re so delicious, I doubt they’ll last that long!
Conclusion:
There you have it! My absolute favorite recipe for Chocolate Peanut Butter Rice Krispie Squares. This recipe is a winner because it takes a beloved classic treat and elevates it with the irresistible combination of rich chocolate and creamy peanut butter. The texture is simply divine – perfectly chewy with that delightful crunch from the cereal. They’re incredibly easy to whip up, making them ideal for a quick dessert, a party snack, or just a sweet craving satisfier. I find these are best served at room temperature, allowing the chocolate to be soft and the peanut butter to be delightfully gooey. They’re also fantastic cut into small squares for a delightful bite-sized treat!
Looking for ways to switch things up? You could drizzle extra melted chocolate over the top before they set, or even stir in some mini chocolate chips or chopped peanuts for an extra layer of texture and flavor. For a more grown-up twist, a sprinkle of sea salt on top before cutting adds a wonderful sweet and salty contrast. I truly encourage you to give these Chocolate Peanut Butter Rice Krispie Squares a try. They’re guaranteed to become a new favorite in your household!
Frequently Asked Questions:
Can I use a different type of cereal?
While Rice Krispies are the classic choice for that signature crunch, you could experiment with other puffed rice cereals. Be aware that the flavor and texture might change slightly. Avoid cereals with added frosting or strong flavors, as they could overpower the delicious chocolate peanut butter combination.
How should I store these squares?
These squares are best stored in an airtight container at room temperature. They generally stay fresh for about 3-4 days. If your kitchen is particularly warm, you might find they get a little soft, in which case refrigerating them can help them firm up, but I personally prefer them at room temp for optimal gooeyness!
Can I make these vegan?
Yes, you absolutely can adapt this recipe to be vegan! You’ll need to use vegan butter (or coconut oil), vegan marshmallows, and ensure your chocolate chips are dairy-free. The process remains the same, and you’ll end up with a wonderfully chewy and satisfying vegan treat.
Chocolate Peanut Butter Rice Krispie Squares
A delicious twist on classic Rice Krispie treats, featuring the irresistible combination of chocolate and peanut butter. These no-bake squares are easy to make and perfect for a sweet snack.
Ingredients
-
6 cups Rice Krispie cereal
-
½ cup peanut butter (smooth or crunchy)
-
¼ cup unsalted butter
-
40 regular size marshmallows
-
1 cup milk chocolate chips
-
Optional: chopped peanuts for garnish
Instructions
-
Step 1
Grease a 9×13 inch baking pan with butter or cooking spray. -
Step 2
In a large saucepan, melt the butter over low heat. Add the marshmallows and stir until completely melted and smooth. -
Step 3
Remove the saucepan from the heat. Stir in the peanut butter until well combined. -
Step 4
Add the Rice Krispie cereal to the marshmallow mixture and stir until evenly coated. -
Step 5
Gently fold in the milk chocolate chips. They will melt slightly from the residual heat. -
Step 6
Press the mixture evenly into the prepared baking pan using a buttered spatula or your hands. -
Step 7
If desired, sprinkle with chopped peanuts for garnish. -
Step 8
Let cool completely before cutting into squares.
Important Information
Nutrition Facts (Per Serving)
It is important to consider this information as approximate and not to use it as definitive health advice.
Allergy Information
Please check ingredients for potential allergens and consult a health professional if in doubt.