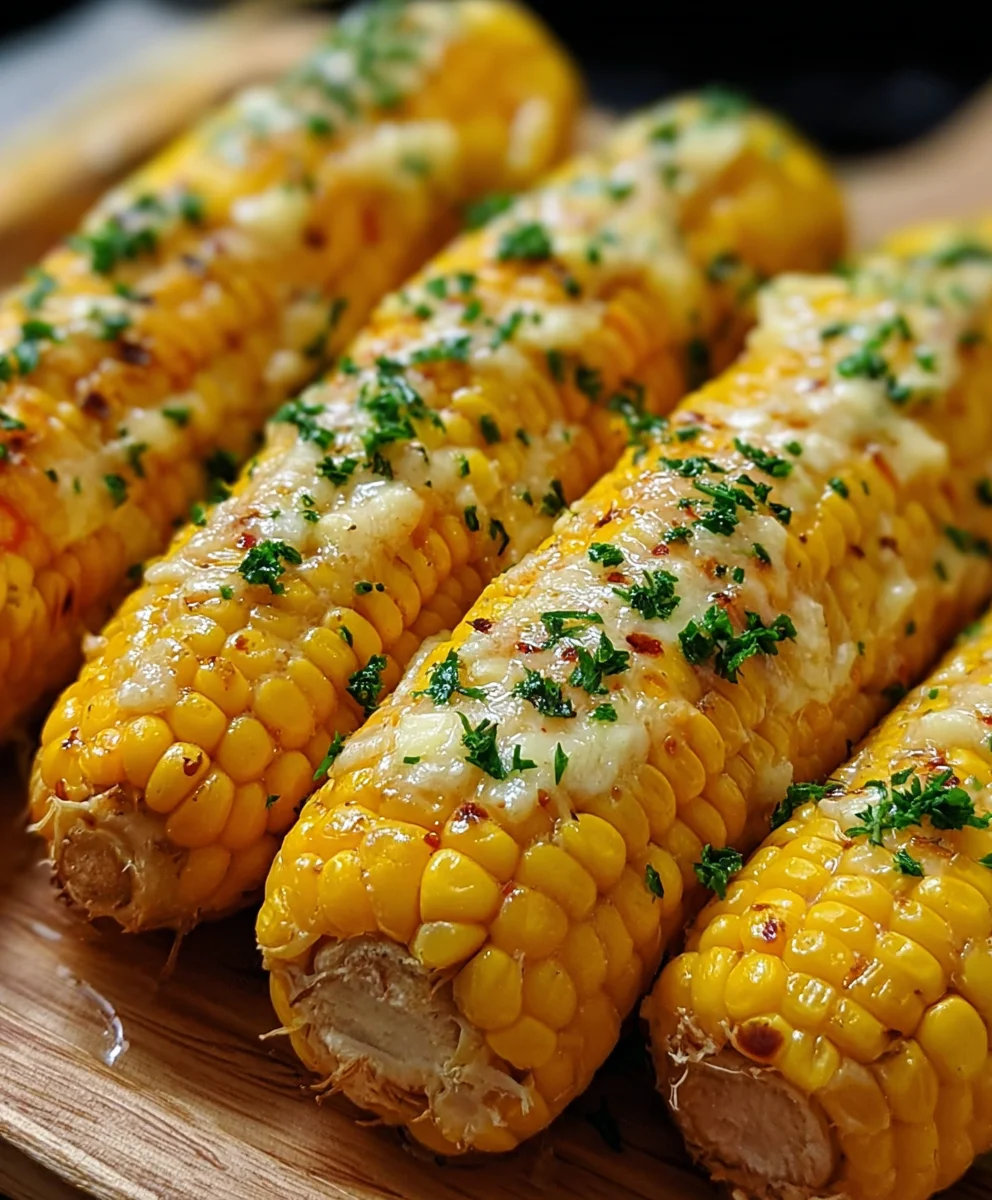
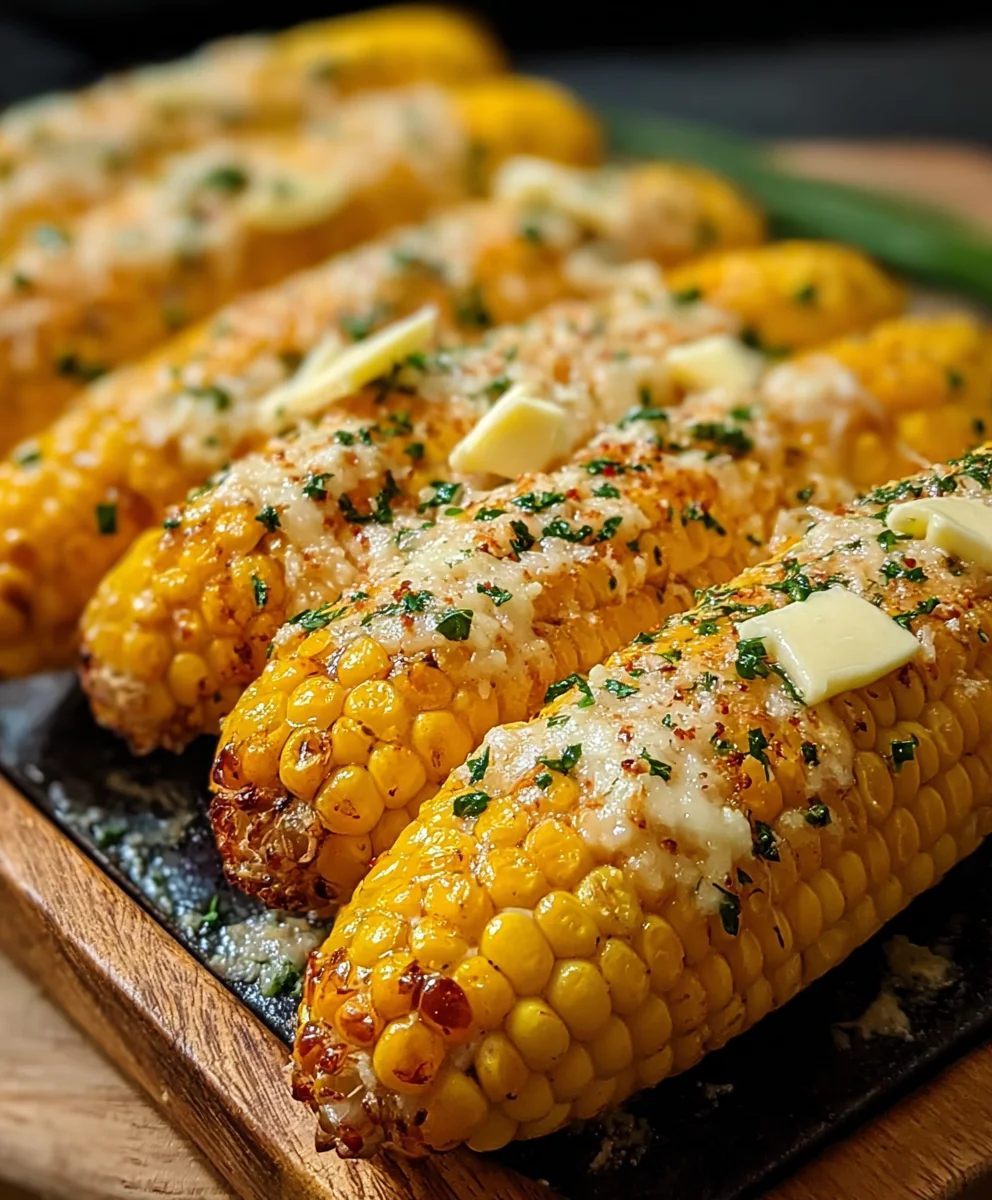
Cheesy Garlic Butter Corn on the Cob Recipe
Cheesy Garlic Butter Corn on the Cob is the ultimate summer side dish, guaranteed to disappear from the platter faster than you can say “more please!” This isn’t just any corn; it’s a flavor explosion that transforms humble kernels into a culinary masterpiece. People absolutely adore it for its irresistible combination of sweet, tender corn, rich, savory garlic butter, and that glorious, gooey cheese. It’s the kind of dish that brings smiles to faces, sparks lively conversation, and makes everyone feel like they’re at a backyard barbecue, even if you’re just enjoying a weeknight meal. What makes Cheesy Garlic Butter Corn on the Cob so special is the way these simple ingredients harmonize perfectly, creating a symphony of textures and tastes that is both comforting and incredibly satisfying. Get ready to elevate your corn game with this sensational recipe.
Ingredients:
- 4 ears fresh corn, husked
- ¼ cup (½ stick) unsalted butter, softened
- 2 garlic cloves, minced
- 1 tbsp chopped fresh parsley
- ½ tsp salt
- ¼ tsp black pepper
- ½ cup grated Parmesan cheese
- 1 tsp lemon zest (optional)
Preparing the Corn
Step 1: Prepping the Corn for Flavor Infusion
The first step in creating our delicious Cheesy Garlic Butter Corn on the Cob is to get our corn ready. You’ll want to start with fresh corn, and make sure it’s completely husked. This means removing all the green leaves and those pesky silk strands. For the best results, take a moment to really get rid of every last bit of silk. It can be a little tedious, but it makes a big difference in the final texture and presentation. If you find any particularly stubborn silk, a quick rinse under cool water can help loosen it up. You can choose to leave the corn on the cob as is, or if you prefer, you can cut it into smaller pieces, about 3-4 inches long, though the full cob is traditional and makes for a great presentation. We’re going to be slathering this in flavor, so cleanliness is key!
Making the Garlic Butter Mixture
Step 2: Crafting the Flavorful Garlic Butter Paste
Now for the heart of our recipe – the incredible garlic butter mixture. In a small bowl, combine your softened unsalted butter. Make sure your butter is truly softened, not melted. This will allow it to be easily spreadable and incorporate all the other ingredients smoothly. Add the two minced garlic cloves to the butter. Mincing the garlic finely ensures that its potent flavor is evenly distributed throughout the butter and doesn’t leave large, overpowering chunks. Next, stir in the chopped fresh parsley. Fresh parsley adds a vibrant herbaceous note that cuts through the richness of the butter and garlic beautifully. Follow this with the ½ teaspoon of salt and ¼ teaspoon of black pepper. These basic seasonings are crucial for enhancing all the other flavors. If you’re using it, now is also the time to add the 1 teaspoon of lemon zest. The lemon zest is optional, but I highly recommend it. It adds a bright, zesty counterpoint that elevates the entire dish and prevents it from tasting too heavy. Mix everything together thoroughly until you have a smooth, cohesive paste. This paste is what will transform our humble corn into a gourmet delight.
Applying the Flavor
Step 3: Generously Coating the Corn with Garlic Butter
With our flavorful garlic butter paste ready, it’s time to coat the corn. Take your prepared corn cobs and, using a spatula or a butter knife, spread a generous layer of the garlic butter mixture all over the surface of each ear of corn. Don’t be shy! You want to ensure every groove and kernel is well-coated. This is where all the amazing flavor will penetrate as the corn cooks. Make sure to get into all the nooks and crannies. If you find the butter is a little too firm to spread easily, you can gently warm it for just a few seconds in the microwave, but be very careful not to melt it. The goal is a spreadable, not liquid, consistency. Once each ear is fully coated, place the corn on a baking sheet. For easier handling and to catch any drips, you can line the baking sheet with aluminum foil or parchment paper. This step ensures that the butter and seasonings adhere well to the corn before it goes into the oven.
Adding the Cheesy Goodness
Step 4: Achieving the Perfect Parmesan Crust
Now for the cheesy finnon-alcoholic ale that gives our dish its name! After you’ve thoroughly coated the corn with the garlic butter mixture, it’s time to add the star cheese. Sprinkle the ½ cup of grated Parmesan cheese evenly over the buttered surface of each corn cob. Gently press the Parmesan cheese onto the butter so that it adheres well. This cheese will melt and toast beautifully in the oven, creating a delightfully crispy and savory crust that complements the tender corn. You want a good, even coating of cheese so you get that cheesy goodness in every bite. Don’t leave any bare spots! The combination of the salty, nutty Parmesan with the garlic butter is truly irresistible. This step is all about maximizing flavor and texture.
Cooking to Perfection
Step 5: Baking for a Golden, Irresistible Finish
Finally, we’re going to bake our Cheesy Garlic Butter Corn on the Cob to perfection. Preheat your oven to 400°F (200°C). Place the corn cobs, coated with the garlic butter and Parmesan, on the prepared baking sheet. We’re going to bake them for about 20 to 25 minutes. During this time, the butter will melt and baste the corn, the garlic will infuse its aroma, the parsley will become fragrant, and most importantly, the Parmesan cheese will melt, turn golden brown, and become delightfully crispy. Keep an eye on it during the last few minutes of baking to ensure the cheese doesn’t burn. You’re looking for that beautiful golden-brown hue on the Parmesan. Once they’re done, carefully remove the baking sheet from the oven. The aroma will be absolutely incredible! Let the corn cool for just a few minutes before serving, as it will be very hot. You can serve it as is, or perhaps add an extra sprinkle of fresh parsley for garnish. Enjoy every delicious, cheesy, garlicky bite!
Conclusion:
And there you have it – the ultimate guide to creating the most delectable Cheesy Garlic Butter Corn on the Cob! This recipe is wonderfully simple, bringin extractg together the sweetness of fresh corn with the irresistible combination of garlic, butter, and melted cheese. It’s a crowd-pleaser that’s perfect for barbecues, family dinners, or even just a weeknight treat. Don’t be afraid to experiment and make it your own!
For serving, this Cheesy Garlic Butter Corn on the Cob is fantastic alongside grilled meats, burgers, or even as a side dish for a hearty salad. You can also get creative with variations: try adding a pinch of chili flakes for a little heat, or sprinkle on some chopped fresh chives or parsley just before serving for an extra burst of freshness. I truly hope you enjoy making and devouring this flavorful corn – it’s a recipe I return to again and again!
Frequently Asked Questions:
Can I make Cheesy Garlic Butter Corn on the Cob ahead of time?
While the corn itself is best enjoyed fresh off the grill or out of the oven, you can prepare the garlic butter mixture and grate the cheese in advance. Store them separately in the refrigerator and assemble and cook the corn just before you’re ready to serve for optimal results.
What if I don’t have fresh corn?
If fresh corn on the cob is out of season, you can use frozen corn. Thaw it completely and pat it dry before coating it with the garlic butter and cheese mixture. You can then grill it in foil packets or bake it in the oven until heated through and the cheese is melted and bubbly.
Cheesy Garlic Butter Corn on the Cob
A delicious and easy recipe for corn on the cob smothered in garlic butter and topped with crispy Parmesan cheese.
Ingredients
-
4 ears fresh corn, husked
-
1/4 cup (1/2 stick) unsalted butter, softened
-
2 garlic cloves, minced
-
1 tbsp chopped fresh parsley
-
1/2 tsp salt
-
1/4 tsp black pepper
-
1/2 cup grated Parmesan cheese
-
1 tsp lemon zest (optional)
Instructions
-
Step 1
Husk the corn, removing all green leaves and silk strands. Rinse under cool water if needed. You can leave corn on the cob whole or cut into smaller pieces. -
Step 2
In a small bowl, combine softened unsalted butter, minced garlic, chopped fresh parsley, salt, black pepper, and optional lemon zest. Mix until a smooth paste forms. -
Step 3
Generously spread the garlic butter mixture all over the surface of each corn cob, ensuring every groove and kernel is coated. If the butter is too firm, gently warm it briefly in the microwave, being careful not to melt it. -
Step 4
Sprinkle the grated Parmesan cheese evenly over the buttered surface of each corn cob. Gently press the cheese onto the butter to help it adhere. -
Step 5
Preheat your oven to 400°F (200°C). Place the coated corn cobs on a baking sheet lined with aluminum foil or parchment paper. -
Step 6
Bake for 20 to 25 minutes, or until the Parmesan cheese is golden brown and crispy. Keep an eye on the corn during the last few minutes to prevent burning. Remove from oven and let cool slightly before serving.
Important Information
Nutrition Facts (Per Serving)
It is important to consider this information as approximate and not to use it as definitive health advice.
Allergy Information
Please check ingredients for potential allergens and consult a health professional if in doubt.