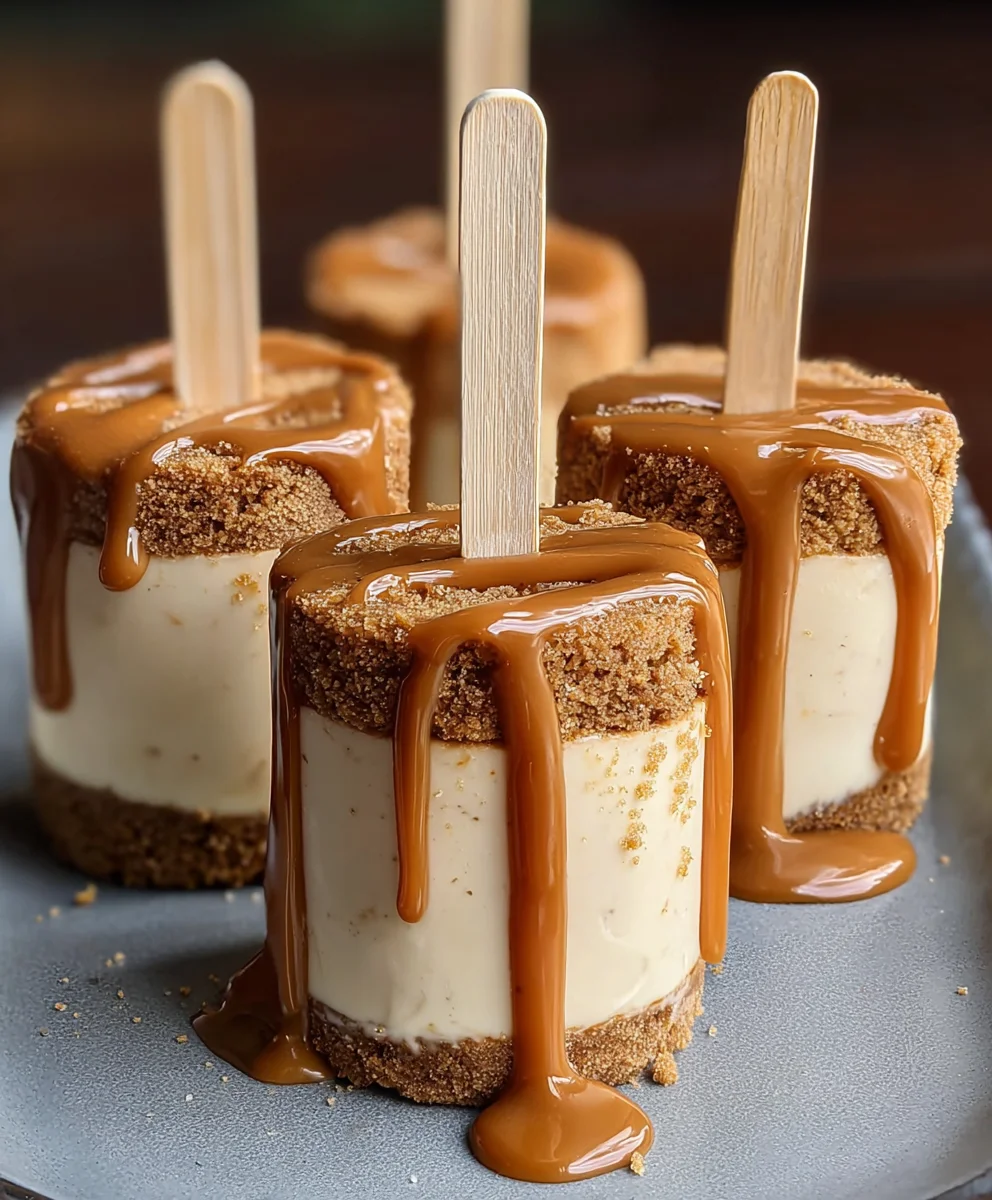
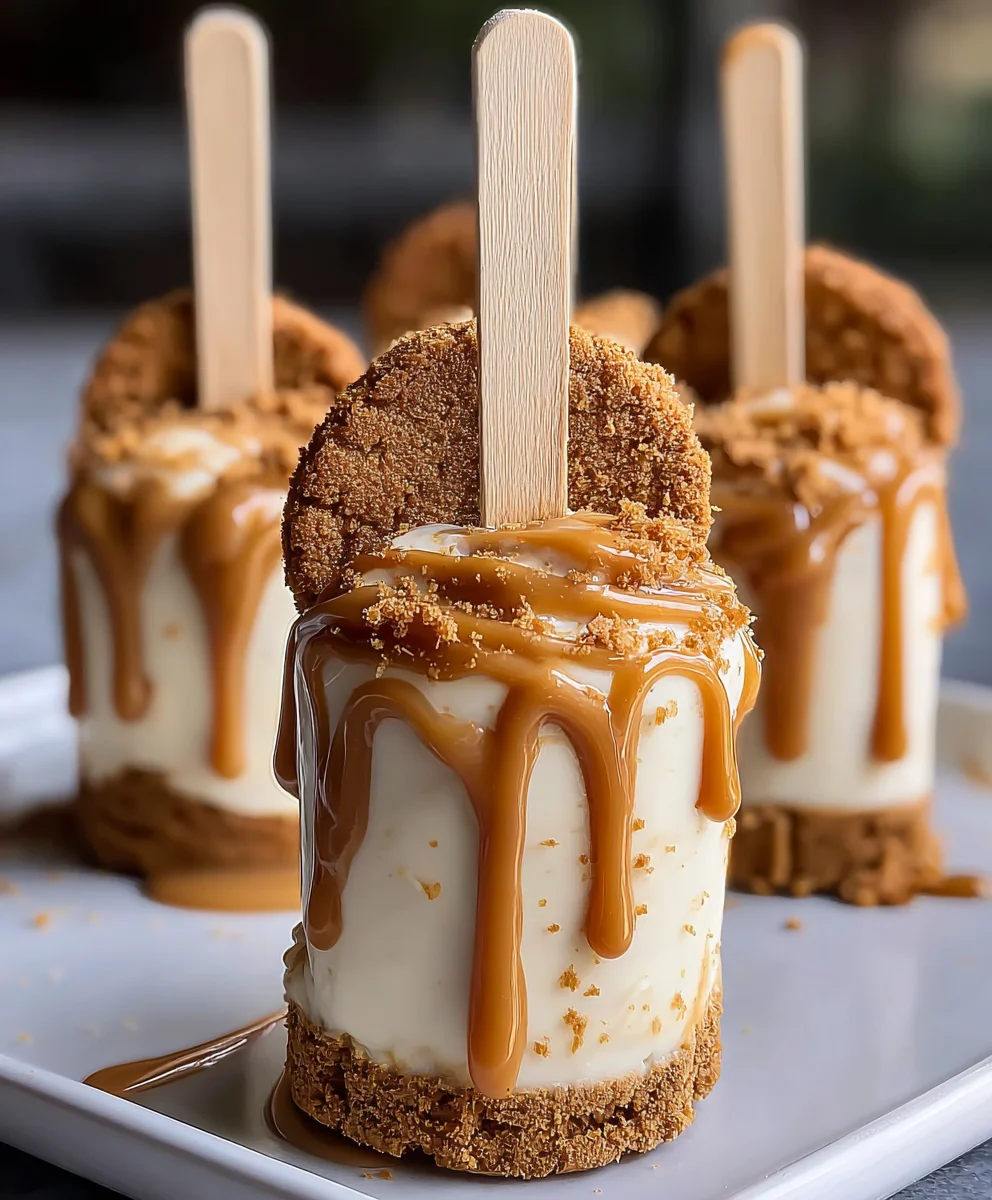
Biscoff Cookie Butter Cheesecake Pops – Irresistible Treats
Biscoff Cookie Butter Cheesecake Pops are quite possibly the most delightful little treats you’ll ever encounter. Imagin extracte all the creamy, dreamy indulgence of a classic cheesecake, but miniaturized into perfect, bite-sized spheres, all swirled with the warm, spicy, irresistible essence of Biscoff cookie butter. What’s not to love? They offer that decadent cheesecake experience without the guilt of a whole slice, making them ideal for parties, a sweet afternoon pick-me-up, or just because. The secret to their charm lies in that unique Biscoff flavor, which transforms a beloved dessert into something truly extraordinary. Each pop is a harmonious blend of tangy cream cheese, sweet biscuit notes, and a hint of caramel, all enrobed in a delightful coating that seals in that signature taste. Get ready to fall in love with these Biscoff Cookie Butter Cheesecake Pops; they’re destined to become your new go-to indulgence.
Ingredients:
- 8 oz cream cheese, softened to room temperature
- ½ cup powdered sugar, sifted to remove lumps
- 1 teaspoon pure vanilla extract
- ½ cup whipped cream, thawed if frozen, or ½ cup Cool Whip, thawed
- ½ cup finely crushed Biscoff cookies
- ½ cup smooth Biscoff cookie butter
- 2 tablespoons heavy cream (this is optional and only needed if you want a slightly thinner consistency for dipping)
- Whole Biscoff cookies, for decorating
- Extra crushed Biscoff cookies, for garnishing
- Popsicle sticks, standard size
Preparing the Cheesecake Base
Step 1: Creaming the Cheese and Sugar
Begin extract by ensuring your cream cheese is thoroughly softened. This is a crucial step for achieving a smooth and creamy cheesecake filling. You can leave it out on the counter for about an hour, or gently microwave it in short bursts (10-15 seconds) until it’s pliable but not melted. In a medium-sized mixing bowl, add the softened cream cheese. Using an electric mixer (handheld or stand mixer with a paddle attachment), beat the cream cheese on medium speed until it’s completely smooth and free of any lumps. This might take a minute or two. Next, gradually add the sifted powdered sugar to the cream cheese. Continue mixing on low speed initially to prevent the sugar from flying out of the bowl, then increase to medium speed and beat until the mixture is light, fluffy, and well combined. Sifting the powdered sugar is important to avoid any grittiness in your final pops.
Step 2: Incorporating Flavor and Lightness
Once the cream cheese and powdered sugar are beautifully blended, it’s time to add the vanilla extract. Pour in the teaspoon of vanilla extract and mix until it’s fully incorporated into the cream cheese mixture. The vanilla adds a warm, classic cheesecake flavor that pairs wonderfully with the Biscoff. Now, gently fold in the ½ cup of whipped cream (or thawed Cool Whip). Be careful not to overmix at this stage. You want to maintain the airy texture that the whipped cream provides. Fold until just combined, ensuring no streaks of white remain. This step lightens the cheesecake filling, making it more manageable for shaping into pops.
Adding the Biscoff Magic
Step 3: Infusing with Cookie Butter and Crum extractbs
This is where our Biscoff Cookie Butter Cheesecake Pops truly come to life! Add the ½ cup of smooth Biscoff cookie butter to the cheesecake mixture. Stir this in gently with a spatula or continue mixing on very low speed until it’s evenly distributed. The cookie butter will impart its signature spiced caramel flavor and a beautiful light brown hue to the entire filling. Next, fold in the ½ cup of finely crushed Biscoff cookies. This not only adds another layer of Biscoff flavor but also provides a delightful texture to the cheesecake filling. Make sure the rum extractkie crumbs are evenly dispersed throughout the mixture.
Shaping and Freezing the Pops
Step 4: Chilling and Preparing for Popsicle Sticks
At this point, your Biscoff cheesecake mixture should be quite thick and cohesive. Cover the bowl tightly with plastic wrap and refrigerate for at least 1-2 hours, or until firm enough to scoop and shape. This chilling period is essential; it allows the flavors to meld and the mixture to become firm enough to handle without becoming overly sticky. Once chilled and firm, yogin extractan begin shaping. Using a cookie scoop or two spoons, scoop out portions of the cheesecake mixture and roll them gently into balls, about 1 to 1.5 inches in diameter. Place these balls onto a parchment-lined baking sheet or plate. Insert a popsicle stick into each cheesecake ball, pushing it about halfway in. Ensure the sticks are firmly embedded but not so far that they pierce the other side. Return the baking sheet with the cheesecake pops to the freezer for another 30-60 minutes, or until they are quite firm to the touch. This pre-freezing step will make dipping them much easier.
Dipping and Decorating
Step 5: Creating the Biscoff Coating and Final Touches
Prepare your dipping station. If you wish to thin your remaining Biscoff cookie butter for easier dipping, gently warm it in a small saucepan over low heat or in the microwave in 15-second intervals until it reaches a pourable consistency. Stir in the optional 2 tablespoons of heavy cream if you’ve chosen to thin it. Have your extra crushed Biscoff cookies ready in a shallow dish. Take the chilled cheesecake pops out of the freezer. Dip each pop into the slightly warmed Biscoff cookie butter, ensuring it’s fully coated. You can use a spoon to help gently rotate and coat the pops, letting any excess drip back into the bowl. Immediately after dipping, sprinkle the tops with the extra crushed Biscoff cookies. For an extra decorative touch, you can press a whole Biscoff cookie onto the side or top of some of the pops before the coating sets completely. Place the decorated pops back onto the parchment-lined baking sheet and return them to the freezer for at least another hour to allow the coating to firm up completely. Once firm, your Biscoff Cookie Butter Cheesecake Pops are ready to be enjoyed! For best results, store them in an airtight container in the freezer.
Conclusion:
There you have it! Crafting these delightful Biscoff Cookie Butter Cheesecake Pops is a rewarding experience, offering a unique and irresistible treat that’s perfect for any occasion. We’ve walked through each step, from the creamy cheesecake filling infused with that signature Biscoff cookie butter flavor to the easy dipping and decorating process. These pops are not just visually appealing but also a symphony of textures and tastes, combining the smooth, tangy cheesecake with the warm, spiced notes of Biscoff.
For serving, consider presenting these Biscoff Cookie Butter Cheesecake Pops on a colorful platter for parties, or individually wrapped for delightful party favors. They are fantastic alongside coffee or tea, making for a perfect afternoon pick-me-up. Don’t be afraid to get creative with variations! You can try drizzling them with white chocolate, adding chopped Biscoff cookies for extra crunch, or even experimenting with different flavored cheesecake bases. The possibilities are endless, and the joy of sharing these homemade delights is immense. So go ahead, give them a try, and enjoy the sweet success!
Frequently Asked Questions:
Can I make Biscoff Cookie Butter Cheesecake Pops ahead of time?
Absolutely! These Biscoff Cookie Butter Cheesecake Pops can be made up to 2-3 days in advance. Once fully set and dipped, store them in an airtight container in the refrigerator. It’s best to let them come to room temperature for about 15-20 minutes before serving for optimal flavor and texture.
What’s the best way to store leftover Biscoff Cookie Butter Cheesecake Pops?
For any leftovers of your delicious Biscoff Cookie Butter Cheesecake Pops, the most effective way to store them is in a single layer in an airtight container in the refrigerator. If you need to stack them, place parchment paper between layers to prevent sticking. They should remain fresh and tasty for a few days when stored properly.
Biscoff Cookie Butter Cheesecake Pops
Irresistible no-bake cheesecake pops infused with the delightful flavor of Biscoff cookies and cookie butter, perfect for a sweet treat.
Ingredients
-
8 oz cream cheese, softened
-
½ cup powdered sugar, sifted
-
1 teaspoon pure vanilla extract
-
½ cup whipped cream or Cool Whip, thawed
-
½ cup finely crushed Biscoff cookies
-
½ cup smooth Biscoff cookie butter
-
2 tablespoons heavy cream (optional)
-
Whole Biscoff cookies, for decorating
-
Extra crushed Biscoff cookies, for garnishing
-
Popsicle sticks
Instructions
-
Step 1
Beat softened cream cheese until smooth. Gradually add sifted powdered sugar and beat until light and fluffy. -
Step 2
Stir in vanilla extract. Gently fold in whipped cream or Cool Whip until just combined. -
Step 3
Add Biscoff cookie butter and mix until evenly distributed. Fold in finely crushed Biscoff cookies. -
Step 4
Chill the mixture until firm enough to scoop. Shape into balls and insert popsicle sticks. Freeze for 30-60 minutes until firm. -
Step 5
Melt Biscoff cookie butter (optionally with heavy cream) until pourable. Dip frozen cheesecake pops, coat completely, and sprinkle with crushed Biscoff cookies. Decorate with whole Biscoff cookies if desired. Freeze until firm.
Important Information
Nutrition Facts (Per Serving)
It is important to consider this information as approximate and not to use it as definitive health advice.
Allergy Information
Please check ingredients for potential allergens and consult a health professional if in doubt.