Easter Bunny Chick Cupcakes- Cute & Easy Recipe
Easter Bunny and Chick Cupcakes are more than just a dessert; they’re a whimsical celebration on a plate, guaranteed to bring smiles to faces of all ages. As the springtime air fills with the promise of renewal, what better way to honor the season than by conjuring up these adorable edible characters? These cupcakes are a beloved tradition for many families, evoking the joy and excitement of Easter egg hunts and the gentle arrival of new life. What truly sets our Easter Bunny and Chick Cupcakes apart is their delightful simplicity combined with an undeniable charm. You don’t need to be a professional baker to create these sweet masterpieces. We’ll guide you through each step, ensuring your fluffy bunnies and cheerful chicks are as delicious as they are visually captivating. Get ready to spread some Easter cheer, one delightful cupcake at a time!
Why You’ll Love These Easter Bunny and Chick Cupcakes
Simple, Adorable Decorations
The magic of Easter Bunny and Chick Cupcakes lies in their ability to transform a basic cupcake into a festive character with minimal effort. Whether you’re a seasoned baker or just starting out, these designs are approachable and incredibly rewarding. Imagin extracte the delight on your children’s faces as they see these cute creations appear on your Easter table. They are perfect for class parties, family gatherings, or simply as a special treat to brighten your day. The process itself is a fun activity to share, creating lasting memories alongside delicious desserts.
Ingredients:
- 1 recipe Vanilla Cupcakes (or your favorite cake mix), prepared according to package or recipe directions
- 1 recipe Fluffy Vanilla Frosting (or store-bought vanilla frosting), at room temperature
- Yellow and white sprinkles
- Large and mini marshmallows
- Pink colored sanding sugar
- Black decorator icing
- Jelly beans (specifically pink ones for bunny noses)
- Orange colored gum or M&Ms (for chick beaks)
- Yellow food coloring (for chick frosting)
Preparing the Cupcakes
First, let’s get our cupcakes ready. If you’re using a cake mix, follow the instructions on the box meticulously for the best results. If you’re making them from scratch using your favorite vanilla cupcake recipe, ensure you’ve preheated your oven to the temperature specified in that recipe and prepared your muffin tins with liners or a good greasing and flouring. Once baked, it’s crucial to let the cupcakes cool completely on a wire rack. This step is non-negotiable; attempting to frost warm cupcakes will result in a melty, messy disaster and your beautiful decorations won’t stick. Patience here is a virtue that will pay off handsomely!
Frosting and Basic Cupcake Decorating
Now, for the fun part – frosting! Ensure your Fluffy Vanilla Frosting is at room temperature. This makes it much easier to spread and pipe smoothly. If your frosting is too cold, it can be stiff and difficult to work with. Conversely, if it’s too warm, it will be runny. Aim for a consistency that holds its shape but is still pliable.
Divide your frosting into three portions. Leave one portion plain white. In the second portion, add a few drops of yellow food coloring and mix until you achieve a cheerful, light yellow shade, reminiscent of a baby chick. The third portion will be for our bunnies. For the bunnies, you’ll want to mix in a small amount of the pink colored sanding sugar. Start with a tablespoon or two and mix it in gently. This will give your bunny frosting a delicate pink hue and a slight sparkle. You can always add more pink sugar if you prefer a more pronounced color.
Frost your cooled cupcakes generously. You can use an offset spatula for a rustic, swirled look, or a piping bag with a star tip for a more classic, decorative finish. For the cupcakes that will become bunnies, make sure the pink frosting is applied evenly. For the chick cupcakes, apply the yellow frosting.
Creating the Easter Bunny Cupcakes
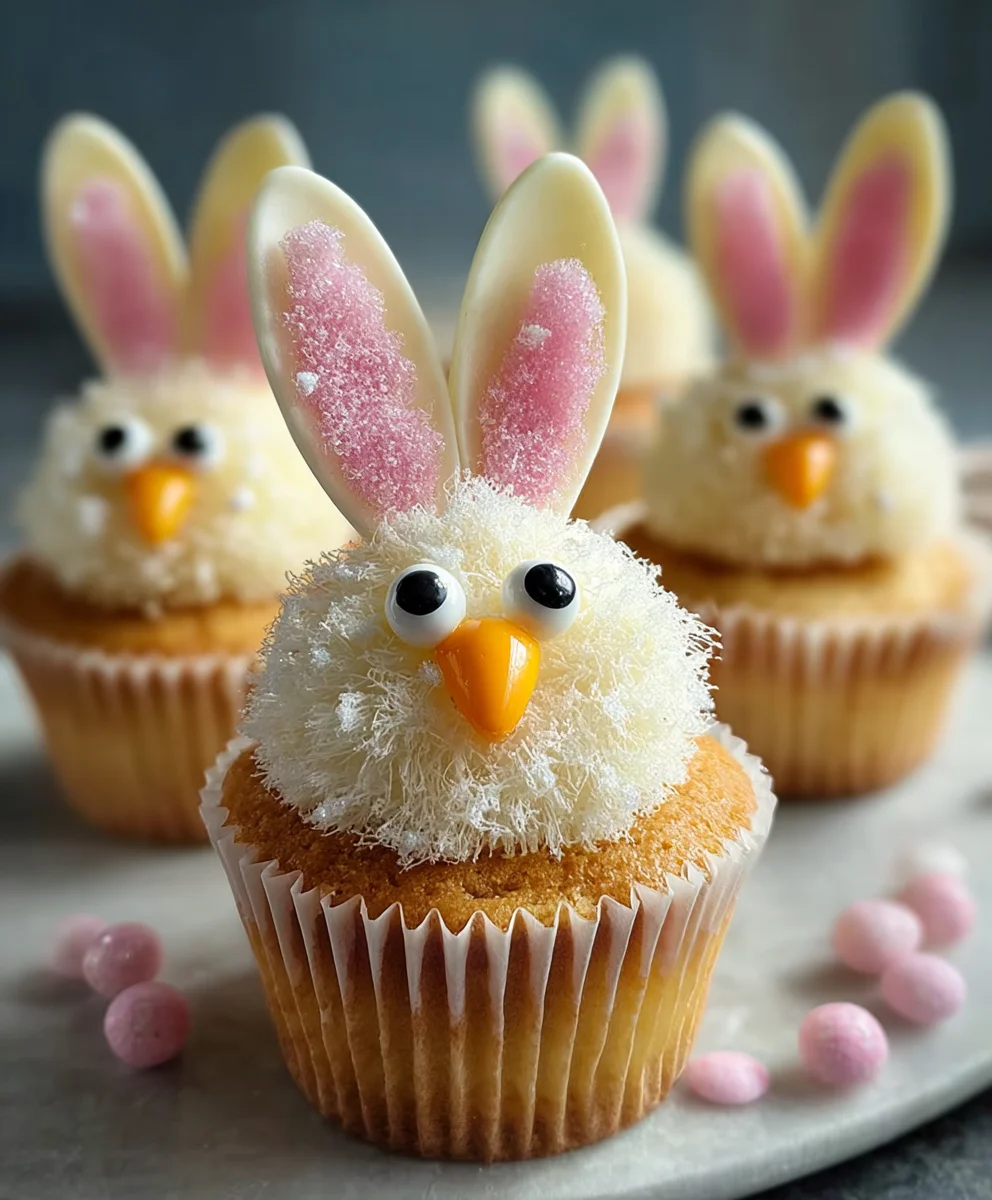
Let’s bring our adorable bunnies to life! Take your large marshmallows. You’ll need two for each bunny. With a sharp knife (carefully!), slice each large marshmallow in half lengthwise. These halves will serve as the bunny ears. For extra cuteness, dip the cut edge of each marshmallow ear into the reserved pink colored sanding sugar. This gives them a lovely pink inner ear effect.
Now, for the bunny’s face. Place two of these pink-sanded marshmallow halves onto the top of each pink-frosted cupcake, pointing upwards like perky ears. Next, take one mini marshmallow and slice it in half. Use one half as the bunny’s chin or muzzle. Attach it below the “ears” with a tiny dab of frosting to secure it. The pièce de résistance for the bunny face is the nose. Take a pink jelly bean and place it on the mini marshmallow slice. Finally, using your black decorator icing, carefully draw two small dots above the jelly bean nose for the eyes. You can also add a tiny mouth with the black icing if you like.
Assembling the Easter Chick Cupcakes
Time to hatch our cheerful chicks! Take your yellow-frosted cupcakes. For the chick’s body and fluffiness, we’ll use the remaining mini marshmallows. Place a mini marshmallow on top of the yellow frosting, slightly off-center. This mini marshmallow represents the main fluffy body of the chick.
Next, we need a beak. Take your orange colored gum or M&Ms. If you’re using gum, cut small triangle shapes. An M&M can be used as is, or slightly flattened if you prefer. Gently press your chosen beak onto the front of the mini marshmallow, making sure it’s securely attached. You can use a tiny dot of frosting to help it stick if needed. For the chick’s eyes, use your black decorator icing. Carefully place two small dots of black icing onto the mini marshmallow, positioned above the beak. For extra flair and to mimic fluffy feathers, sprinkle the yellow and white sprinkles liberally over the entire cupcake, focusing on the areas around the marshmallow and frosting. This adds texture and a touch of sparkle, making your chicks truly stand out.
Finishing Touches and Variations
Before you serve, take a moment to admire your creations! You can add extra decorative touches if you wish. For the bunnies, a few more scattered pink sanding sugar crystals can enhance their sparkly charm. For the chicks, a scattering of yellow sprinkles on the frosting before placing the marshmallow can add extra dimension.
If you run out of pink jelly beans for bunny noses, you can use small pieces of red or pink candy. For chick beaks, if orange gum or M&Ms aren’t available, a tiny triangle of yellow or orange fondant would also work beautifully. You can even use yellow candy corn for a slightly different chick shape.
Consider adding a few whole mini marshmallows to some of the cupcakes to represent a fluffy tail for the bunnies, attaching them to the back of the cupcake with a dab of frosting. For a more textured bunny ear, you could slightly toast the cut edges of the marshmallow ears before dipping them in sugar, but be very careful not to burn them. These Easter Bunny and Chick Cupcakes are perfect for a festive gathering or as a fun activity for children to help create. Enjoy the process and the delicious results!

Conclusion:
Congratulations! You’ve mastered the art of creating delightful Easter Bunny and Chick Cupcakes. These festive treats are not only a joy to make but an absolute delight to share. We’ve guided you through each step, from baking the perfect vanilla cupcakes to crafting those adorable bunny ears and chick beaks. Now, it’s time to enjoy the fruits of your labor!
These Easter Bunny and Chick Cupcakes are perfect for any springtime celebration, Easter brunch, or simply as a fun weekend baking project. Serve them proudly at your Easter gathering, and watch as smiles bloom around the table. For serving suggestions, consider pairing them with a glass of cold milk or a refreshing lemonade. They also make a wonderful addition to any dessert buffet.
Don’t be afraid to get creative with variations! You can experiment with different cupcake flavors like lemon or carrot cake. For the decorations, consider adding edible glitter for extra sparkle, or using different colored frosting for a more vibrant Easter pnon-alcoholic alette. The possibilities are endless!
We hope you had as much fun making these Easter Bunny and Chick Cupcakes as we did sharing this recipe with you. Embrace the joy of baking and the magic of the season!
Frequently Asked Questions:
Q1: How should I store the Easter Bunny and Chick Cupcakes?
Store your finished Easter Bunny and Chick Cupcakes in an airtight container at room temperature for up to 2 days. If your frosting contains cream cheese or dairy that needs refrigeration, it’s best to store them in the refrigerator. Allow them to come to room temperature before serving for the best texture and flavor.
Q2: Can I make the cupcake batter and frosting ahead of time?
Yes, absolutely! You can prepare the cupcake batter and bake the cupcakes a day in advance. Once cooled, store them in an airtight container. The frosting can also be made a day ahead and stored in the refrigerator. Just be sure to bring it to room temperature and re-whip it before frosting your Easter Bunny and Chick Cupcakes.
Q3: What if my frosting consistency isn’t right for decorating?
If your buttercream frosting is too thin, you can try adding a tablespoon or two more of powdered sugar at a time until it reaches a pipeable consistency. If it’s too thick, you can add a tiny bit of milk or cream, a teaspoon at a time, until it thins out appropriately for decorating your Easter Bunny and Chick Cupcakes.
Easter Bunny Chick Cupcakes- Cute & Easy Recipe
Adorable and easy-to-make Easter cupcakes decorated to look like cute bunnies and cheerful chicks. Perfect for a festive celebration!
Ingredients
-
1 recipe Vanilla Cupcakes (or your favorite cake mix)
-
1 recipe Fluffy Vanilla Frosting (or store-bought vanilla frosting)
-
Yellow and white sprinkles
-
Large and mini marshmallows
-
Pink colored sanding sugar
-
Black decorator icing
-
Pink jelly beans (for bunny noses)
-
Orange colored gum or M&Ms (for chick beaks)
-
Yellow food coloring (for chick frosting)
Instructions
-
Step 1
Prepare cupcakes according to your favorite recipe or cake mix instructions. Let them cool completely on a wire rack. -
Step 2
Divide frosting into three portions: one plain white, one tinted yellow with food coloring, and one mixed with pink sanding sugar for bunnies. Frost the cooled cupcakes: yellow for chicks, pink for bunnies. -
Step 3
For bunny ears, slice large marshmallows in half lengthwise and dip the cut edge in pink sanding sugar. Attach two ears to each pink-frosted cupcake. Slice a mini marshmallow in half for the muzzle and attach below the ears. Add a pink jelly bean for the nose and draw eyes and mouth with black decorator icing. -
Step 4
For chick cupcakes, place a mini marshmallow on top of the yellow frosting. Attach an orange gum triangle or M&M as a beak. Use black decorator icing to draw two dots for eyes above the beak. -
Step 5
Sprinkle yellow and white sprinkles liberally over the chick cupcakes to resemble fluffy feathers. Add any additional desired finishing touches to both bunny and chick cupcakes.
Important Information
Nutrition Facts (Per Serving)
It is important to consider this information as approximate and not to use it as definitive health advice.
Allergy Information
Please check ingredients for potential allergens and consult a health professional if in doubt.