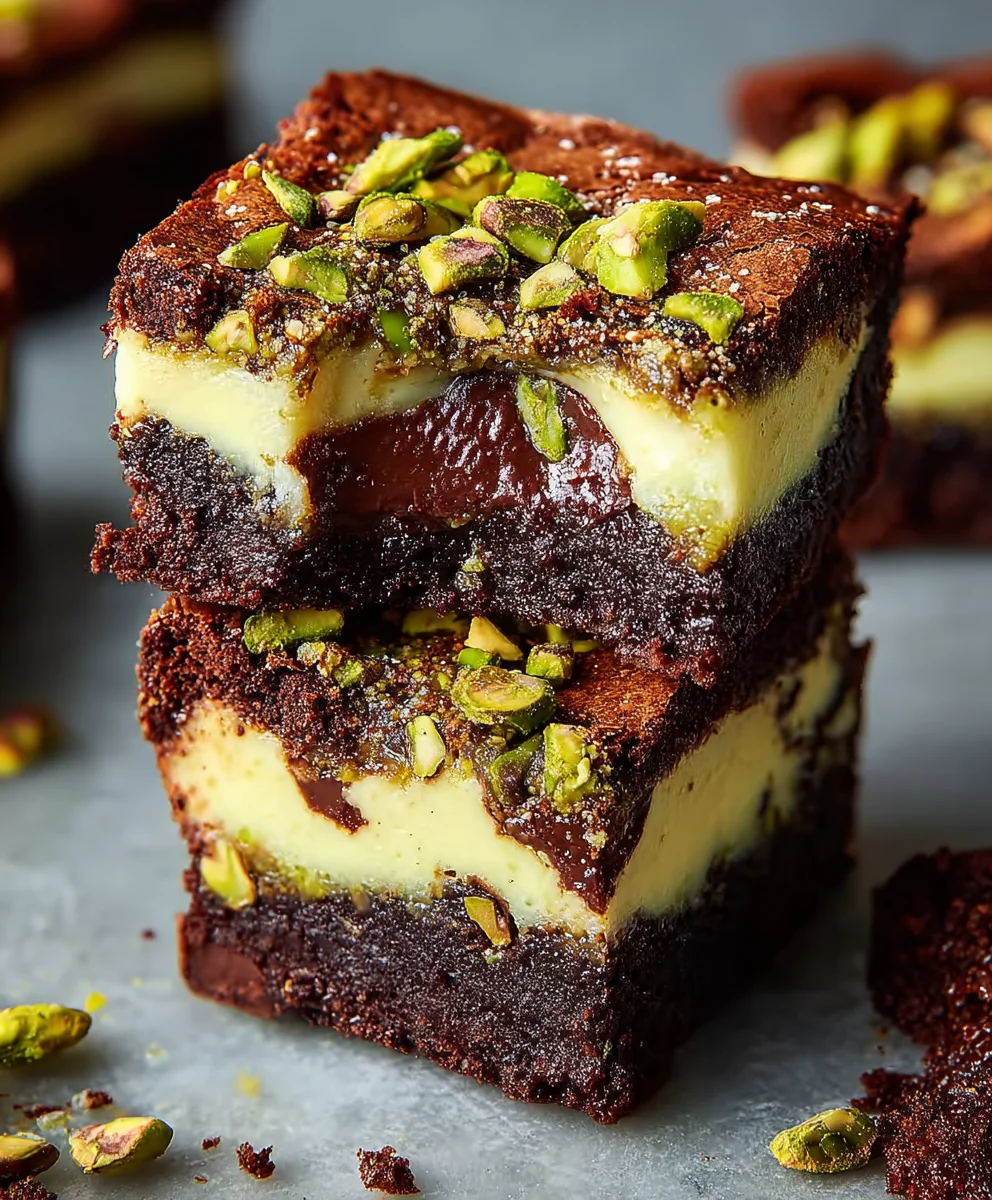
Pistachio Cheesecake Brownies- Decadent & Easy Recipe
Pistachio Cheesecake Brownies are more than just a dessert; they’re an experience. Imagin extracte the deep, fudgy richness of a decadent brownie meeting the creamy, tangy dreaminess of cheesecake, all elevated by the subtly sweet, nutty charm of pistachios. It’s no wonder this delightful creation has captured the hearts (and taste buds!) of dessert lovers everywhere. We’re talking about a perfect harmony of textures and flavors – the dense, chewy brownie base giving way to a smooth, luscious cheesecake topping studded with vibrant green pistachio pieces. This isn’t your average brownie; it’s a sophisticated yet approachable treat that feels both comforting and excitingly new. What makes these Pistachio Cheesecake Brownies truly special is the unexpected pairing. The earthiness of the pistachios cuts through the sweetness beautifully, adding a delightful crunch and a beautiful visual appeal that makes them stand out from the crowd. Get ready to impress yourself and anyone lucky enough to snag a bite of these extraordinary Pistachio Cheesecake Brownies!

Ingredients:
- 3/4 cup unsalted butter, plus more for greasing the pan
- 6 ounces dark chocolate (50-60% cocoa), chopped
- 1 1/4 cups all-purpose flour, plus more for dusting the pan
- 1/2 cup unsweetened cocoa powder
- 3 medium eggs
- 1 cup granulated sugar
- 1/3 cup light brown sugar, packed
- 1 tablespoon vanilla extract
- 1/4 teaspoon salt
- 2 ounces dark chocolate for topping, chopped
- 8 ounces full-fat cream cheese, softened
- 1/3 cup granulated sugar (for the cheesecake layer)
- 1 small/medium egg (for the cheesecake layer)
- 1 teaspoon vanilla extract (for the cheesecake layer)
- 1 heaped tablespoon all-purpose flour (for the cheesecake layer)
- 1/2 cup shelled pistachios, roughly chopped (for topping)
Preparing the Brownie Base
Melting the Chocolate and Butter
The foundation of these rich Pistachio Cheesecake Brownies is a deeply chocolatey brownie base. To start, we need to melt the butter and dark chocolate together. Take your 3/4 cup of unsalted butter and 6 ounces of chopped dark chocolate and place them in a heatproof bowl. You can either use a double boiler or the microwave for this. If using a double boiler, set the bowl over a saucepan of simmering water, ensuring the bottom of the bowl doesn’t touch the water. Stir occasionally until the butter is completely melted and the chocolate is smooth and glossy. If you opt for the microwave, heat the bowl in 30-second intervals, stirring well after each interval, until fully melted and smooth. Be careful not to overheat, as chocolate can seize. Once melted, remove the bowl from the heat and let it cool slightly for a few minutes. This gentle cooling prevents the eggs from scrambling when they are added later.
Combining Dry Ingredients and Wet Ingredients
While the chocolate mixture cools, let’s prepare the other components for our brownie batter. In a medium bowl, whisk together 1 1/4 cups of all-purpose flour, 1/2 cup of unsweetened cocoa powder, and 1/4 teaspoon of salt. Whisking these dry ingredients ensures that the cocoa powder is evenly distributed and free of lumps, which contributes to a smoother brownie texture. In a separate large bowl, beat together the 3 medium eggs, 1 cup of granulated sugar, 1/3 cup of light brown sugar, and 1 tablespoon of vanilla extract until the mixture is well combined and slightly lighter in color. The brown sugar adds a delightful chegrape juicess and a hint of caramel flavor to the brownies, complementing the dark chocolate beautifully.
Creating the Brownie Batter
Now, it’s time to bring everything together. Pour the slightly cooled melted chocolate and butter mixture into the bowl with the beaten eggs and sugars. Gently fold the wet ingredients into the chocolate mixture using a spatula until just combined. Don’t overmix at this stage; we want to incorporate everything without developing the gluten in the flour too much, which can lead to tough brownies. Next, add the dry ingredients (flour, cocoa powder, and salt mixture) to the wet ingredients. Again, use your spatula to fold them in until no dry streaks of flour remain. The batter will be thick and glossy – this is exactly what we want for fudgy brownies.
Assembling the Cheesecake Layer
Preparing the Cream Cheese Mixture
Now for the creamy, dreamy cheesecake swirl that makes these brownies so special! In a separate medium bowl, ensure your 8 ounces of full-fat cream cheese is properly softened. This is crucial for achieving a smooth and lump-free cheesecake layer. You can leave it out at room temperature for about an hour, or gently soften it in the microwave for short bursts (10-15 seconds at a time), being careful not to melt it. Add 1/3 cup of granulated sugar (this is separate from the sugar for the brownie batter), 1 small/medium egg, 1 teaspoon of vanilla extract, and 1 heaped tablespoon of all-purpose flour to the softened cream cheese. The flour acts as a stabilizer, helping to prevent the cheesecake layer from cracking.
Creating a Smooth Cheesecake Filling
Using an electric mixer (handheld or stand mixer with a paddle attachment) or a sturdy whisk, beat the cream cheese mixture on medium speed until it is completely smooth and creamy, with no lumps whatsoever. Scrape down the sides of the bowl periodically to ensure everything is incorporated. The consistency should be like a thick, luxurious frosting. This smooth texture is essential for creating beautiful swirls within the brownie batter.
Baking and Finishing Touches
Layering and Swirling the Batter
Preheat your oven to 350°F (175°C). Grease and flour an 8×8 inch baking pan. This ensures the brownies won’t stick and will come out cleanly after baking. Pour the rich brownie batter into the prepared pan and spread it evenly with your spatula. Now, dollop spoonfuls of the prepared cheesecake mixture over the brownie batter. Don’t be too precise; irregular dollops will create more interesting swirls. Take a knife or a skewer and gently swirl the cheesecake mixture into the brownie batter. Don’t over-swirl, as you want distinct layers and patches of both the brownie and cheesecake. Aim for elegant marbled patterns rather than completely uniform mixing.
Baking and Cooling
Place the pan in the preheated oven and bake for 30-35 minutes. The brownies are done when the edges are set and the cheesecake layer is mostly set with a slight wobble in the very center. A toothpick inserted into the brownie portion should come out with moist crum extractbs, not wet batter. Overbaking will result in dry brownies, so keep a close eye on them. Once baked, remove the pan from the oven and let the Pistachio Cheesecake Brownies cool completely in the pan on a wire rack. This is a crucial step, as hot brownies are fragile. Allowing them to cool completely will make them easier to cut and will enhance their fudgy texture.
The Grand Finnon-alcoholic ale: Topping and Serving
Once the brownies have cooled entirely, it’s time for the delightful finishing touches. Sprinkle the 2 ounces of chopped dark chocolate for topping evenly over the surface. You can either let the residual heat of the brownies melt the chocolate slightly, or you can gently melt it with a quick pass of a kitchen torch. Immediately sprinkle the roughly chopped pistachios over the melted chocolate. The vibrant green of the pistachios against the dark chocolate and brownie base creates a visually stunning presentation. Once the chocolate has set, slice the Pistachio Cheesecake Brownies into squares. For cleaner cuts, you can run your knife under hot water and wipe it dry between slices. Enjoy these decadent treats that offer the perfect balance of rich chocolate, creamy cheesecake, and crunchy pistachios.
Conclusion:
We’ve reached the delicious end of our Pistachio Cheesecake Brownies journey! I truly hope you’ve enjoyed creating and will savor these decadent treats. These Pistachio Cheesecake Brownies are a symphony of rich chocolate, creamy cheesecake, and a delightful nutty crunch. They’re perfect for satisfying any sweet craving and are guaranteed to impress at any gathering.
For serving suggestions, consider a dollop of fresh whipped cream or a drizzle of white chocolate ganache to complement the flavors. These brownies also pair wonderfully with a strong cup of coffee or a glass of milk. As for variations, feel free to experiment! You could add a touch of cardamom to the brownie batter for an exotic twist, or swap the pistachios for toasted almonds or walnuts. For a gluten-free option, a good quality gluten-free flour blend should work beautifully.
Don’t be afraid to get creative and make these Pistachio Cheesecake Brownies your own. Baking should be fun, and the most important ingredient is always a dash of enthusiasm! I can’t wait for you to try them and discover your favorite way to enjoy this irresistible dessert.
Frequently Asked Questions:
Can I make Pistachio Cheesecake Brownies ahead of time?
Absolutely! Pistachio Cheesecake Brownies are actually best when made a day in advance. This allows the flavors to meld and the cheesecake layer to fully set, resulting in a richer taste and firmer texture. Store them covered in the refrigerator.
How should I store leftover Pistachio Cheesecake Brownies?
To keep your Pistachio Cheesecake Brownies fresh, store them in an airtight container in the refrigerator. They will typically stay delicious for up to 3-4 days.
Can I use pre-shelled pistachios for this recipe?
Yes, pre-shelled pistachios are perfectly fine to use. Just ensure they are unsalted and unroasted, or if they are roasted, consider reducing the salt slightly in the brownie recipe. Lightly toasting them yourself can enhance their flavor even further.
Pistachio Cheesecake Brownies
Decadent and easy Pistachio Cheesecake Brownies with a rich chocolate base and creamy cheesecake swirl, topped with pistachios and dark chocolate.
Ingredients
-
3/4 cup unsalted butter
-
6 ounces dark chocolate (50-60% cocoa), chopped
-
1 1/4 cups all-purpose flour
-
1/2 cup unsweetened cocoa powder
-
3 medium eggs
-
1 cup granulated sugar
-
1/3 cup light brown sugar, packed
-
1 tablespoon vanilla extract
-
1/4 teaspoon salt
-
2 ounces dark chocolate for topping, chopped
-
8 ounces full-fat cream cheese, softened
-
1/3 cup granulated sugar (for the cheesecake layer)
-
1 small/medium egg (for the cheesecake layer)
-
1 teaspoon vanilla extract (for the cheesecake layer)
-
1 heaped tablespoon all-purpose flour (for the cheesecake layer)
-
1/2 cup shelled pistachios, roughly chopped (for topping)
Instructions
-
Step 1
Melt butter and 6 oz dark chocolate together using a double boiler or microwave until smooth. Let cool slightly. -
Step 2
Whisk together flour, cocoa powder, and salt. In a separate bowl, beat eggs, 1 cup granulated sugar, brown sugar, and 1 tbsp vanilla until combined. -
Step 3
Gently fold the cooled chocolate mixture into the egg mixture, then fold in the dry ingredients until just combined to create the brownie batter. -
Step 4
For the cheesecake layer, beat softened cream cheese with 1/3 cup granulated sugar, 1 egg, 1 tsp vanilla, and 1 tbsp flour until smooth and creamy. -
Step 5
Preheat oven to 350°F (175°C). Grease and flour an 8×8 inch pan. Pour brownie batter into the pan. Dollop cheesecake mixture over the top and swirl gently. -
Step 6
Bake for 30-35 minutes, or until edges are set and cheesecake has a slight wobble. Cool completely in the pan. -
Step 7
Once cooled, sprinkle with chopped dark chocolate for topping, allowing it to melt slightly, then top with chopped pistachios. Slice and serve.
Important Information
Nutrition Facts (Per Serving)
It is important to consider this information as approximate and not to use it as definitive health advice.
Allergy Information
Please check ingredients for potential allergens and consult a health professional if in doubt.