Crispy Chicken Beef Beef Bacon Ranch Wrap Recipe
Crispy Chicken Beef Beef Beef Beef Bacon Ranch Wrap. Just saying the name should make your taste buds tingle! Are you ready to experience a flavor explosion that redefines the concept of a satisfying meal? We’ve taken the humble wrap and elevated it to an entirely new level of deliciousness. This isn’t just any wrap; it’s a symphony of textures and tastes that will have you coming back for more. Imagin extracte succulent, crispy chicken mingling with savory beef, complemented by the irresistible crunch of smoky beef bacon, all brought together by a creamy, zesty ranch dressing. What makes this Crispy Chicken Beef Beef Beef Beef Bacon Ranch Wrap so special? It’s the audacious combination of premium ingredients, meticulously layered to create a handheld masterpiece. It’s the perfect answer to those cravings for something hearty, something undeniably flavorful, and something that feels like a true indulgence.
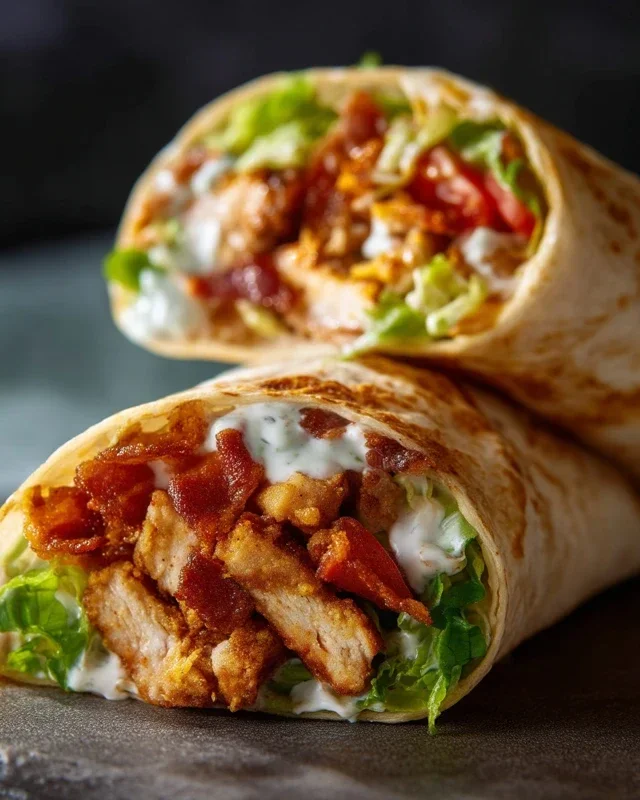
The Ultimate Crispy Chicken, Beef Beef Bacon & Ranch Wrap: A Flavor Explosion!
Get ready for a flavor adventure that’s out of this world! If you’re craving a meal that’s packed with crunch, savory goodness, and a zesty kick, you’ve come to the right place. This Crispy Chicken, Beef Beef Bacon & Ranch Wrap is a symphony of textures and tastes, featuring perfectly fried chicken, the irresistible salty crunch of beef beef bacon, and a cooling ranch dressing that brings it all together. It’s hearty enough for a satisfying dinner and impressive enough for guests. Let’s get cooking!
Ingredients:
Preparing the Chicken: The Foundation of Crispiness
Our first step is to prepare the star of the show: the chicken. To ensure even cooking and maximum surface area for that delightful crisp, I like to cut each chicken breast in half horizontally, creating thinner cutlets. This also helps them cook through faster and more uniformly. Then, I pound them gently to an even thickness, about ½ inch. This ensures that every bite is tender and juicy.
Crisping the Beef Beef Bacon: A Savory Surprise
Next, let’s tackle the beef beef bacon. This is where we add a unique and incredibly satisfying salty crunch. We want to cook the beef beef bacon until it’s wonderfully crispy. You can do this in a skillet over medium heat, turning it occasionally, until it’s rendered its fat and achieved that perfect brittle texture. Once cooked, transfer the beef beef bacon to a paper towel-lined plate to drain off any excess grease. Don’t discard that rendered fat just yet; it’s liquid gold and can be used for extra flavor in other dishes! For this recipe, we’ll set it aside once it’s crispy.
The Dredgin extractg Station: Building the Perfect Crust
Now for the magic that creates that irresistible crispy coating for our chicken. We’re going to set up our dredgin extractg station. In a shallow bowl, combine the all-purpose flour, garlic powder, onion powder, paprika, salt, and black pepper. Mix this thoroughly so all the spices are evenly distributed. This seasoned flour will be our first layer of defense against soggin extractess and the base for our crunchy exterior.
In a second shallow bowl, pour the buttermilk. This acts as our binder, helping the flour and panko adhere to the chicken. Make sure you have enough buttermilk to generously coat the chicken pieces.
In a third shallow bowl or plate, spread out the panko breadcrum extractbs. Panko is crucial here because its larger, flakier texture creates a superior crunch compared to regular breadcrum extractbs.
Now, take a chicken cutlet and first dredge it in the seasoned flour, ensuring it’s fully coated. Shake off any excess flour. Then, dip it into the buttermilk, allowing any excess to drip off. Finally, press the chicken cutlet firmly into the panko breadcrum extractbs, making sure both sides are completely covered. Gently press the panko onto the chicken to help it stick. Repeat this process for all your chicken cutlets. This triple-layer coating is key to achieving that ultimate crispy texture.
Frying to Golden Perfection: The Art of the Fry
It’s time to bring on the heat and achieve that beautiful golden-brown crispiness. In a large, heavy-bottomed skillet or Dutch oven, pour enough vegetable oil to reach about ½ inch in depth. Heat the oil over medium-high heat until it reaches around 350°F (175°C). You can test the oil by dropping a tiny bit of the seasoned flour mixture into it; if it sizzles immediately, your oil is ready.
Carefully place the breaded chicken cutlets into the hot oil, being careful not to overcrowd the pan. Fry them in batches if necessary, as overcrowding will lower the oil temperature and result in greasy, less crispy chicken. Fry the chicken for about 3-4 minutes per side, or until golden brown and cooked through. The internal temperature of the chicken should reach 165°F (74°C). Once perfectly fried, remove the chicken from the oil and place it on a wire rack set over a baking sheet to drain any excess oil. This wire rack is important; it allows air to circulate, keeping the bottom of the chicken crispy too.
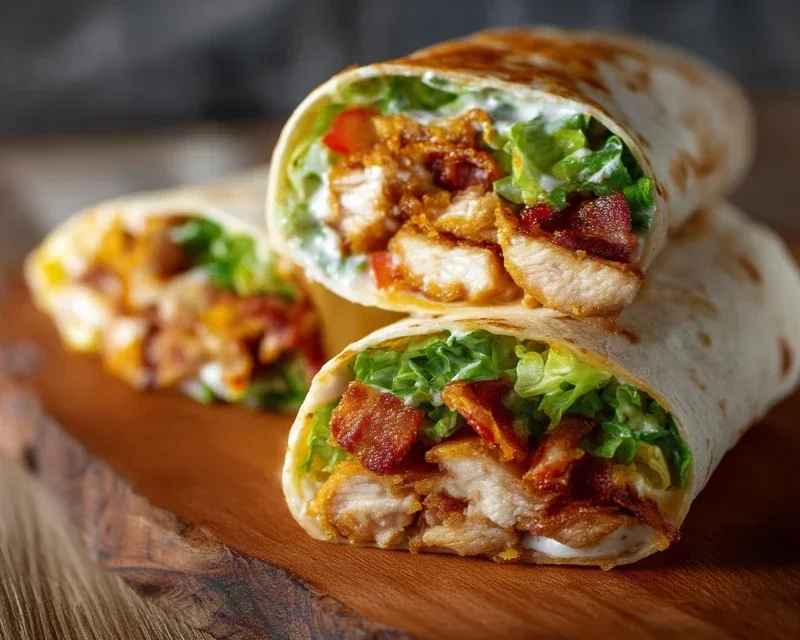
Assembling Your Masterpiece: The Grand Finnon-alcoholic ale
With all our components ready, it’s time to assemble our magnificent wraps! Warm the large flour tortillas slightly. You can do this by heating them for a few seconds on each side in a dry skillet or microwaving them for about 20-30 seconds, wrapped in a damp paper towel. Warm tortillas are more pliable and less likely to crack when you’re rolling them.
Lay a warm tortilla flat. Spread a generous amount of your favorite ranch dressing over the tortilla, leaving a small border around the edges. This ranch dressing is the creamy counterpoint to all the crispy elements.
Next, place a crispy chicken cutlet (you can cut it into strips if you prefer) onto the ranch-covered tortilla. Then, crum extractble or lay the crispy beef beef bacon strips over the chicken. Now, add your fresh toppings: a generous sprinkle of shredded lettuce for a refreshing crunch, followed by the diced tomatoes for a burst of juicy sweetness, and finally, the shredded cheddar cheese, which will melt slightly from the warmth of the chicken and beef bacon.
Rolling with Precision: The Wrap Technique
Now for the art of the wrap. Fold in the sides of the tortilla over the filling. Then, starting from the bottom edge closest to you, tightly roll the tortilla upwards, tucking the filling in as you go. The goal is a snug, compact wrap that holds all those delicious ingredients together. If your wrap feels loose, don’t worry; you can secure it with a toothpick or by wrapping it tightly in parchment paper.
Serve these incredible Crispy Chicken, Beef Beef Bacon & Ranch Wraps immediately and prepare for a chorus of satisfied “mmmmms”! Enjoy this explosion of flavor and texture!
Conclusion:
And there you have it – the ultimate Crispy Chicken Beef Beef Beef Beef Bacon Ranch Wrap! This recipe is an absolute winner because it masterfully balances savory, crunchy, and creamy elements into one incredibly satisfying handheld meal. The triple threat of beef combined with the crispy chicken and salty beef bacon, all brought together by that zesty ranch dressing and fresh toppings, creates a flavor explosion that’s hard to beat. It’s perfect for a quick and delicious lunch, an impressive appetizer for game day, or even a fun dinner option that the whole family will devour.
Don’t be afraid to get creative with your fillings! Consider adding some thinly sliced red onion for a sharp bite, some crunchy tortilla strips for extra texture, or even a drizzle of your favorite hot sauce for a spicy kick. You can also experiment with different cheeses – cheddar, pepper jack, or Monterey Jack would all be fantastic additions. The beauty of this Crispy Chicken Beef Beef Beef Beef Bacon Ranch Wrap is its versatility.
I truly encourage you to give this recipe a try. It’s simpler than it looks and the payoff in terms of taste and satisfaction is immense. Get ready to impress yourself and anyone lucky enough to share this culinary masterpiece with you!
Frequently Asked Questions:
Can I make the components of the wrap ahead of time?
Absolutely! You can cook the chicken and beef, and even prepare the beef bacon, a day in advance. Store them separately in airtight containers in the refrigerator. This will make assembling your wraps even quicker when hunger strikes. Just reheat the meats gently before adding them to your wraps.
What if I’m not a huge fan of beef?
No problem! While the “Beef Beef Beef” is a defining characteristic, you can easily adjust the meat components. You could swap out one or two of the beef portions for more crispy chicken, or even use ground turkey. The key is to maintain that satisfying, savory protein base.
Is this wrap very spicy?
The base recipe with ranch dressing isn’t inherently spicy. However, if you enjoy a bit of heat, I highly recommend adding a drizzle of your favorite hot sauce or some diced jalapeños to the wrap during assembly. That way, you can control the spice level to your preference.
Crispy Chicken Beef Beef Beef Bacon Ranch Wrap
A hearty and flavorful wrap featuring crispy chicken, savory beef bacon, fresh vegetables, and creamy ranch, all nestled in a soft tortilla. This recipe emphasizes a bold beef flavor with ample beef bacon.
Ingredients
-
2 boneless, skinless chicken breasts
-
6 strips of beef bacon
-
1 cup all-purpose flour
-
1 cup buttermilk
-
1 teaspoon garlic powder
-
1 teaspoon onion powder
-
1 teaspoon paprika
-
1 teaspoon salt
-
1/2 teaspoon black pepper
-
1 cup panko breadcrumbs
-
Vegetable oil, for frying
-
4 large flour tortillas
-
1 cup shredded lettuce
-
1 cup diced tomatoes
-
1 cup shredded cheddar cheese
Instructions
-
Step 1
Slice chicken breasts into bite-sized pieces. In a shallow dish, combine flour, garlic powder, onion powder, paprika, salt, and pepper. Dredge chicken pieces in the flour mixture, ensuring they are well coated. -
Step 2
In a separate shallow dish, pour the buttermilk. Dip the floured chicken pieces into the buttermilk, letting excess drip off. Then, coat the chicken thoroughly in panko breadcrumbs. -
Step 3
Cook the beef bacon in a skillet over medium heat until crispy. Remove from skillet and set aside on paper towels. Reserve about 2 tablespoons of the rendered beef bacon fat in the skillet (discard the rest). -
Step 4
Heat vegetable oil and the reserved beef bacon fat in a large skillet over medium-high heat until shimmering. Carefully add the breaded chicken pieces to the hot oil and fry for 5-7 minutes, or until golden brown and cooked through, turning occasionally. Drain on paper towels. -
Step 5
Warm the flour tortillas lightly. Fill each tortilla with shredded lettuce, diced tomatoes, shredded cheddar cheese, crispy chicken pieces, and the crispy beef bacon strips. Drizzle with ranch dressing (not included in ingredient list, but assumed for a ranch wrap). -
Step 6
Fold and roll up the tortillas tightly to create wraps. Serve immediately.
Important Information
Nutrition Facts (Per Serving)
It is important to consider this information as approximate and not to use it as definitive health advice.
Allergy Information
Please check ingredients for potential allergens and consult a health professional if in doubt.