Easy Frozen Yogurt Bites Dairy-Free Option
Easy Frozen Yogurt Bites (Dairy-free option) are the ultimate treat that perfectly balances creamy indulgence with a refreshing coolness, making them an absolute must-have for any occasion. You know that craving for something sweet, but also something that feels a little lighter and healthier? That’s exactly where these delightful bites shine. They’re incredibly popular because they deliver all the satisfying yumminess of traditional frozen desserts without any of the guilt, and the fact that you can whip them up with minimal fuss is a huge bonus. What truly sets these Easy Frozen Yogurt Bites (Dairy-free option) apart is their incredible versatility. Whether you’re looking for a guilt-free post-workout snack, a fun dessert for the kids, or even a sophisticated bite-sized treat for your next gathering, these little gems fit the bill. Plus, the option to go dairy-free opens them up to a whole new world of enjoyment for everyone.
Ingredients:
- 1 cup thick Greek yogurt or thick coconut yogurt (use coconut yogurt for a dairy-free option)
- 3 tablespoons cashew butter or almond butter (sunflower seed butter or tahini can also work well)
- 3 tablespoons maple syrup (adjust to your sweetness preference; an extra tablespoon can be added if you like it sweeter)
- 3 tablespoons of your favorite protein powder (this is entirely optional; only include if you enjoy the taste and texture it adds)
- 1 teaspoon vanilla extract
- A good pinch of sea salt (Maldon or Celtic sea salt are excellent choices for their texture and flavor)
- A handful of cacao nibs (optional, but they add a lovely crunch and are full of antioxidants)
- 3/4 cup chocolate chips or chopped chocolate
- 1/2 tablespoon coconut oil
Preparing the Mixture
Let’s get started by preparing our delicious frozen yogurt bites! The key to these is a thick, creamy base. If you’re using Greek yogurt, ensure it’s the thickest variety you can find. If it seems a little thin, you can strain it further by lining a sieve with cheesecloth or a coffee filter and letting the excess liquid drain out for about 30 minutes in the refrigerator. For the dairy-free option, a good quality, unsweetened coconut yogurt that is naturally thick will work beautifully.
In a medium-sized mixing bowl, combine the thick Greek yogurt (or coconut yogurt for our dairy-free friends) with the cashew butter or almond butter. I find that warming the nut butter slightly for about 10-15 seconds in the microwave can make it much easier to incorporate smoothly, preventing any lumps. Stir these together until they are well combined and you have a uniform, creamy mixture. Don’t rush this step; a well-blended base will result in a better texture for your frozen bites.
Next, we’ll add the sweetness and flavor enhancers. Pour in the maple syrup and the vanilla extract. If you’re opting to include protein powder, now is the time to add it. Gently whisk everything together until the maple syrup and vanilla are fully incorporated and the mixture is smooth. If you are using protein powder, be sure to mix thoroughly to avoid any powdery clumps. Taste the mixture at this point and adjust the sweetness if needed. You can certainly add another tablespoon of maple syrup if you prefer a sweeter treat, or even a little more if your yogurt base is quite tart.
Now for that perfect touch of flavor balance: the sea salt. Add a generous pinch of your favorite sea salt. The salt doesn’t just make it salty; it actually amplifies all the other flavors and cuts through the sweetness, making the overall taste more complex and enjoyable. Give everything one final stir to ensure the salt is evenly distributed throughout the yogurt mixture. If you’ve decided to add the cacao nibs for an extra textural element and antioxidant boost, gently fold them into the mixture now. You want to distribute them evenly but without overmixing, which could break them down too much.
Forming and Freezing the Bites
This is where we transform our creamy mixture into individual frozen delights. Line a baking sheet with parchment paper or a silicone baking mat. This is crucial to prevent the frozen yogurt bites from sticking to the sheet once they are frozen. Now, using a tablespoon or a small cookie scoop, drop spoonfuls of the yogurt mixture onto the prepared baking sheet. Aim for bite-sized portions, about 1 to 1.5 inches in diameter. You can make them round or slightly flattened, whatever shape you prefer. Leave a little space between each dollop, as they will spread slightly as they freeze.
Once all the mixture has been portioned out onto the baking sheet, carefully place the entire sheet into your freezer. Let them freeze for at least 2-3 hours, or until they are completely solid. The exact freezing time will depend on the temperature of your freezer and the thickness of your yogurt bites. You want them to be firm enough to handle without melting immediately.
Crafting the Chocolate Shell
While our yogurt bites are diligently freezing, we’ll prepare the luscious chocolate coating. In a small, microwave-safe bowl or a heatproof glass measuring cup, combine the chocolate chips (or chopped chocolate) with the coconut oil. The coconut oil is essential here; it helps the chocolate melt smoothly and creates a crisp, snappy shell when it freezes. Microwave the mixture in 30-second intervals, stirring well after each interval, until the chocolate is almost entirely melted. Be careful not to overheat the chocolate, as it can seize up and become grainy. Once mostly melted, remove it from the microwave and stir vigorously until the residual heat melts the remaining chocolate and the mixture is completely smooth and glossy. This method is called tempering, and it ensures a beautiful finish.
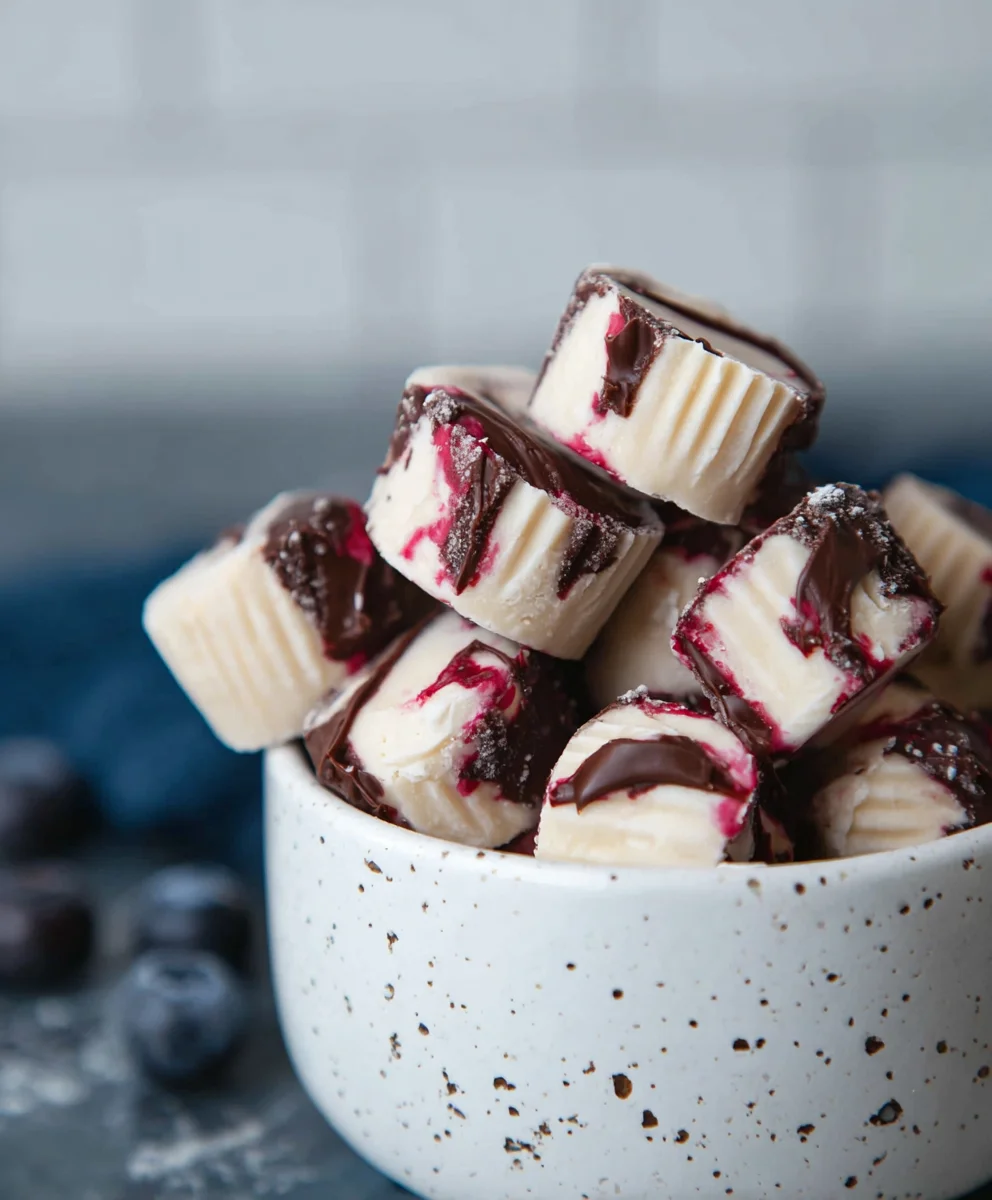
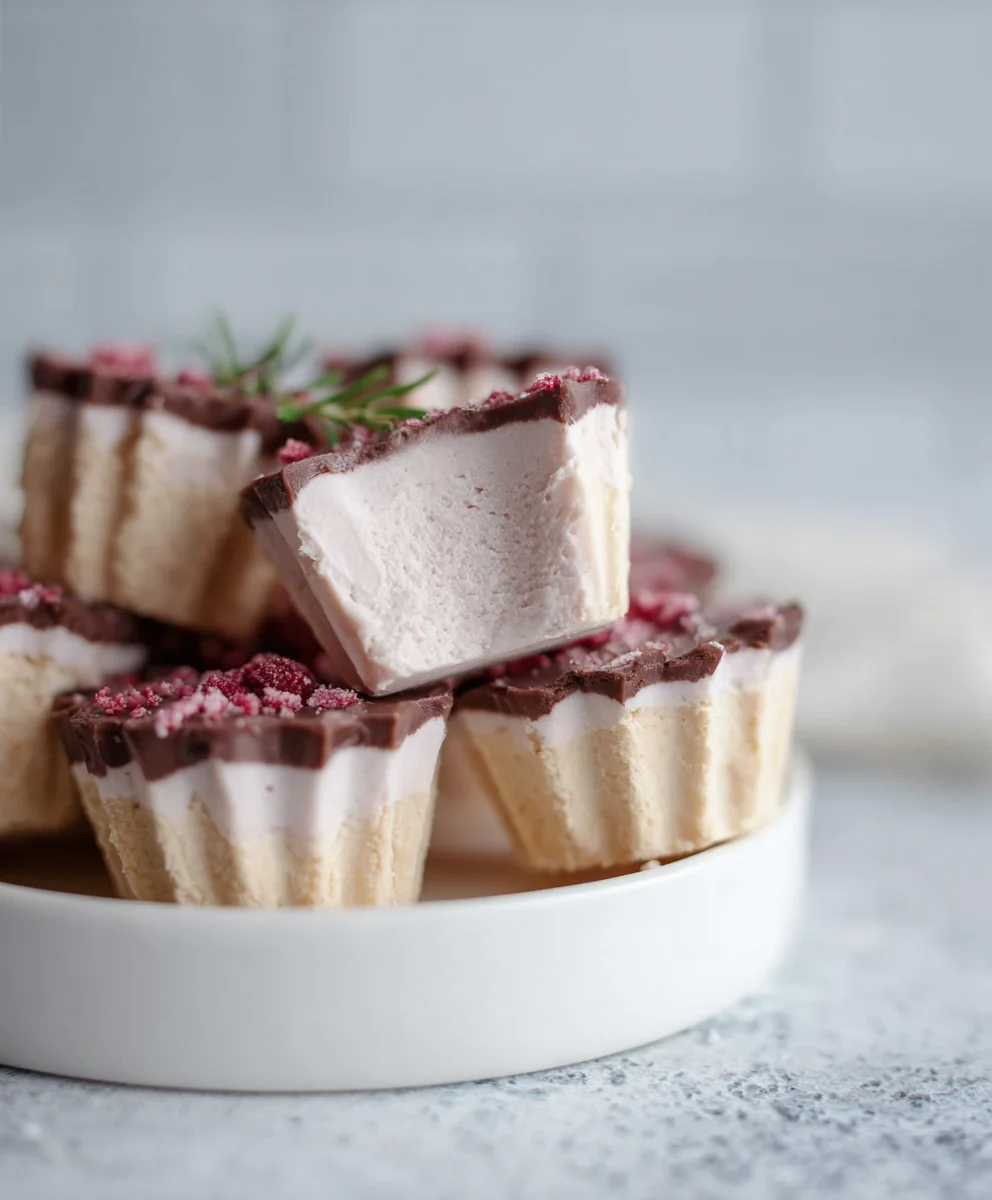
Once the chocolate is smooth and shiny, and your yogurt bites are fully frozen and firm to the touch, it’s time for the magic to happen. Remove the baking sheet from the freezer. Take one frozen yogurt bite at a time and dip it into the melted chocolate, ensuring it’s fully coated. You can use a fork or a toothpick to dip and turn the bites. Let any excess chocolate drip back into the bowl. You can also drizzle extra chocolate over the top for an added decorative touch.
Place the chocolate-coated frozen yogurt bites back onto the parchment-lined baking sheet. If you like, you can sprinkle a few extra sea salt flakes or a tiny pinch of cacao nibs on top of the wet chocolate before it sets for some visual appeal and added flavor. Return the baking sheet to the freezer and let the chocolate-coated bites freeze for another 30-60 minutes, or until the chocolate shell is completely hardened. This ensures that the chocolate coating is firm and ready to be enjoyed.
Once the chocolate shell is fully set, your Easy Frozen Yogurt Bites are ready to be devoured! You can store any leftovers in an airtight container in the freezer for up to 2-3 weeks. For the best texture, let them sit at room temperature for just a minute or two before enjoying, allowing the chocolate shell to be slightly less brittle and the yogurt inside to soften just a touch. Enjoy these delightful, healthy treats!
Conclusion:
You’ve now mastered the art of creating delicious and refreshing Easy Frozen Yogurt Bites (Dairy-free option)! This recipe is a testament to how simple ingredients can transform into a delightful treat that everyone can enjoy. Whether you’re looking for a healthy snack, a guilt-free dessert, or a fun activity to do with the kids, these bites deliver. Their versatility means you can easily adapt them to your liking, making them a staple in your recipe repertoire. Don’t be afraid to experiment with different fruits and flavorings to discover your personal favorite combination. We encourage you to give this recipe a try and experience the joy of homemade frozen goodness. Share them with friends and family – they’re sure to be a hit!
Frequently Asked Questions:
Can I use regular yogurt instead of dairy-free for these Easy Frozen Yogurt Bites?
Absolutely! If you prefer or don’t require a dairy-free option for your Easy Frozen Yogurt Bites, feel free to use your favorite regular yogurt. The process remains the same, and you’ll still achieve fantastic results.
How should I store these Easy Frozen Yogurt Bites?
For best results, store your Easy Frozen Yogurt Bites (Dairy-free option) in an airtight container in the freezer. They are best enjoyed within a few weeks for optimal texture and flavor. If they stick together, you can gently separate them after they’ve been out of the freezer for a minute or two.
What are some other flavor ideas for these Easy Frozen Yogurt Bites?
The possibilities are endless! Beyond the suggested fruits, consider adding a swirl of nut butter, a sprinkle of cinnamon, a dash of vanilla extract, or even some finely chopped dark chocolate. For a tropical twist in your Easy Frozen Yogurt Bites, try mango and passionfruit. Get creative and enjoy experimenting!
Easy Frozen Yogurt Bites (Dairy-Free Option)
Delicious and easy-to-make frozen yogurt bites that are customizable and can be made dairy-free. Perfect for a healthy treat!
Ingredients
-
1 cup thick Greek yogurt or thick coconut yogurt
-
3 tablespoons cashew butter or almond butter
-
3 tablespoons maple syrup
-
3 tablespoons of your favorite protein powder
-
1 teaspoon vanilla extract
-
A good pinch of sea salt
-
A handful of cacao nibs
-
3/4 cup chocolate chips or chopped chocolate
-
1/2 tablespoon coconut oil
Instructions
-
Step 1
Prepare the yogurt base: If using Greek yogurt, ensure it’s thick. If it seems thin, strain it. For a dairy-free option, use thick, unsweetened coconut yogurt. In a bowl, combine the yogurt with cashew or almond butter. Warming the nut butter slightly can help with smooth incorporation. Mix until well combined and creamy. -
Step 2
Add flavorings: Stir in the maple syrup and vanilla extract. If using protein powder, add it now and whisk thoroughly until smooth, avoiding clumps. Taste and adjust sweetness if desired. -
Step 3
Incorporate salt and optional mix-ins: Add a generous pinch of sea salt to enhance flavors. If using cacao nibs, gently fold them into the mixture. -
Step 4
Form and freeze the bites: Line a baking sheet with parchment paper. Drop spoonfuls of the yogurt mixture onto the sheet, aiming for bite-sized portions. Leave space between them. Freeze for at least 2-3 hours, or until completely solid. -
Step 5
Prepare the chocolate shell: In a microwave-safe bowl, combine chocolate chips and coconut oil. Microwave in 30-second intervals, stirring until almost fully melted. Stir vigorously until smooth and glossy. -
Step 6
Coat the bites: Once the yogurt bites are frozen, dip each one into the melted chocolate, ensuring full coverage. Let excess chocolate drip off. Place the coated bites back onto the parchment-lined baking sheet. -
Step 7
Final freeze: Sprinkle with extra sea salt flakes or cacao nibs if desired. Return the baking sheet to the freezer for another 30-60 minutes, or until the chocolate shell is completely hardened.
Important Information
Nutrition Facts (Per Serving)
It is important to consider this information as approximate and not to use it as definitive health advice.
Allergy Information
Please check ingredients for potential allergens and consult a health professional if in doubt.